Creating a private WordPress members area is a great option for all types of WordPress sites – from everything to an online course to a WooCommerce store to blog and more. Creating restricted members-only content lets you:
- Monetize your site. You can charge for access to your members-only content on either a one-time or recurring basis.
- Build a list of interested users. Even if you don’t charge for access, you can still collect the names and email addresses of your members, which is valuable all by itself.
- Create an online community. Once people invest in your site by creating an account, they’ll be more likely to keep coming back. You can even add members-only forums with bbPress and other community features to keep people around.
In this post, you’re going to learn how to create your own WordPress membership area with tons of advanced functionality (if you want it).
It will work with any WordPress theme and you’ll be able to:
- Lock some or all of your content behind your WordPress members area.
- Create dedicated login and registration pages for users to access your membership area.
- Charge for access to your members area or open it up for free (or both at the same time, with different content available to free vs paid users).
- Let users manage their profiles and subscription plans from the front-end of your site.
An Example of the WordPress Members Area You’ll Be Building
Here’s a high-level look at the type of members area that you’re going to learn how to build.
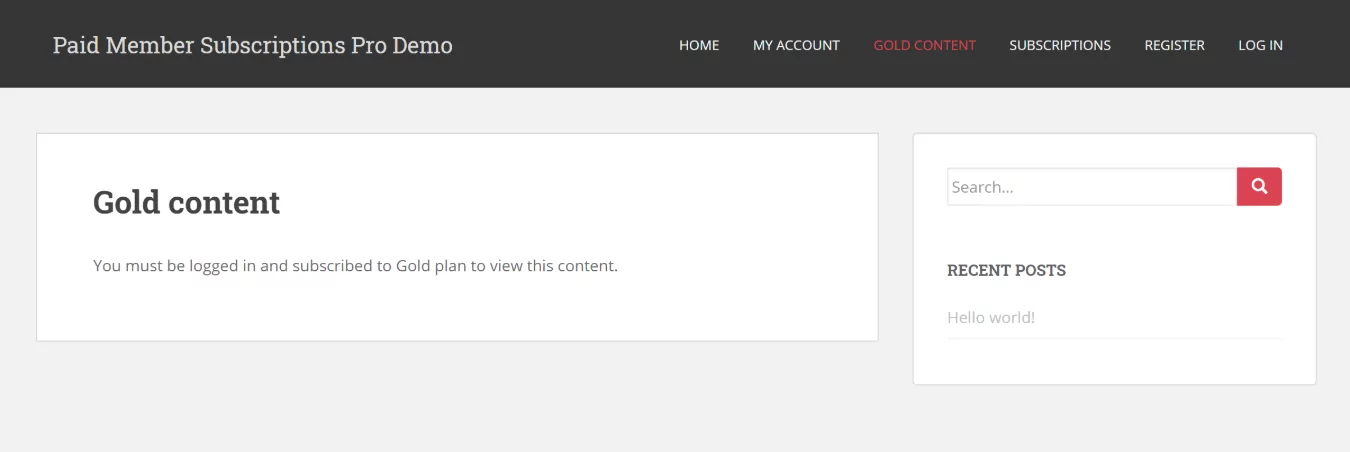
First, you’ll be able to lock some or all of your content behind your WordPress members area. If users aren’t logged in with the proper subscription plan, you can display a customizable message when they try to view restricted content (or just redirect them to your registration page):
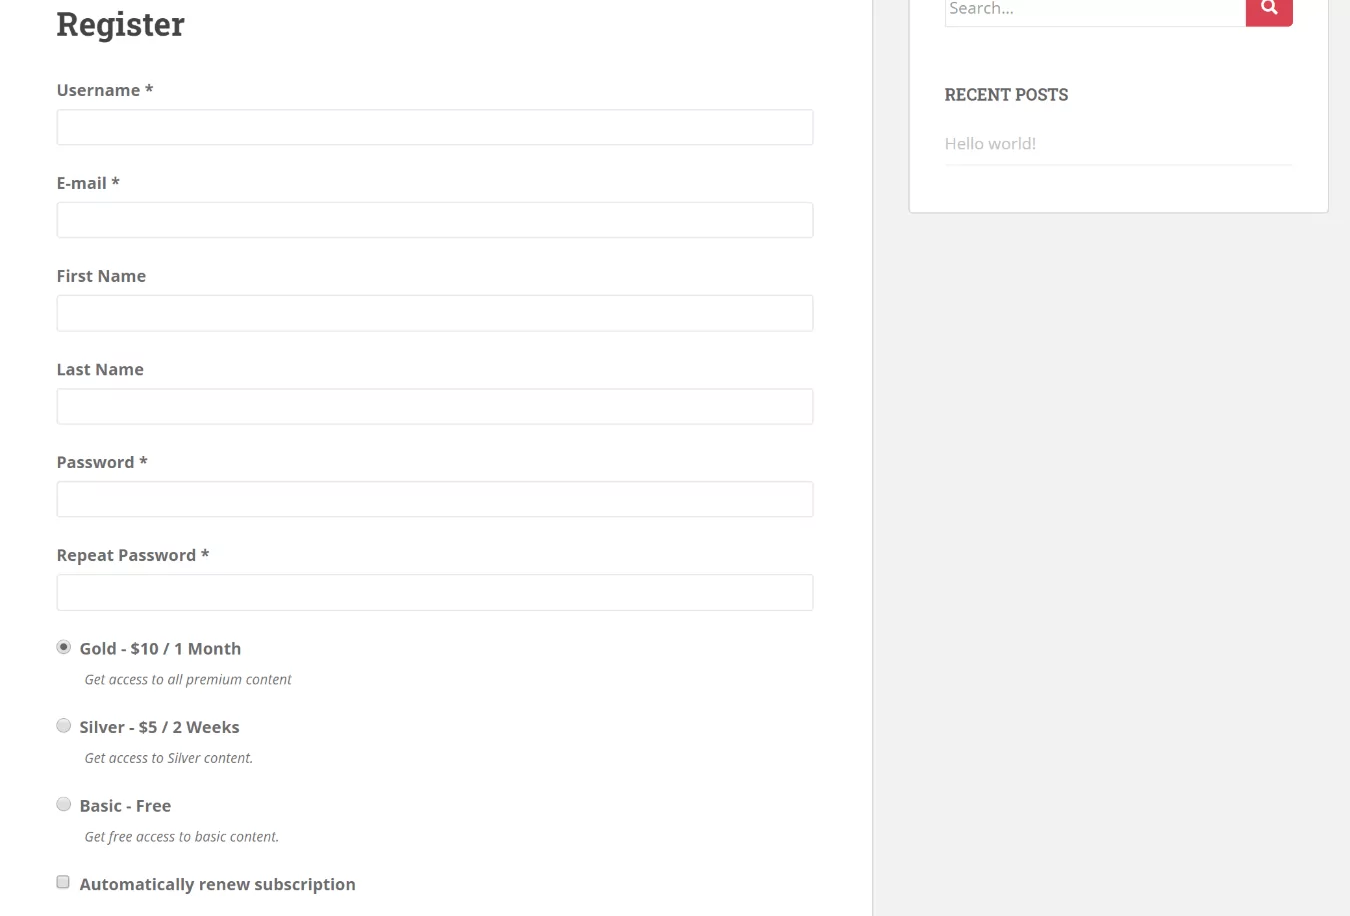
To access content in your members area, users can register for an account and choose from free and/or premium access levels that you’ve created:
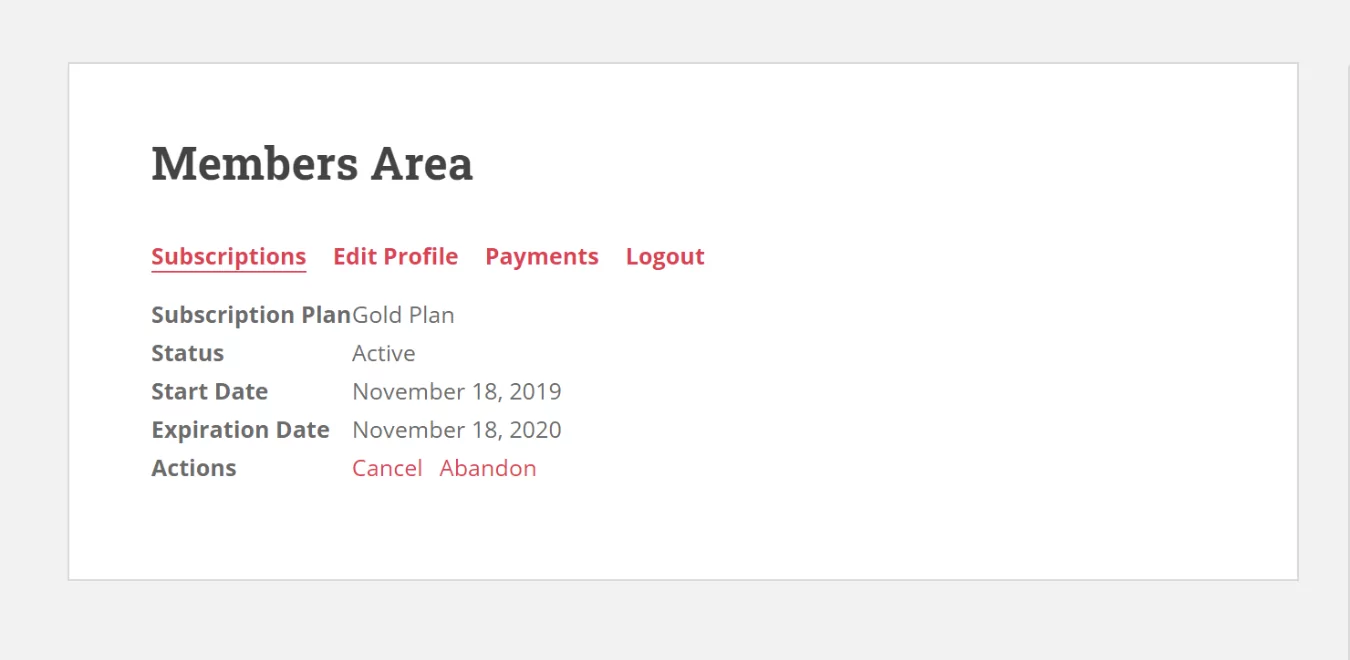
And once they register, members will be able to manage their user profile information and subscriptions from their own front-end account page:
That’s a very basic look at what you’ll be building – as we go through the tutorial, you’ll have plenty of options to customize things to meet your needs, including creating a WooCommerce members area on your eCommerce store, more detailed profile pages, and more.
Ready to create your membership site? Let’s dig in…
How to Create a WordPress Members Area With Paid Member Subscriptions
To create a members area on your WordPress website, you’ll use the Paid Member Subscriptions plugin.
Paid Member Subscriptions is a full WordPress membership plugin, which means you can use it to manage all aspects of your members area. You can…
- Restrict access to certain content, including an option to drip content over the life of a user’s membership.
- Restrict access to any content types, including custom post types, WooCommerce products, bbPress forums, Easy Digital Downloads products, and more.
- Create unlimited free and premium membership levels as needed. Each membership level can have access to different content (including overlapping access where needed).
- Charge for access to your WordPress membership area and premium content using a variety of payment gateways, including PayPal and Stripe.
- Create enticing promos to attract new members, like trial periods, coupon codes/discount codes, and more.
Paid Member Subscriptions has a free version at WordPress.org which we’ll use for most of this tutorial. There’s also a Pro version that adds more functionality, like more payment gateways, content dripping, group memberships, recurring payments, and more.
You’ll be able to create a WordPress members area using just the free version, but we’ll also touch on what you can do with some of the premium features.
To get started, install and activate the free Paid Member Subscriptions plugin from WordPress.org. Then, here’s how to use it to create your WordPress members area…
1. Set Up Core Members Area Pages and Settings
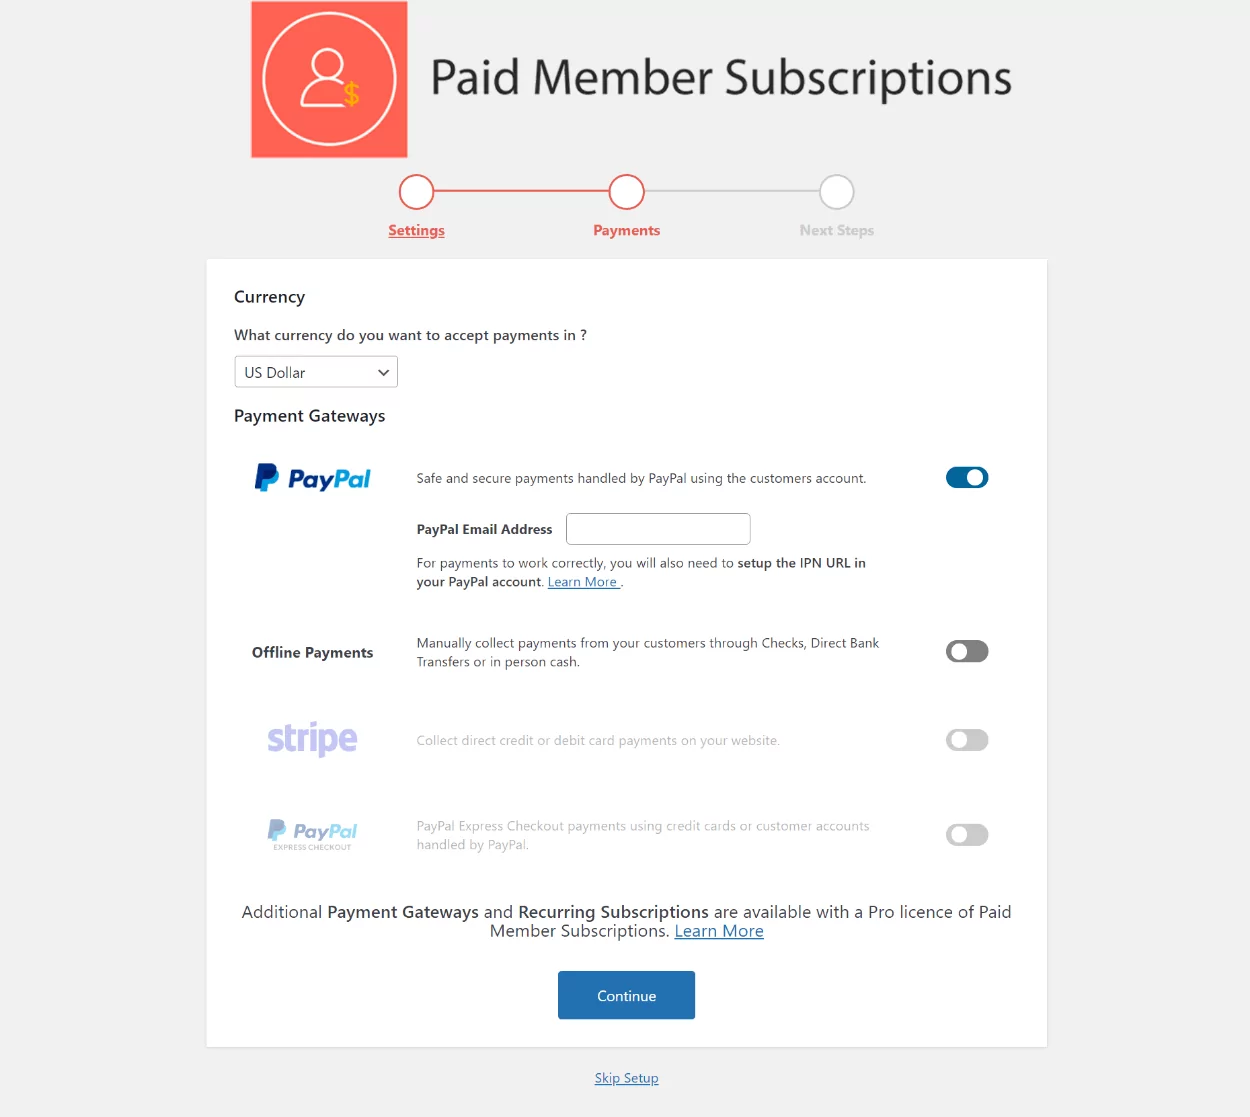
As soon as you activate the Paid Member Subscriptions plugin, it will launch a wizard to help you set up some key settings:
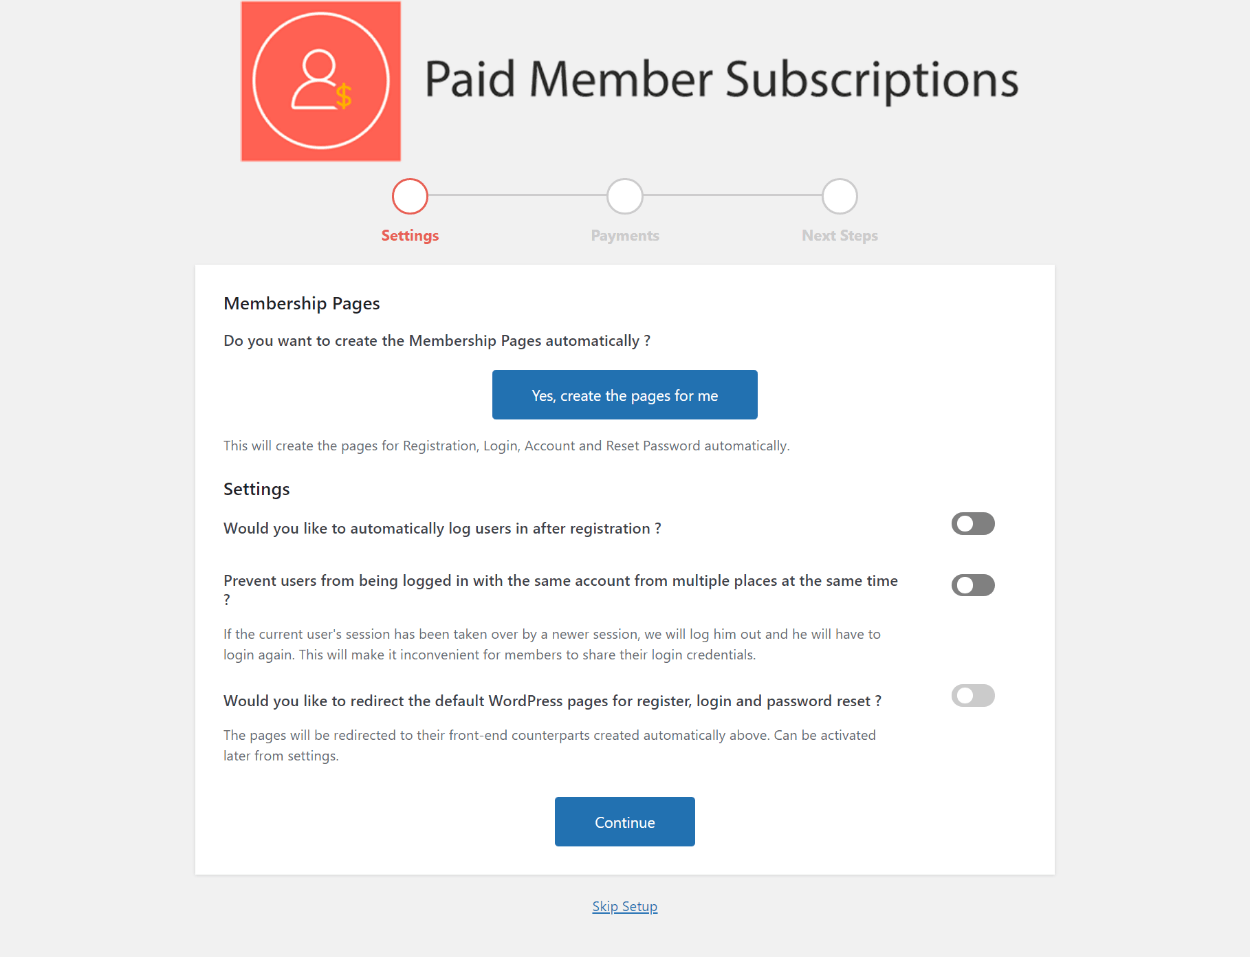
Make sure to click the option to create pages as this will automatically create your core membership pages for you. This includes the following pages:
- Login page
- Registration page
- Account management page, where users can manage their subscriptions and profile information
You can also configure some other important settings, such as choosing which payment gateway you want to use. If you don’t want to charge for access to your WordPress members area, you can also just leave all of the payment gateways disabled:
If you want more control over your members area pages, you can use shortcodes to control the pages yourself (or you can edit the default pages that Paid Member Subscriptions creates). These are:
- Registration page – [pms-register]
- Login form page – [pms-login]
- Account management page – [pms-account]
- Password recovery page – [pms-recover-password]
You can create these pages like you would any other page – go to Pages → Add New and use a Shortcode block to add the shortcode. Repeat the process for each page.
You can also add other content around the shortcode. For example, you might want to add some conversion-boosting copy and FAQs on your registration page to encourage people to sign up:
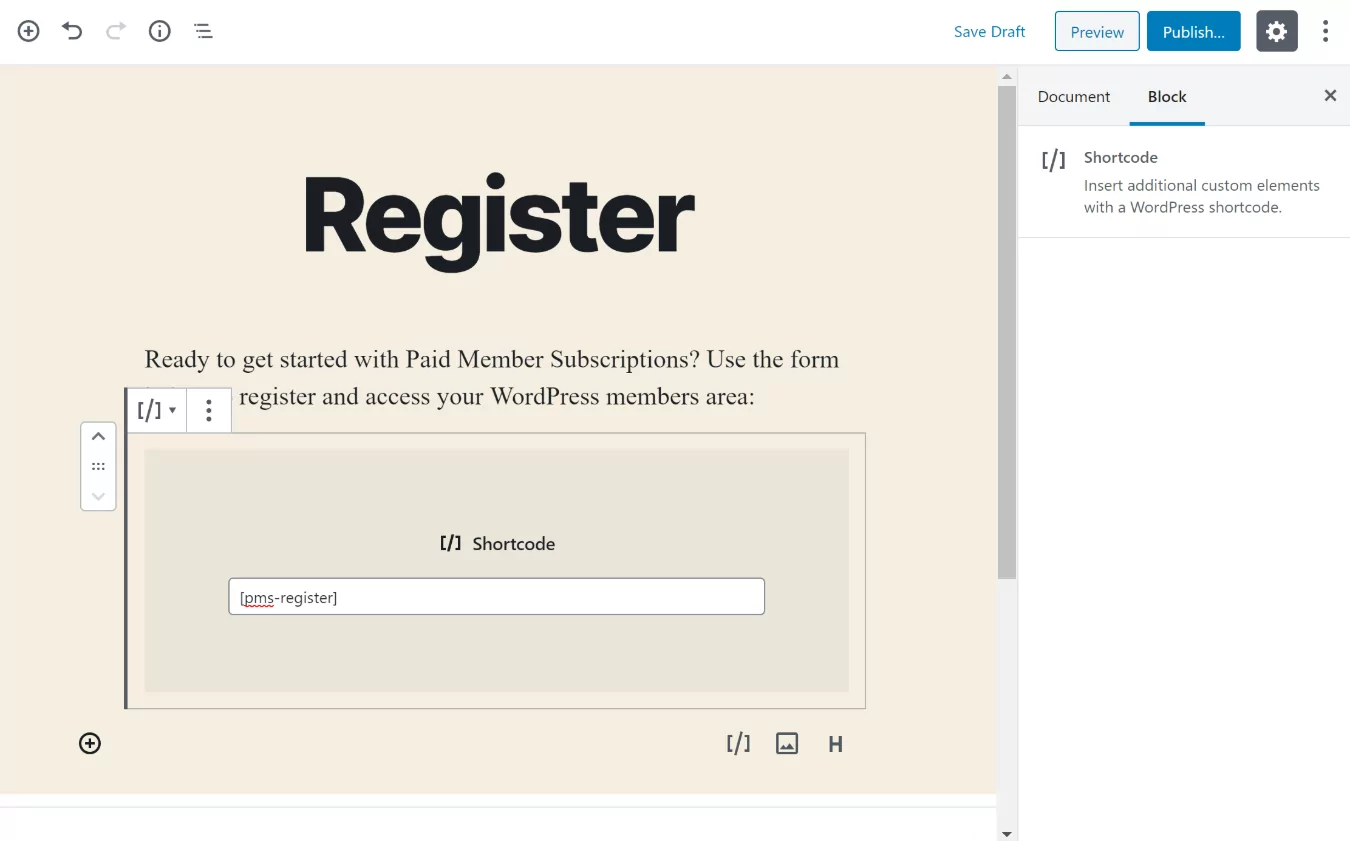
In addition to creating four pages for the four shortcodes, you also might want to create a fifth “Registration Success” page to redirect users to after they sign up.
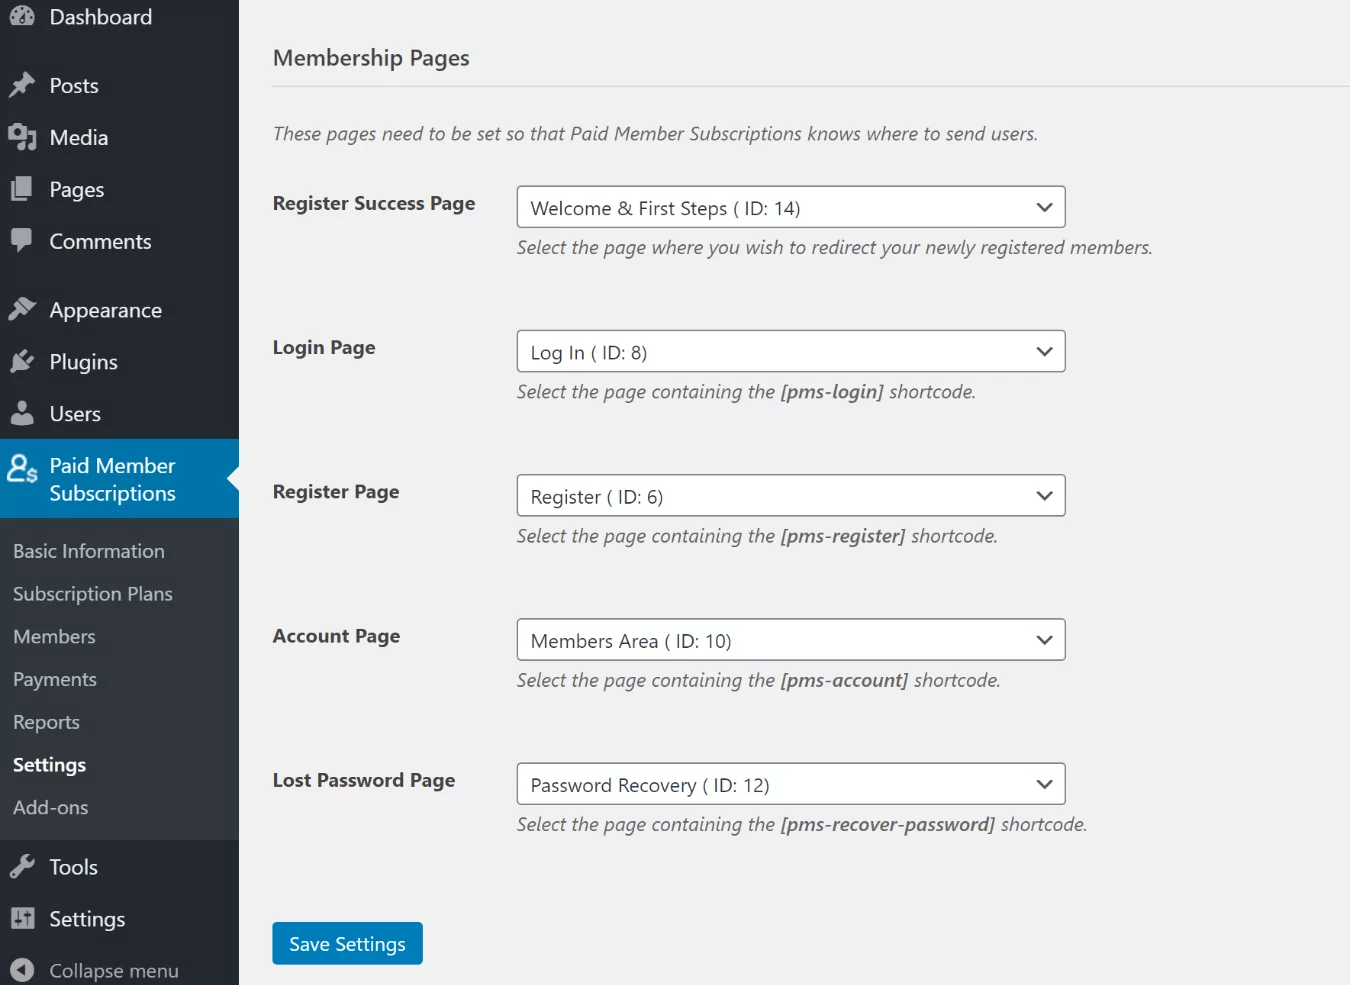
Once you’ve created all five pages, go to Paid Member Subscriptions → Settings. Then, scroll down to the Membership Pages section and use the drop-downs to select each page that you created:
2. Configure Payment Gateways
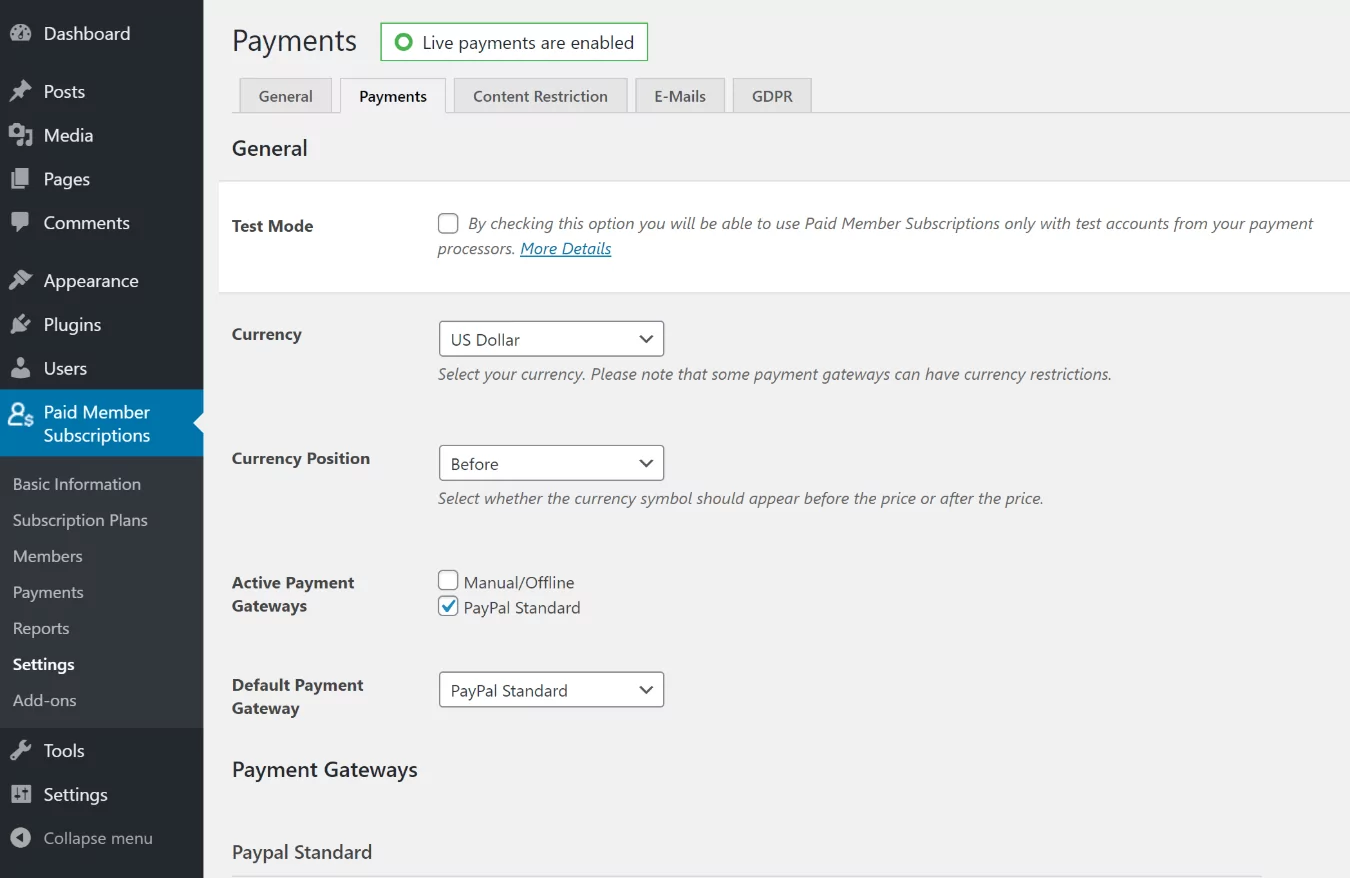
Next, go to Paid Member Subscriptions → Settings → Payments to further configure the payment gateways that you want to use if you’re planning to charge for access to your WordPress members area, as well as the currency you want to use.
With the free version of the plugin, you can charge one-time registration fees using standard PayPal payments – all you need to do is add your PayPal email address and set up the IPN URL in your PayPal account:
If you go Pro, you can also use Stripe and PayPal Pro and create automatic recurring subscriptions.
3. Create Membership Levels (Subscription Plans)
Now, you’re ready to create the different membership levels that users can choose from to access your WordPress members area.
Paid Member Subscriptions lets you create unlimited membership levels, which means you have detailed control over exactly how much access each user has in your WordPress members area.
For example, you could give some VIP users access to all the content in your WordPress members area, while limiting other users to content in a specific category or with a tag. Or, you can get a lot more creative than that!
By default, Paid Member Subscriptions will display a full list of all your subscription plans on the registration page that you created in step #1 (though you can customize this if you want).
Create Your First Subscription Plan
To create your first subscription plan, go to Paid Member Subscriptions → Subscription Plans → Add New. Then, fill out the following information:
- Title – the public title for this access plan. For example, “Bronze Plan”
- Description – a short description of this plan. Visitors will see this on your registration page.
- Duration – if you want to set a limit on how long people will have access, you can set that up here in days, weeks, months, or years. Or, you can also leave it as “0” to set it so that users’ access never expires.
- Price – if you want to charge for access to this plan, enter the price here. Or, leave it as “0” to make this subscription plan free.
- Status – if you aren’t ready to make this plan public yet, you can change it to Inactive.
- User Role – if you’re not sure what this means, just leave it as the default (“Create new user role…”)
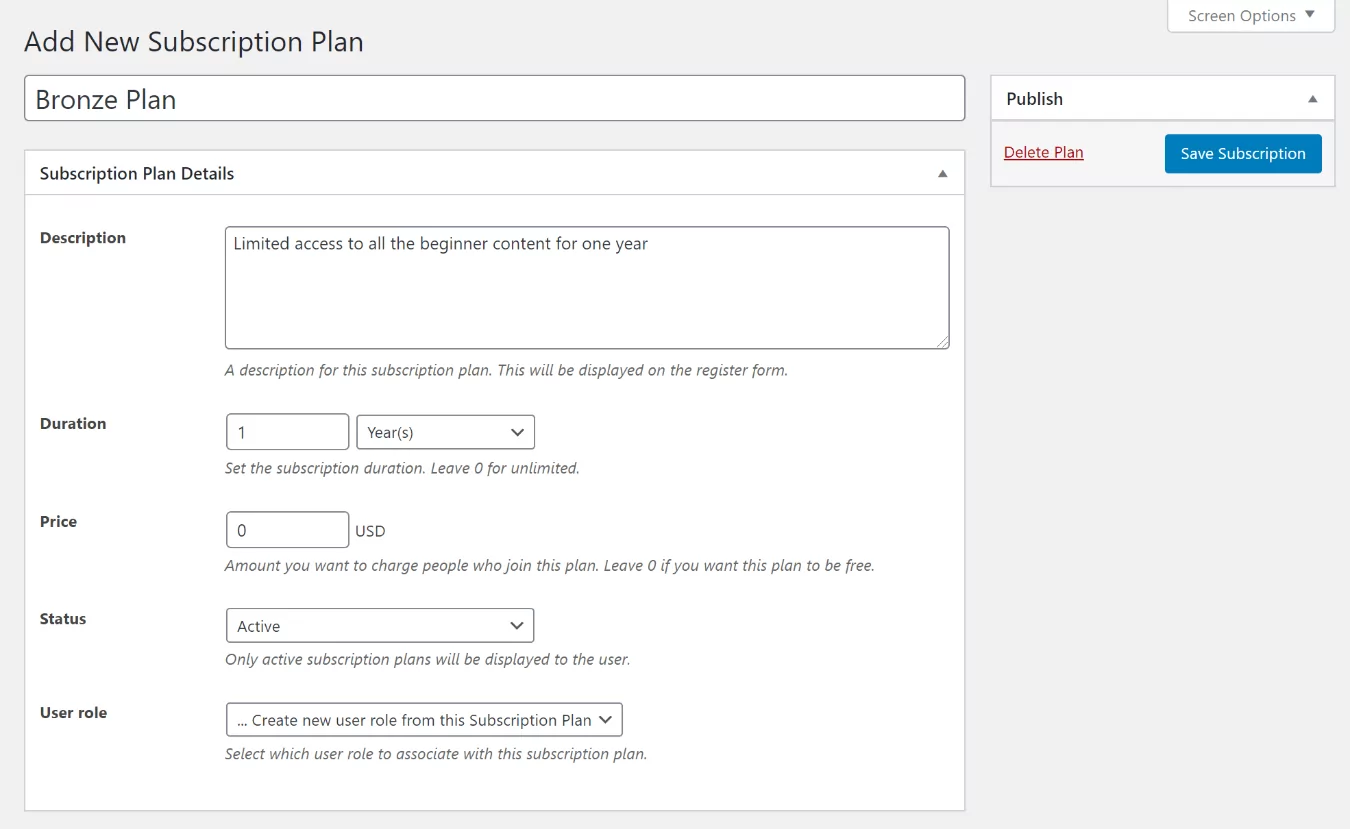
Once you’ve made your choices, click Save Subscription. Then, repeat the process for all the different subscription plans that you want to offer.
Order Your Subscription Plans
Once you’ve created all of your subscription plans, you need to set the upgrade/downgrade order for your plans.
From their account dashboards, users will be able to manage their own subscriptions to upgrade or downgrade to different subscription levels. So you need to set the proper order so that users are changed to the right plans when they upgrade or downgrade.
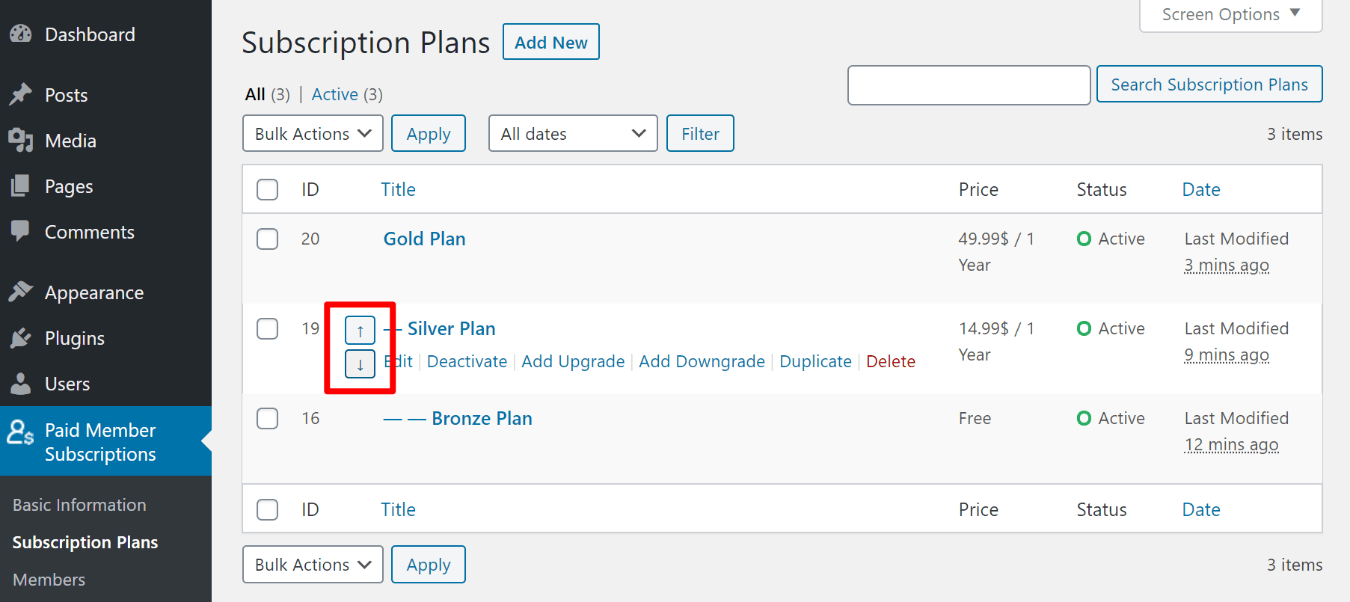
To set this, go to Paid Member Subscriptions → Subscription Plans. Hover over one of your plans and use the up or down arrows to change the order of your plans:
- Your highest-tier plan should go at the top. That is, if someone were to upgrade to the most premium plan, you want that plan first.
- Your lowest-tier plan should go at the bottom.
For example, you can see how the “Gold Plan” is at the top and the “Bronze Plan” is at the bottom:
With the Multiple Subscriptions per User add-on in the Pro version of Paid Member Subscriptions Pro, you can create multiple subscription tiers and also let users subscribe to multiple plans at the same time.
4. Restrict Access to Your Content
Now, you’re ready to restrict some or all of your content so that it’s only available in your private WordPress members area to users with the relevant subscription plan.
Paid Member Subscriptions lets you restrict content at a few different levels, depending on how targeted you want your restrictions to be:
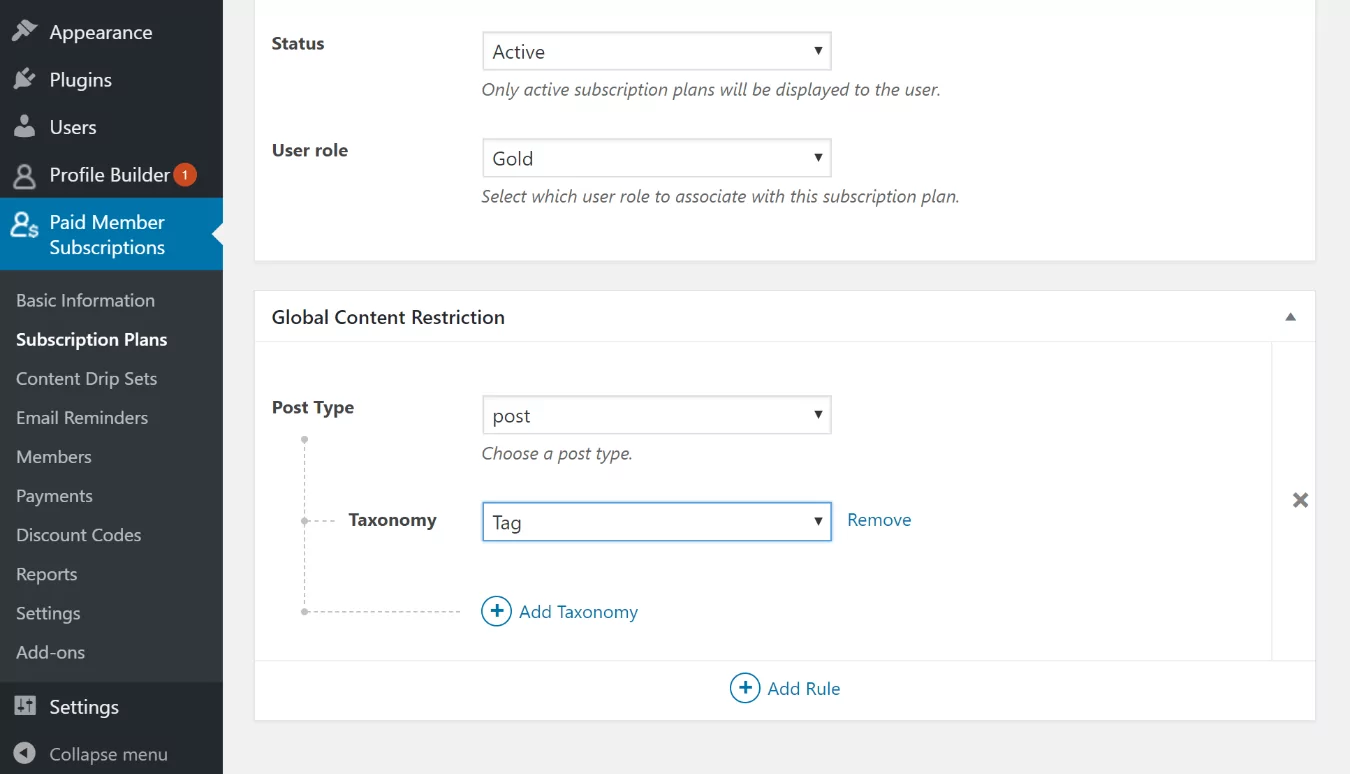
- Post types or taxonomies – you can restrict entire post types (like all your blog posts) or entire categories or tags. This is the fastest way to restrict access to lots of content, but it requires the Global Content Restriction add-on in Paid Member Subscriptions Pro.
- Restrict individual pieces of content. You can restrict entire posts (or other post types) on a post-by-post basis.
- Restrict parts of content – you can restrict just part of an otherwise public piece of content using a shortcode. Or, you can also restrict specific Elementor widgets and sections if you’re using the Elementor page builder.
Choose Restriction Method
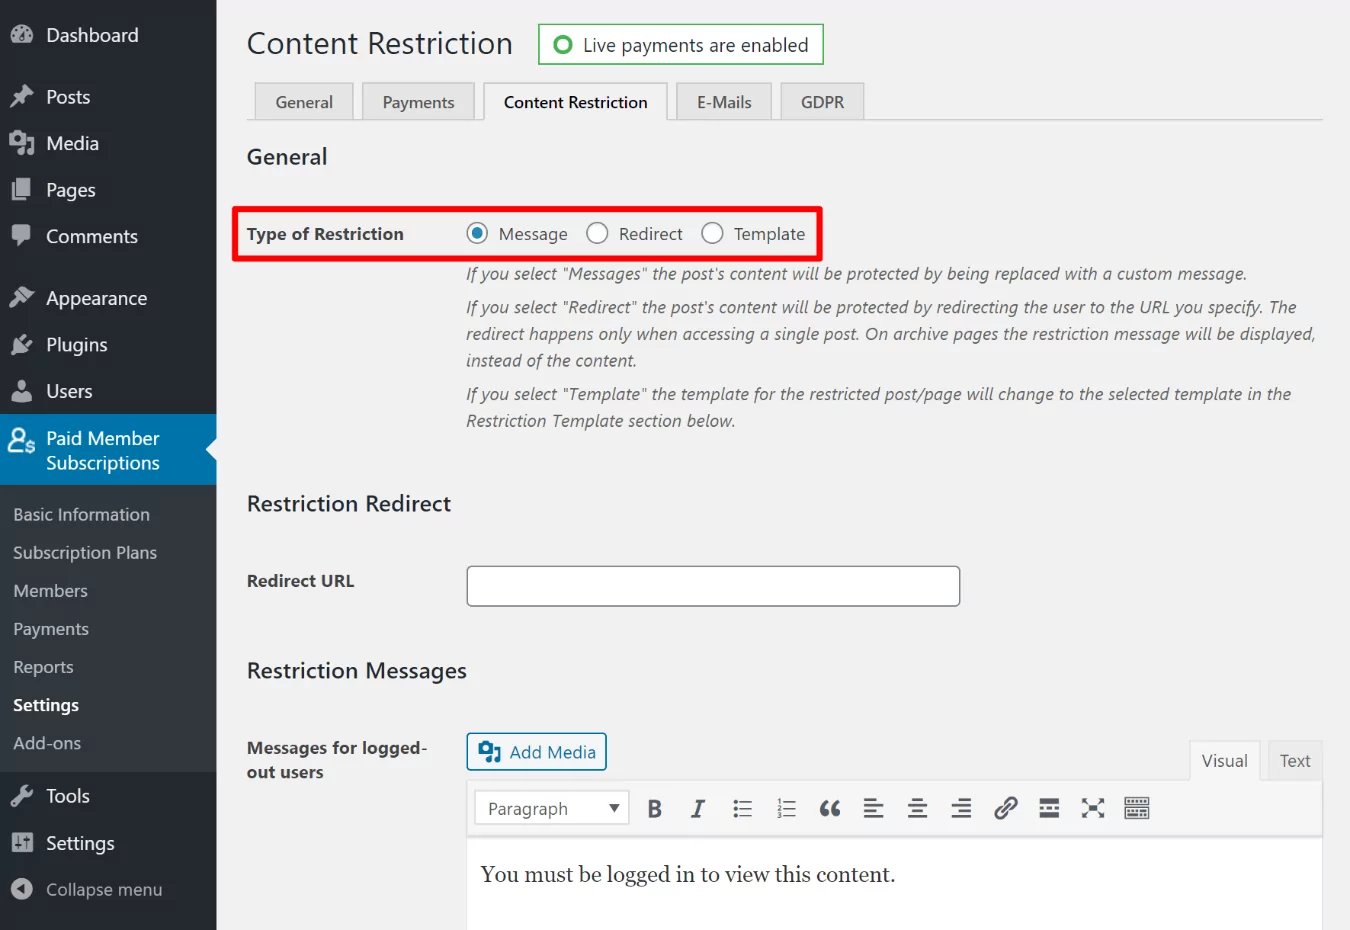
Before you start restricting content, though, you should decide what will happen if a user without the relevant permissions tries to view restricted content in your WordPress members area. Here, you get three options:
- Message – replace the restricted content with your own custom message.
- Redirect – redirect users to a custom URL (like your registration page).
- Template – automatically change the template of a restricted piece of content to any page template on your site.
To make this choice, go to Paid Member Subscriptions → Settings → Content Restriction:
Restrict Your Content
Now, you’re ready to restrict access to your content.
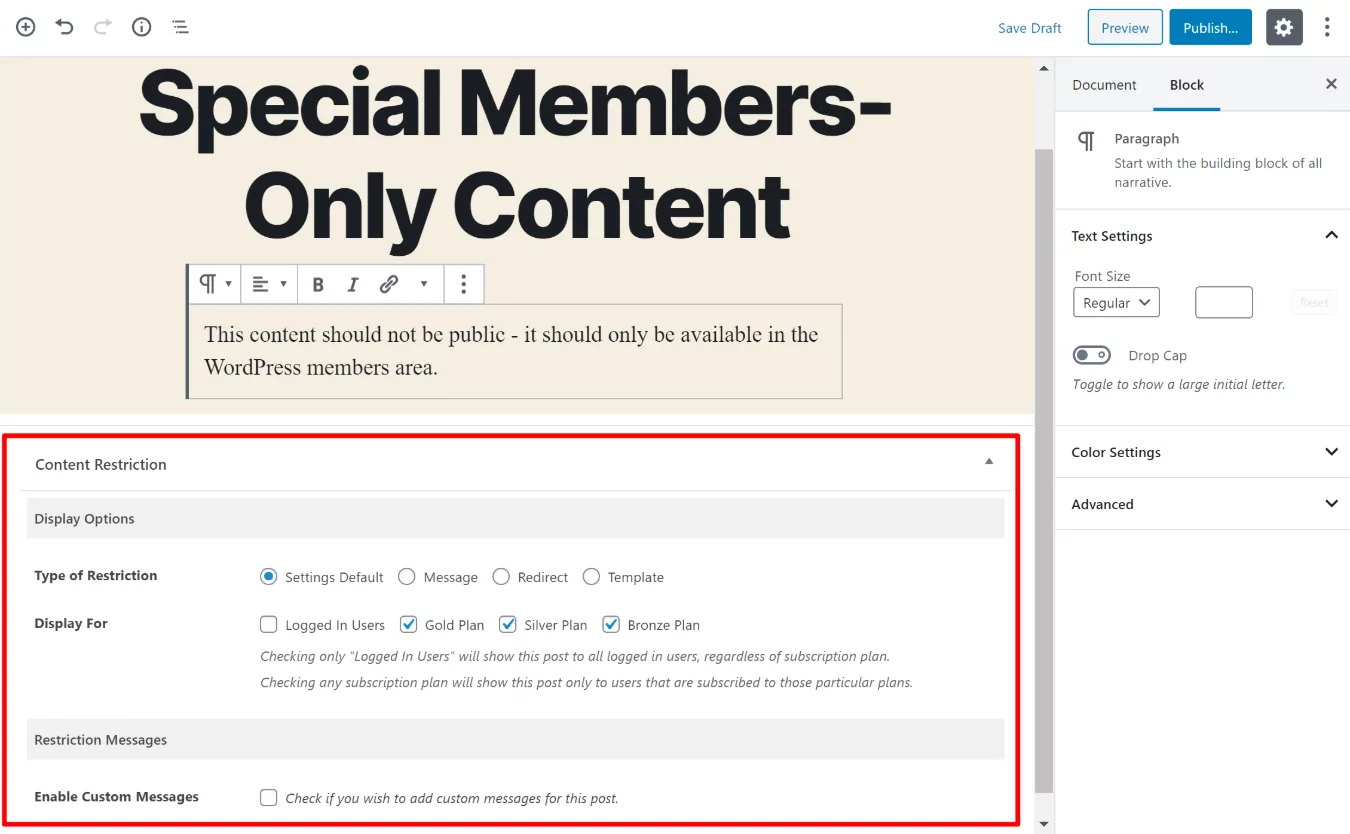
To do that, open up the piece of content you want to restrict and look for the new Content Restriction meta box at the bottom. There, you can choose which members should be able to view this content from a list of all your subscription plans, as well as a generic “logged in users” option:
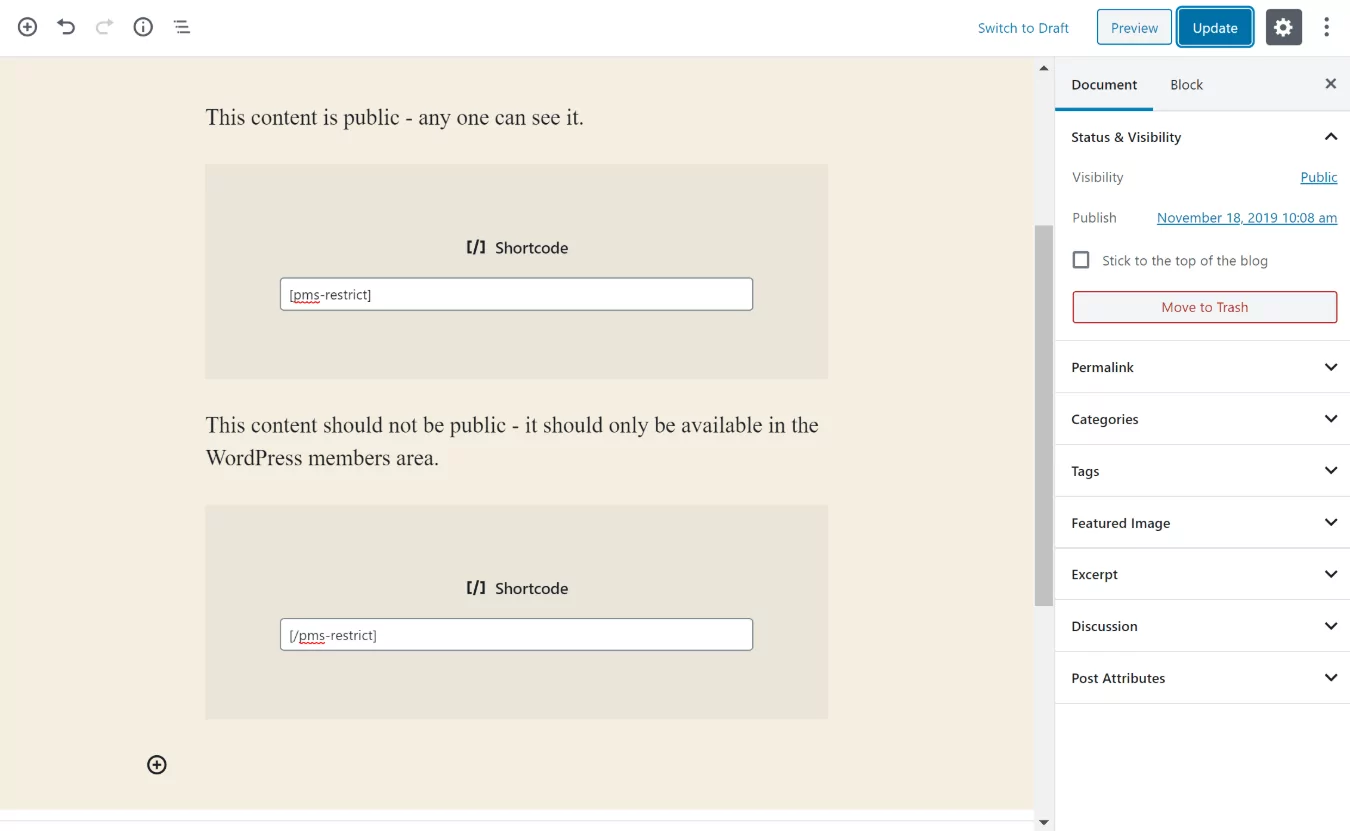
If you only want to restrict part of a piece of content, you can skip the meta box and instead wrap the content that you want to restrict in the [pms-restrict] shortcode inside the WordPress editor:
If you have the Global Content Restriction add-on, you can also restrict access to entire post types or taxonomies when you edit a subscription plan:
And that’s how you create a basic WordPress members area, complete with content restriction and different subscription levels!
Now, let’s dig into some of the ways that you can further enhance your WordPress members area.
How to Set Up Recurring Subscriptions and Offer Free Trials/Coupons
With Paid Member Subscriptions Pro and its many add-ons, you can get a lot more creative with how you charge for access to your WordPress members area.
The big addition is the ability to set up automatic recurring payments.
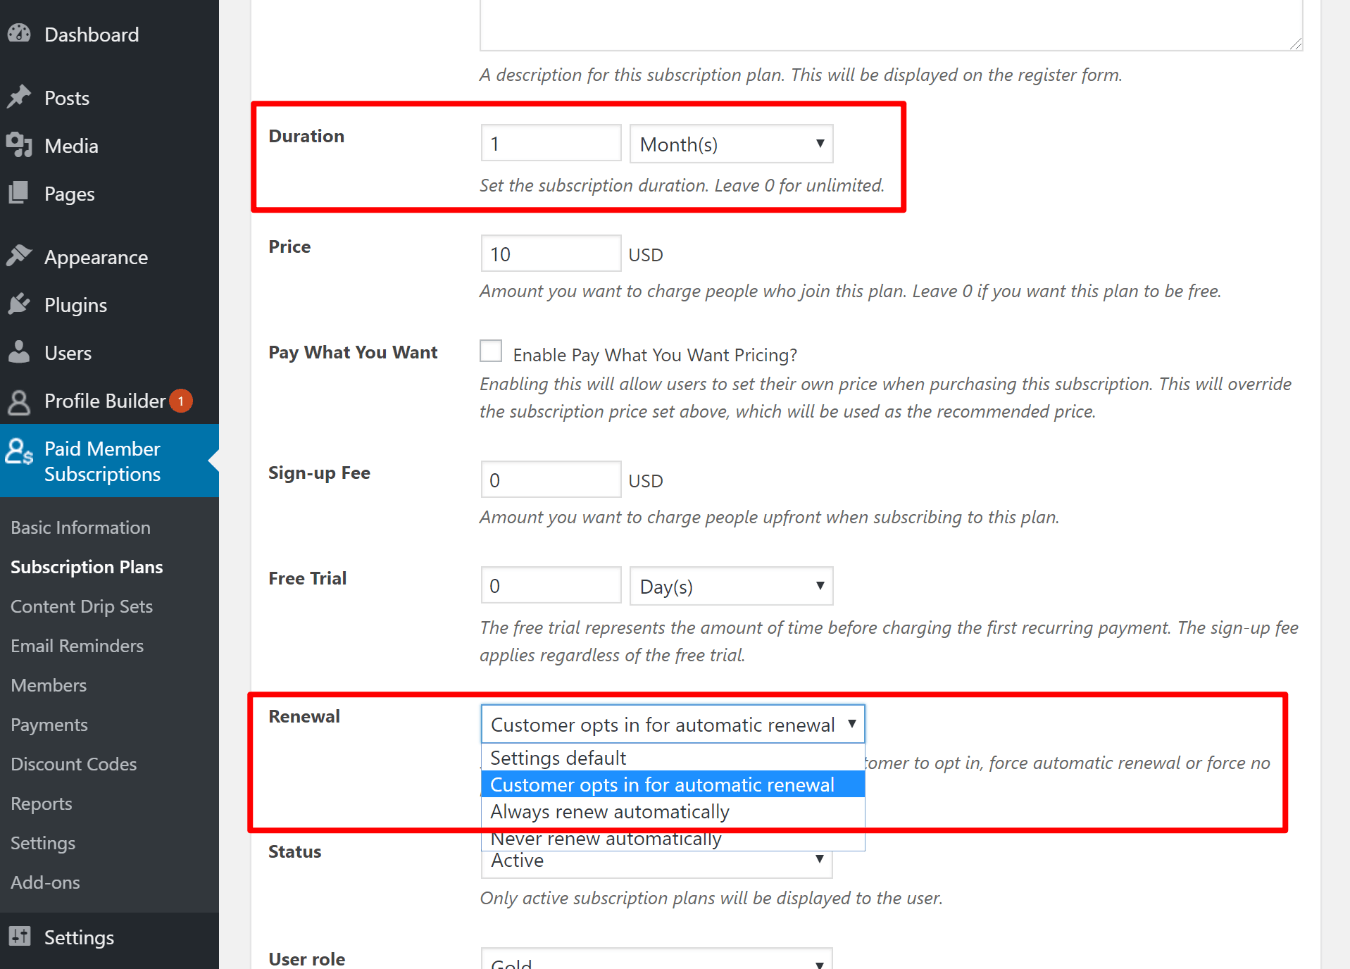
When you create or edit a subscription plan, you’ll get a new Renewal drop-down that lets you choose how to automatically renew a person’s subscription when the Duration that you specified expires.
You can either:
- Automatically renew if the member opts-in.
- Automatically renew a subscription by default – no opt-in required (make sure you clearly communicate this to your members).
Other New Pricing Options
You also get other new pricing options to help you get more creative with your pricing. From this same area, you can also set up:
- A free trial period so that users can test the plan before they have to pay.
- A one-time sign-up fee that users are charged upfront. For example, you could charge $50 to sign up and then $10 every month for continued access.
Or, you can even let people pay what they want!
You’ll also get access to a bunch of new payment gateways when you go to Paid Member Subscriptions → Settings → Payments, including:
- PayPal Express
- PayPal Pro
- Stripe
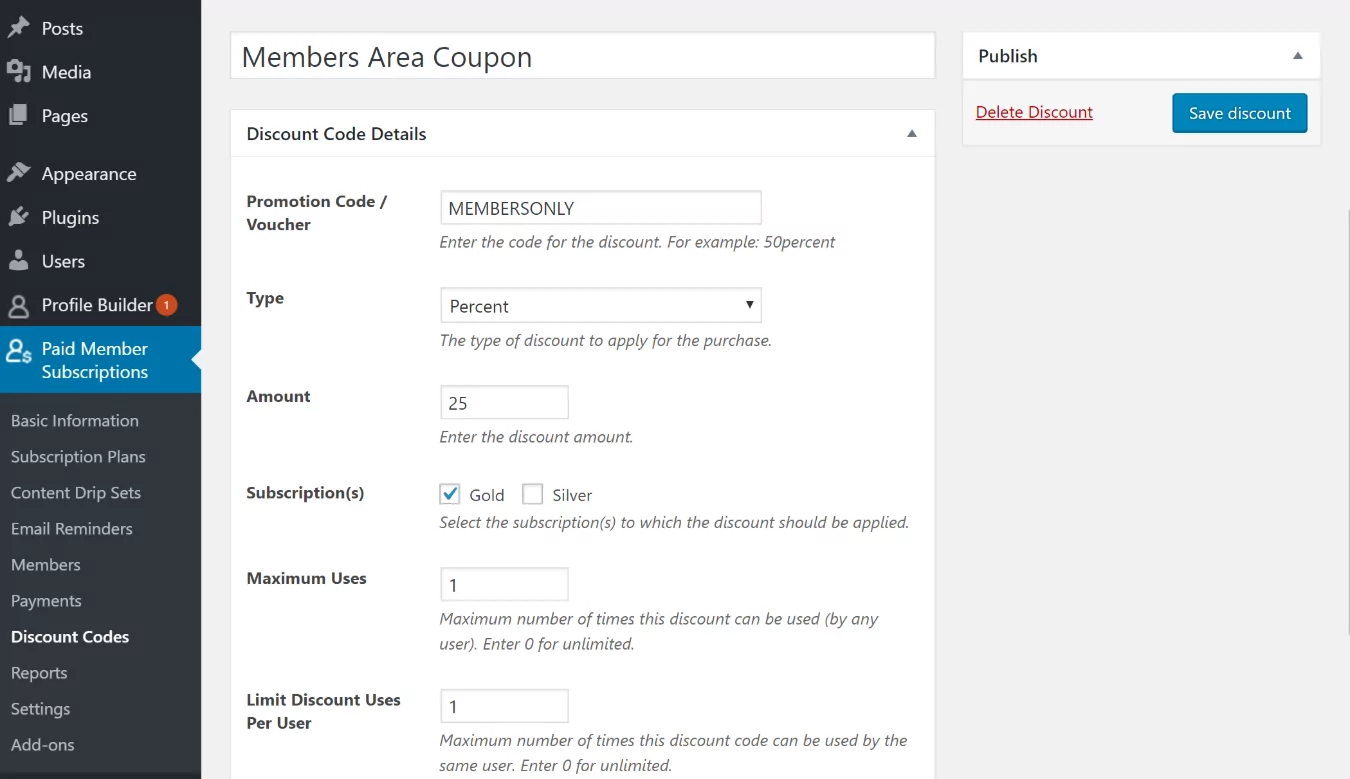
And if you go to Paid Member Subscriptions → Discount Codes, you can create special coupon codes to give users discounted access to your WordPress membership area. You can even…
- Limit your coupons to specific subscription plans.
- Set a maximum number of uses.
- Add a start/expiration date.
- Choose whether to apply the coupon to all recurring payments (for recurring subscriptions) or just the first payment.
How to Integrate Your WordPress Members Area With WooCommerce
If you’re running a WooCommerce store, you can integrate all the core membership area functionality that you saw above with your WooCommerce store, plus some new features.
You have two main approaches to creating a WooCommerce members area. You can…
You can set both of these up just like you would regular content restrictions.
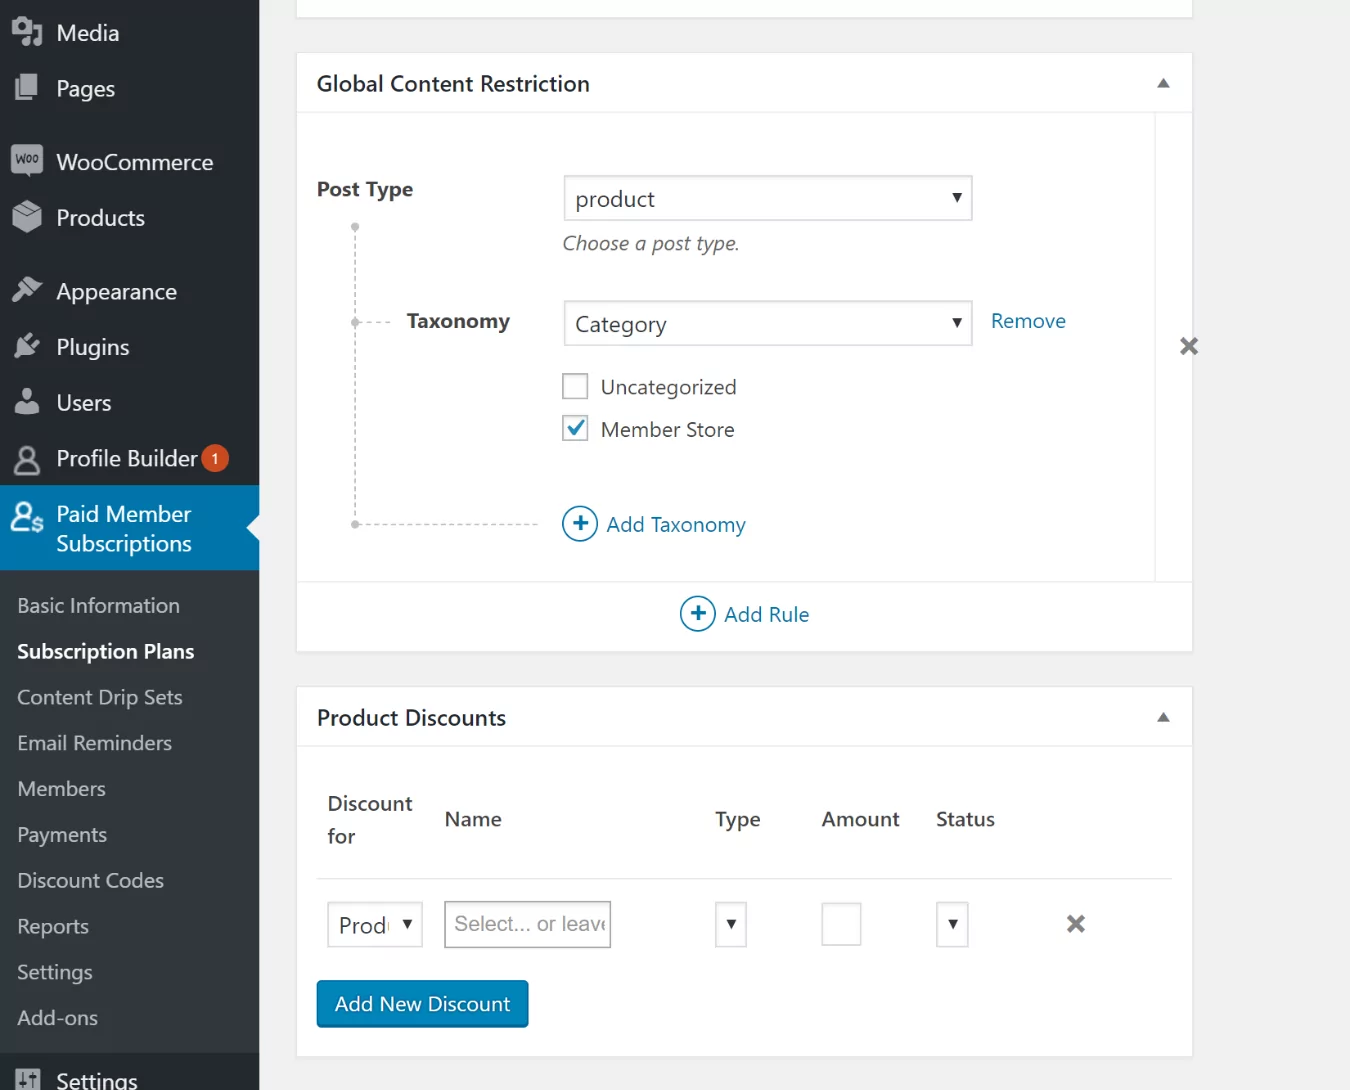
First, you can edit a subscription plan to restrict access to all products or certain product categories/tags. You can also set up product discounts from this area:
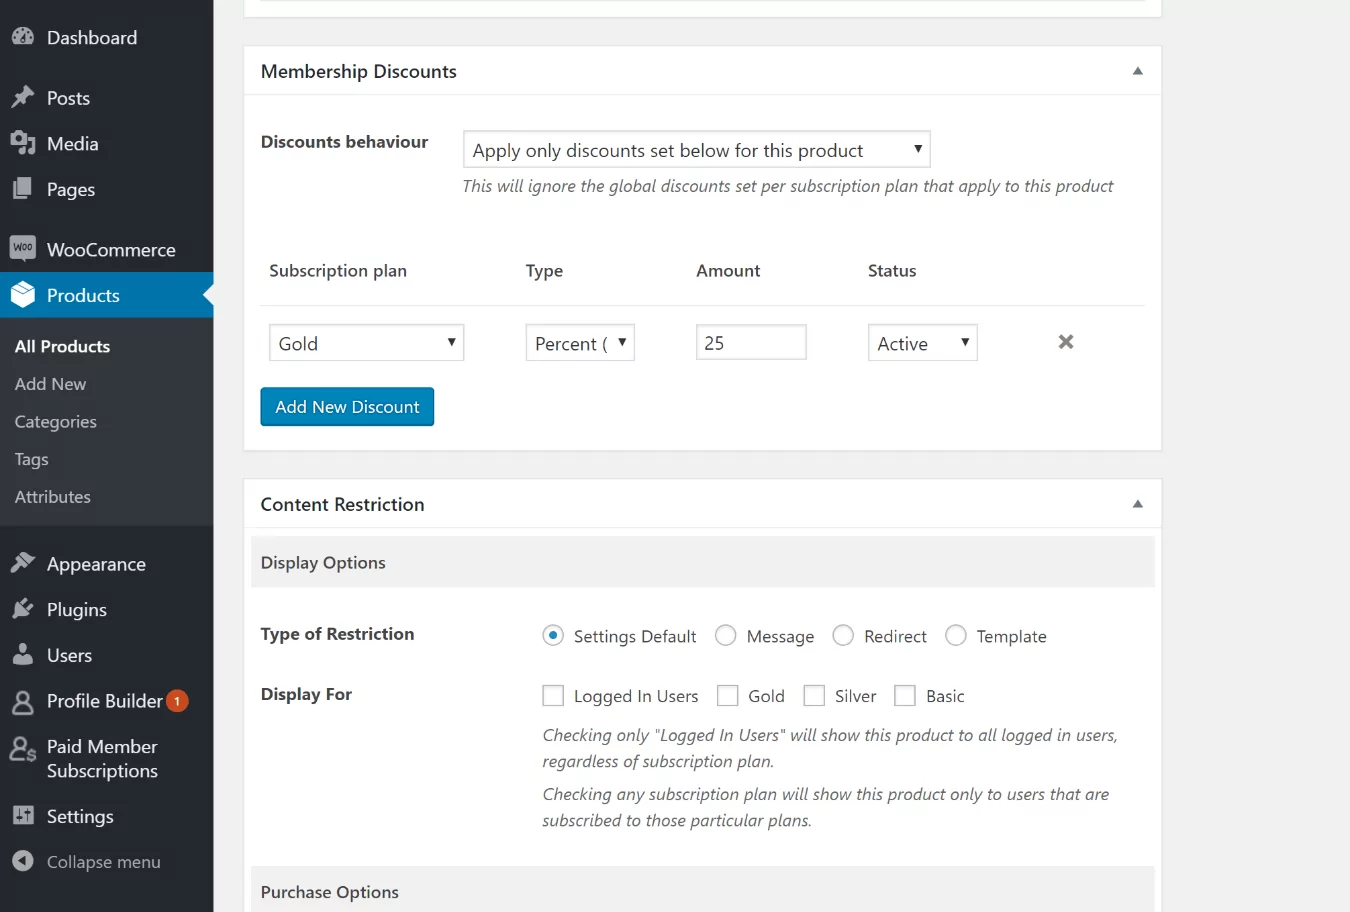
Or, you can edit individual products and use the Membership Discounts or Content Restriction meta boxes to set up restricted access or members-only discounts:
How to Create a More Detailed Member Registration Page
By default, Paid Member Subscriptions only collects the following information on the registration page (plus payment information when users checkout, if needed).
- Username
- First and last name
- Password
For some uses, that might be all you need.
But if you want to collect more information from your visitors and create a more detailed profile, you can use the Profile Builder WordPress plugin, which integrates perfectly with the Paid Member Subscriptions plugin that you’ve been using.
Essentially, Profile Builder lets you replace the registration form from Paid Member Subscriptions with your own custom registration form, including as many custom fields as you want. You can also use Profile Builder to create a custom WooCommerce registration system.
To get started, make sure to install the Profile Builder plugin on your members area website. It comes in both a free plugin at WordPress.org, as well as a premium version with more functionality.
Create Your Own Custom Registration Form
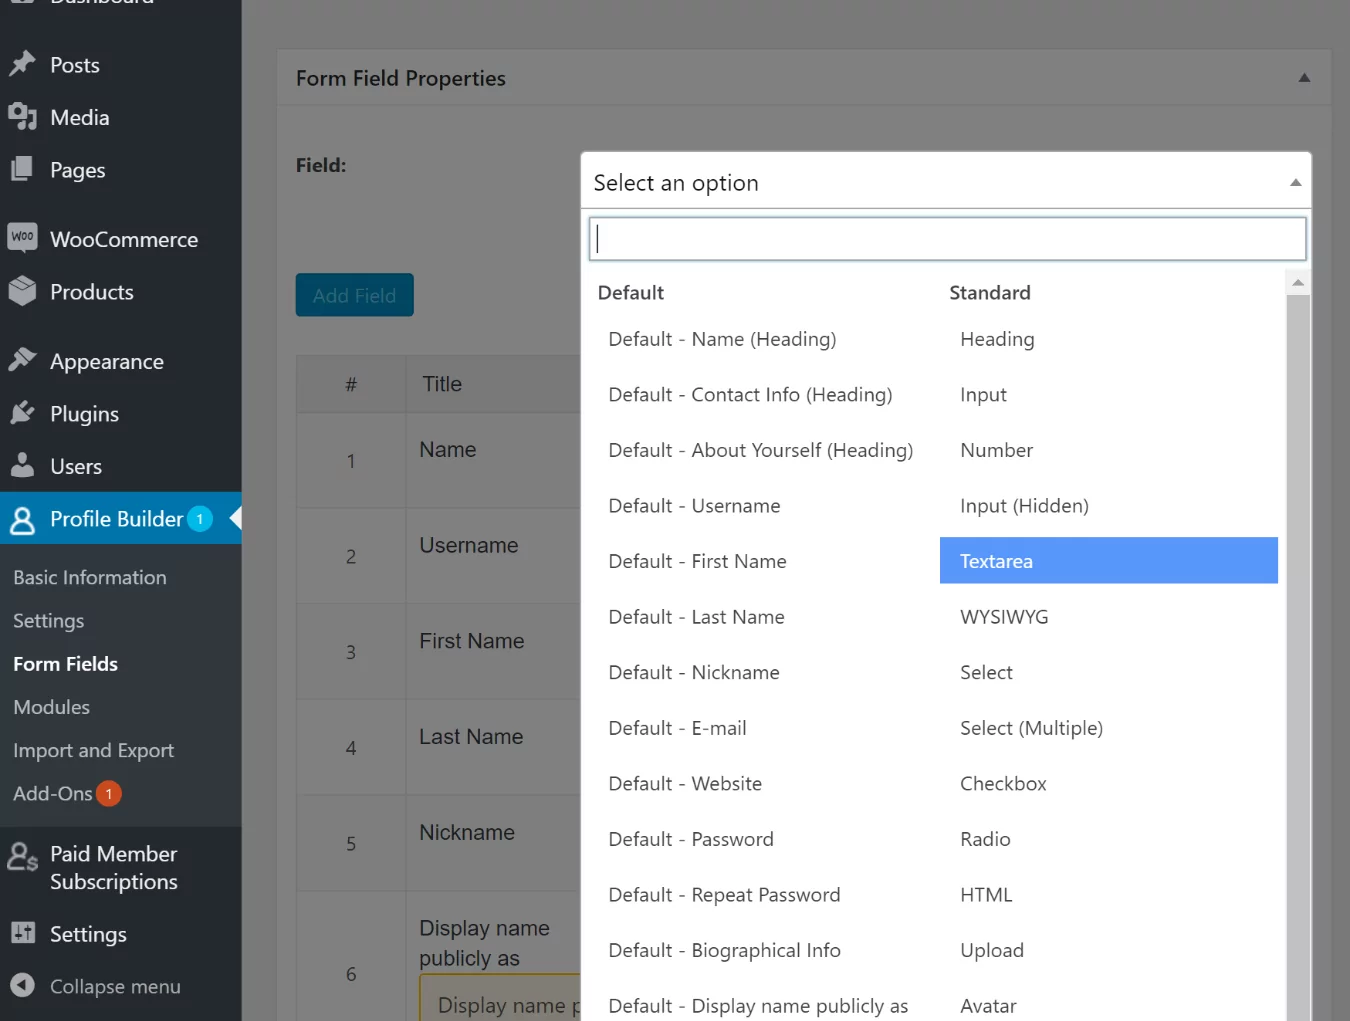
Once you’ve installed the Profile Builder plugin, go to Profile Builder → Form Fields to control which fields appear on your custom registration page.
You can add as many fields as you want to collect extra information from your members:
In addition to extra profile information, you can also collect other types of input. For example, if you have a Mailchimp list, you could add a checkbox for users to opt-in to receive email marketing.
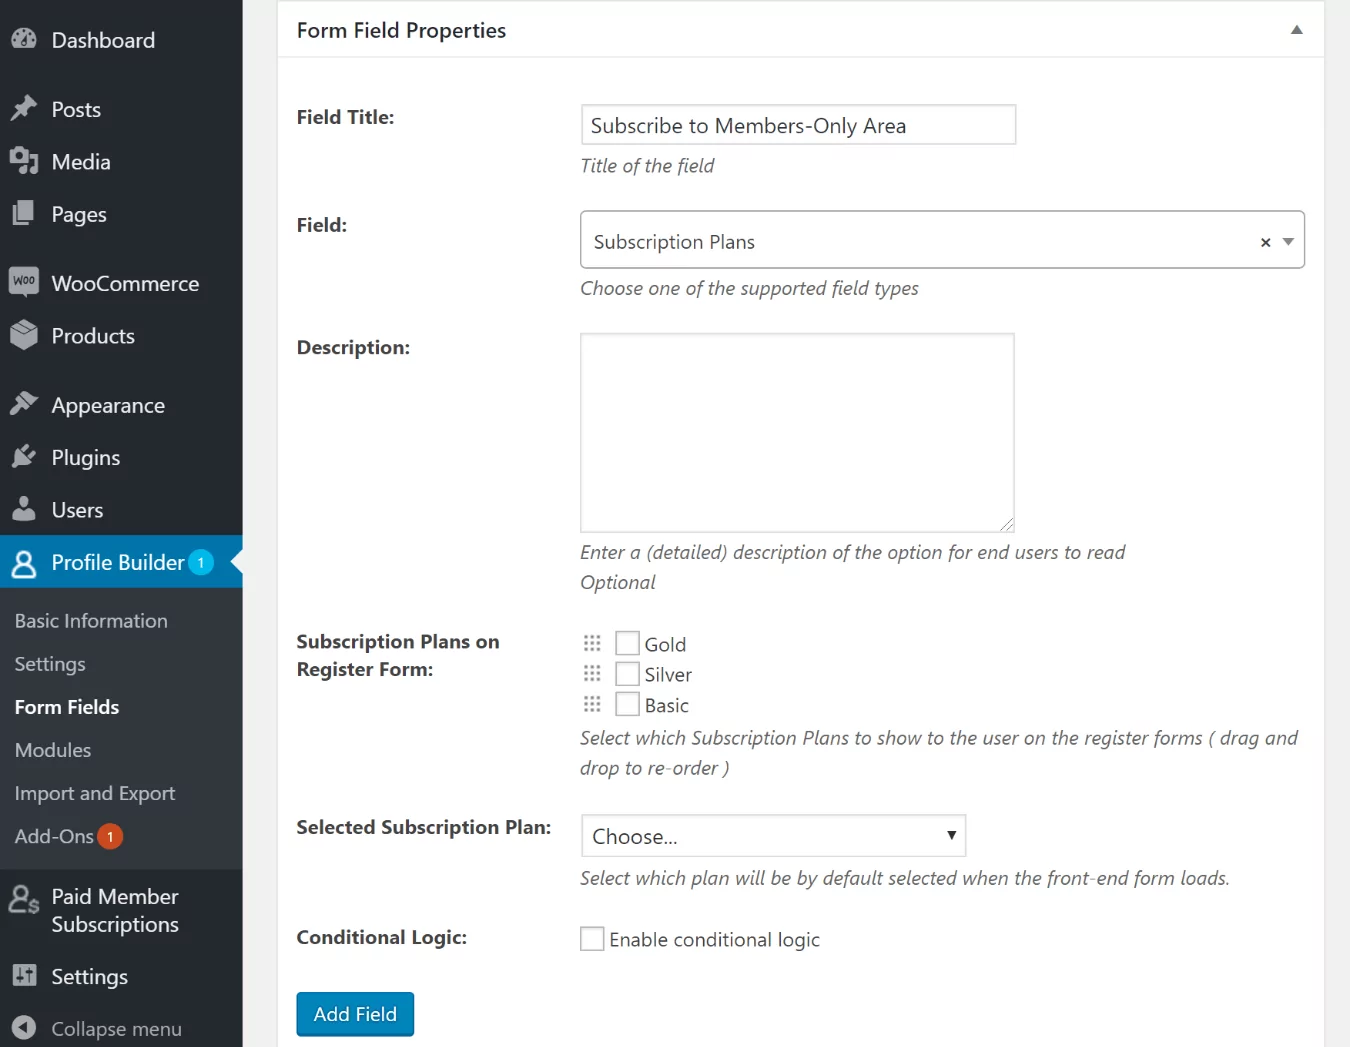
The only new field that you absolutely must add is the Subscription Plans field, as this is what lets you connect to your members area from Paid Member Subscriptions.
Once you’ve added the field, you can choose exactly which subscription plans are visible on your registration form:
Once you’re happy with your form, save your changes.
Then, edit your front-end registration page and replace the [pms-register] shortcode with the [wppb-register] shortcode.
Now, users will see your new custom registration form, but they’ll still be able to choose a subscription plan for your WordPress members-only area.
Require Manual Admin Approval (Optional)
After publishing this post, we received a comment with a use case where the person wanted to require manual admin approval for people who sign up for a free plan. So they wanted to offer free access to the WordPress members area, but only for users who have received manual admin approval.
You can easily set this up if you’re using Profile Builder for your registration forms. You can even target admin approval to specific WordPress user roles. For example, you could let people register for some membership roles right away while requiring manual admin approval for other roles.
To set this up, go to Profile Builder > Settings and set the “Admin Approval” Activated: feature equal to Yes. You can then use the checkboxes to choose which roles you want to require manual admin approval for:
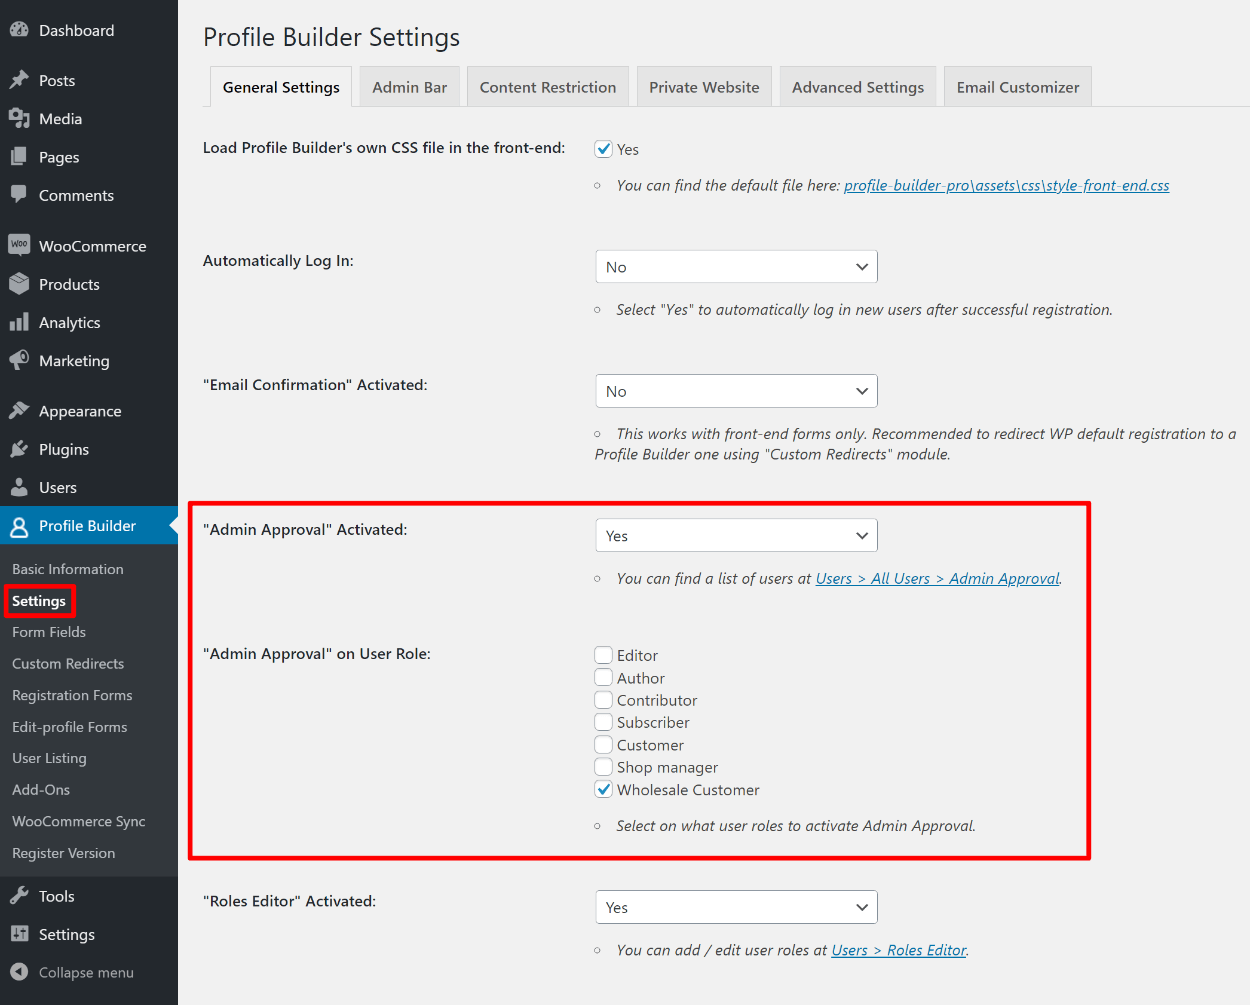
To learn more, check out our full guide to manual admin approval feature in Profile Builder.
Get Started With Your Members Area Today
Whether you want to create a simple members area to restrict access to some of your content or you want to get more advanced with content dripping, recurring payments, and more, Paid Member Subscriptions is the best WordPress membership plugin to create a members-only area.
You can use it to create membership sites, online courses, members-only stores, and much more.
To get started with your own fully-functioning members area, you can install the free version of Paid Member Subscriptions and follow this tutorial. All you need to do is:
- Create your core members area pages.
- Select your payment gateways.
- Set up your subscription plans.
- Restrict access to your content.
Then, once you have your basic WordPress membership website, upgrade to the Hobbyist or Pro plans of Paid Member Subscriptions Pro for access to great new features like:
- Recurring payments.
- More payment gateways.
- Global content restriction to restrict entire post types or categories/tags.
- Content dripping.
- More flexible prices, with one-time signup fees, free trials, coupons, etc.
- Integrations for WooCommerce and bbPress.
Purchase Paid Member Subscriptions today and create your own WordPress membership site.
Paid Member Subscriptions Pro
The best WordPress membership plugin for creating dedicated members areas and offering members-only content and discounts.
Source: https://www.cozmoslabs.com/177365-wordpress-members-area/

