Searching for a WordPress user roles plugin so that you can edit roles and capabilities on your WordPress site?
Capabilities are individual actions that a WordPress user can take and a role is a group of one or more capabilities that you can easily assign to WordPress users.
With a WordPress user role editor, you gain the ability to create your own user roles or edit the existing user roles to control exactly which capabilities a user has access to (AKA exactly which actions a user can perform).
In this post, we’ll show you everything you need to know about these plugins. We’ll start with a quick look at four of the best WordPress role manager plugins, all of which have free options.
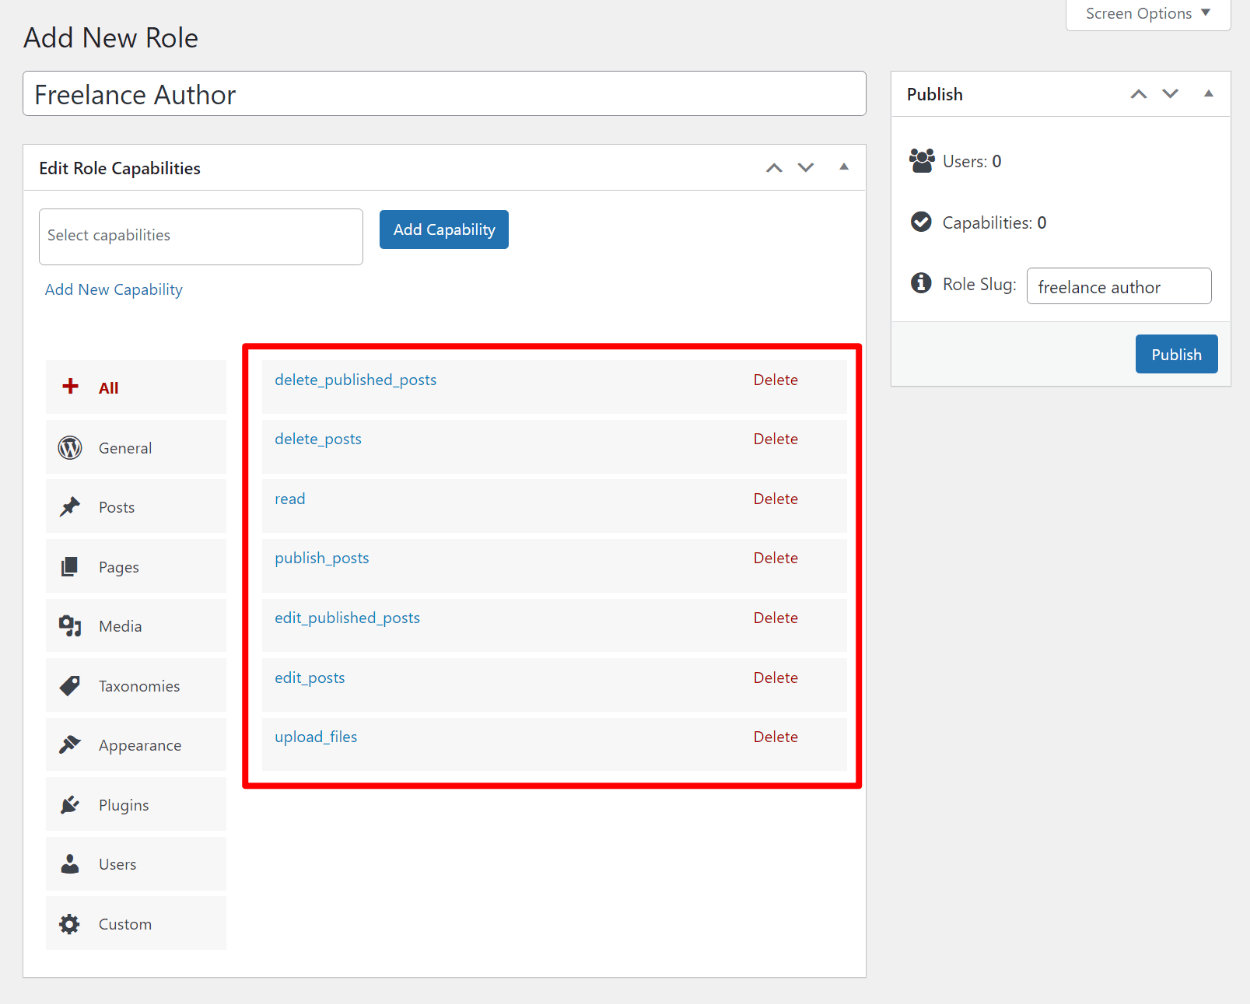
Then, we’ll show you step-by-step how you can use the free Profile Builder plugin to manage roles and capabilities on your site in a bunch of useful ways. You’ll be able to use a simple interface like below to manage capabilities for the existing WordPress user roles or your own custom roles:
Let’s dig in!
Four Best WordPress User Roles Plugin Options in 2021
All of these plugins have free versions at WordPress.org, though most also have premium versions with more features.
1. Profile Builder

Profile Builder is a full solution for working with all aspects of WordPress users and registration.
In terms of user roles, the free version of Profile Builder comes with a built-in role manager. You can:
- Edit existing user roles.
- Create new user roles, including cloning existing roles or creating new roles from scratch.
- Add or remove capabilities from roles, including support for all built-in capabilities as well as the capabilities that plugins add. You can also add your own capabilities.
Once you’ve set up your user roles, Profile Builder also adds the ability to assign multiple user roles to a single user.
In addition to working with user roles and capabilities, Profile Builder can also go further and help you create custom registration, login, and edit profile forms.
For example, you could create a custom registration form that automatically assigns users to a specific user role. This lets you not just create and edit user roles, but also work with them in meaningful ways when it comes to user registration.
Finally, Profile Builder also includes content restriction so that you can restrict access to content on your site based on a user’s role.
If you upgrade to the premium version, you’ll also get more advanced login, registration, and edit profile features, along with useful features such as manual admin approval upon registration for certain user roles.
2. User Role Editor

User Role Editor is a popular freemium plugin that’s 100% focused on editing user roles and capabilities.
With the free version, you’ll get a dedicated interface where you can edit existing roles or add your own roles. Once you open a role, you’ll get a detailed capability manager to add or remove capabilities as needed (including support for capabilities from third-party plugins).
If you upgrade to the premium version, you’ll also get more advanced options such as controlling access to the following items by user role:
- Admin menu items.
- Widgets.
- Meta boxes.
3. Members

Members is a popular user role editor and membership manager plugin that was acquired by MemberPress in November 2020.
It lets you create, edit, clone, or delete user roles and then manage all of the capabilities assigned to each role.
You also get the option to assign multiple user roles to a single user, as well as lightweight content restriction and a custom login form.
For more features, there are free add-ons to control access to blocks based on a user’s role, create custom privacy capabilities, create hierarchical roles, and more.
4. WPFront User Role Editor

WPFront User Role Editor is another lightweight option for creating, cloning, or editing user roles. You’ll also be able to manage capabilities for each role that you create or edit, including support for capabilities from plugins.
Another useful feature is the ability to assign multiple user roles to a single user.
If you upgrade to the premium version, you’ll also be able to use roles to control access to admin menus, the media library, navigation menus, widgets, and other types of content.
How to Use a WordPress User Role Editor Plugin
Now that you know some of the best options when it comes to managing user roles, let’s get into some more actionable tips and we’ll show you step-by-step how you can use one of those plugins (Profile Builder) to create, edit, and manage user roles on your WordPress site.
Best of all, Profile Builder lets you do this 100% for free and it also includes those other helpful user profile features like creating custom registration, login, and edit profile forms.
For example, once you’ve created a custom user role, you could also use Profile Builder to create a custom registration form that automatically adds new users to that role.
To get started, make sure to install and activate the free version of Profile Builder from WordPress.org. Then, here’s how to use it…
1. Activate the WordPress Role Manager in Profile Builder
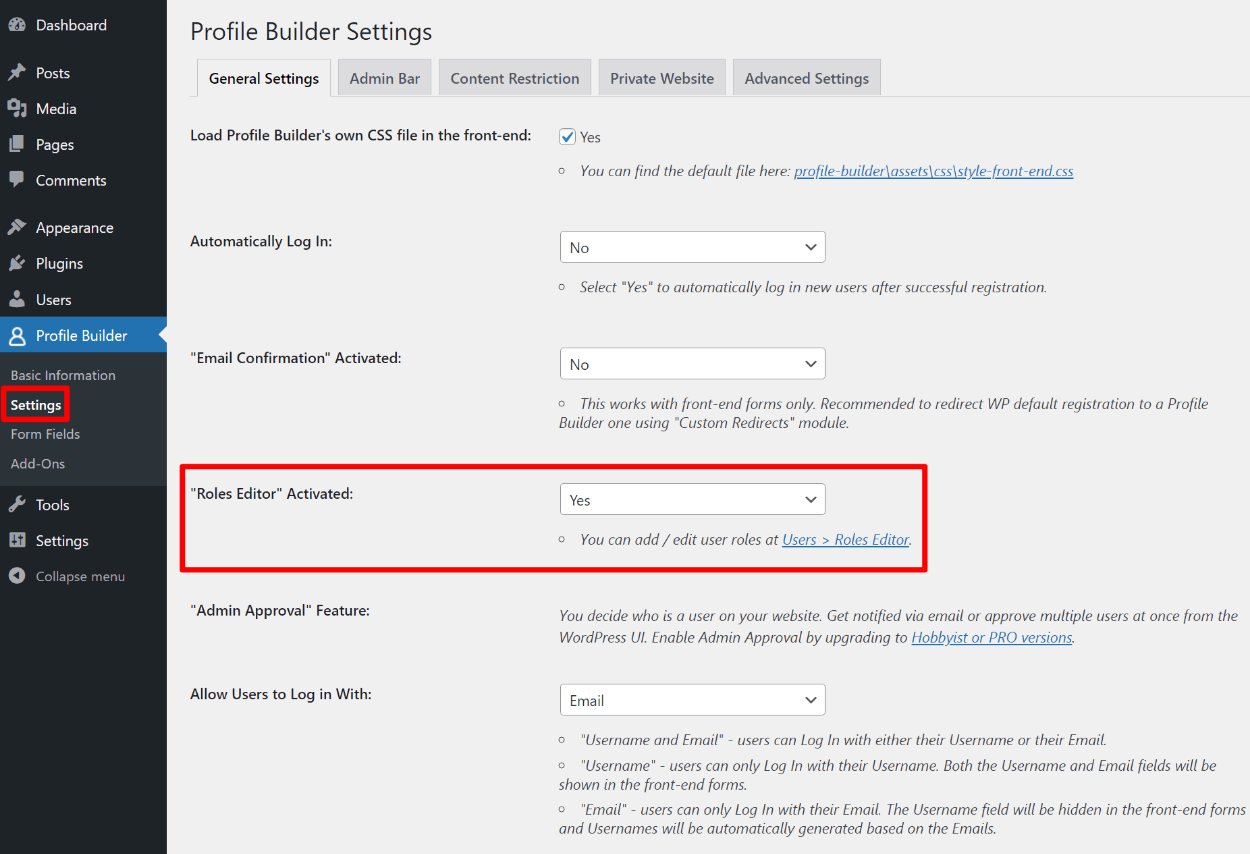
To use Profile Builder to create or edit user roles, you first need to activate its built-in role manager in the Profile Builder settings.
To do that, go to Profile Builder → Settings and set the “Roles Editor” Activated drop-down equal to Yes:
2. Create or Edit User Roles
Once you’ve activated the feature, you can go to Users → Roles Editor to edit any existing user role and also create your own custom user roles.
At first, the interface will list all of your current user roles, along with a quick summary of how many capabilities each role has and how many users have been assigned that role. In the screenshot below, you can see that we’ve already created some custom roles for our site.
If you want to edit an existing user role, all you need to do is hover over it and click Edit.
If you want to create a new user role, you have two options:
- You can click the Add New Role button at the top to create a new user role from scratch.
- You can hover over an existing user role and click the Clone option. This will create a new user role that starts with all the same capabilities as the role that you cloned. This is useful if you just want to make a few tweaks but otherwise keep a similar level of capabilities.

3. Manage Capabilities for Your Role
Once you edit an existing role or create your own, you’ll be in the Edit Role Capabilities interface. If you created a new role, you’ll also need to give it a name.
In the example below, we’ve cloned the existing “Author” role to create a new role called “Freelance Author”.
Since we cloned the role, our new role starts off with all the same capabilities that the author role had. You can see these assigned capabilities listed in the interface (highlighted below):

To remove a capability from the role, you can click the Delete link.
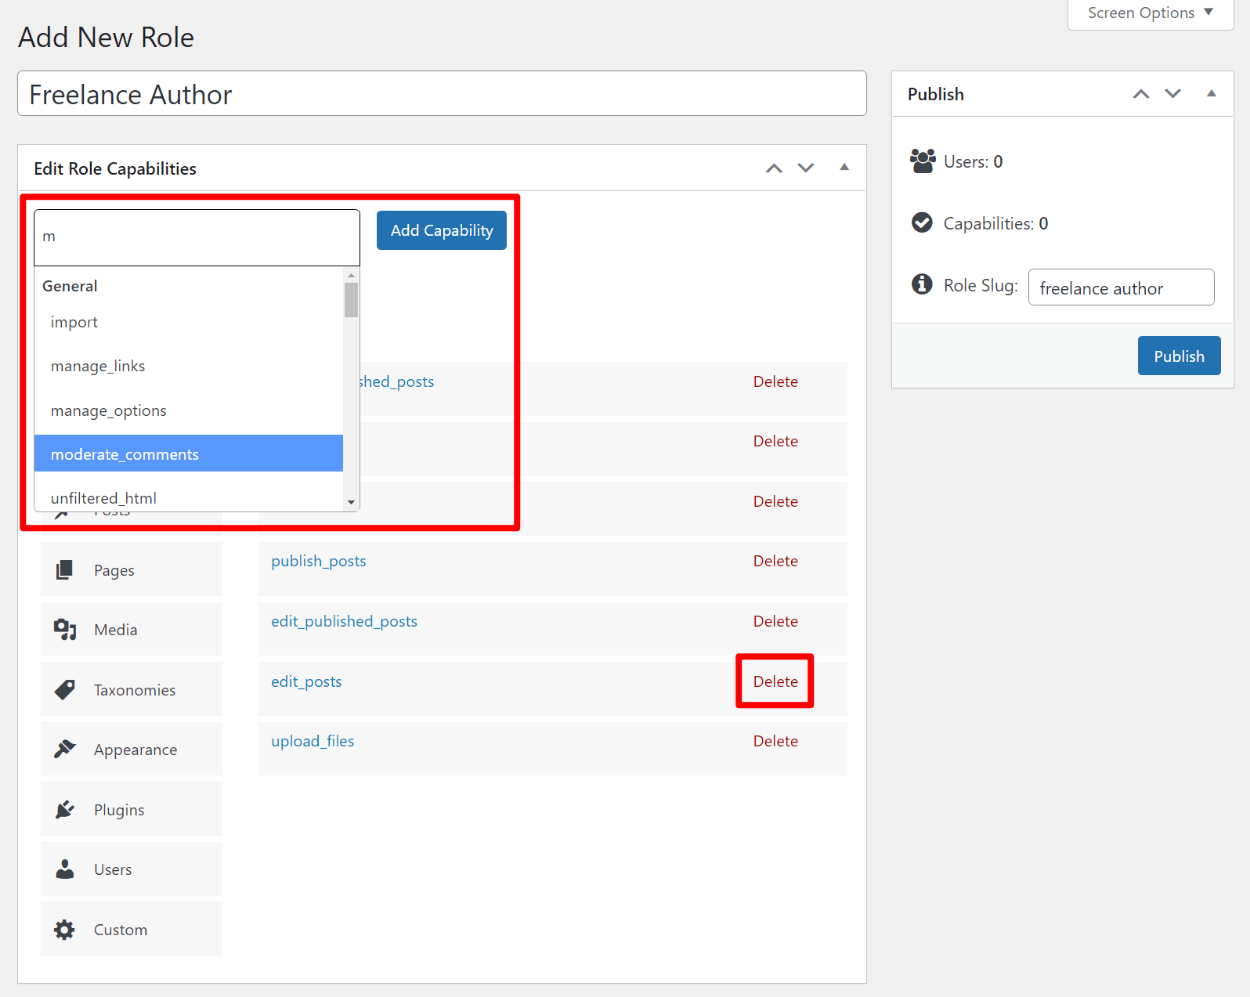
To add one or more new capabilities (from the list of existing capabilities), you can click in the Select capabilities box to expand a list of options. You can also search to quickly find the option that you’re looking for in the list.
The list of capabilities includes all the core WordPress capabilities, along with any defined capabilities from plugins that you might be using:
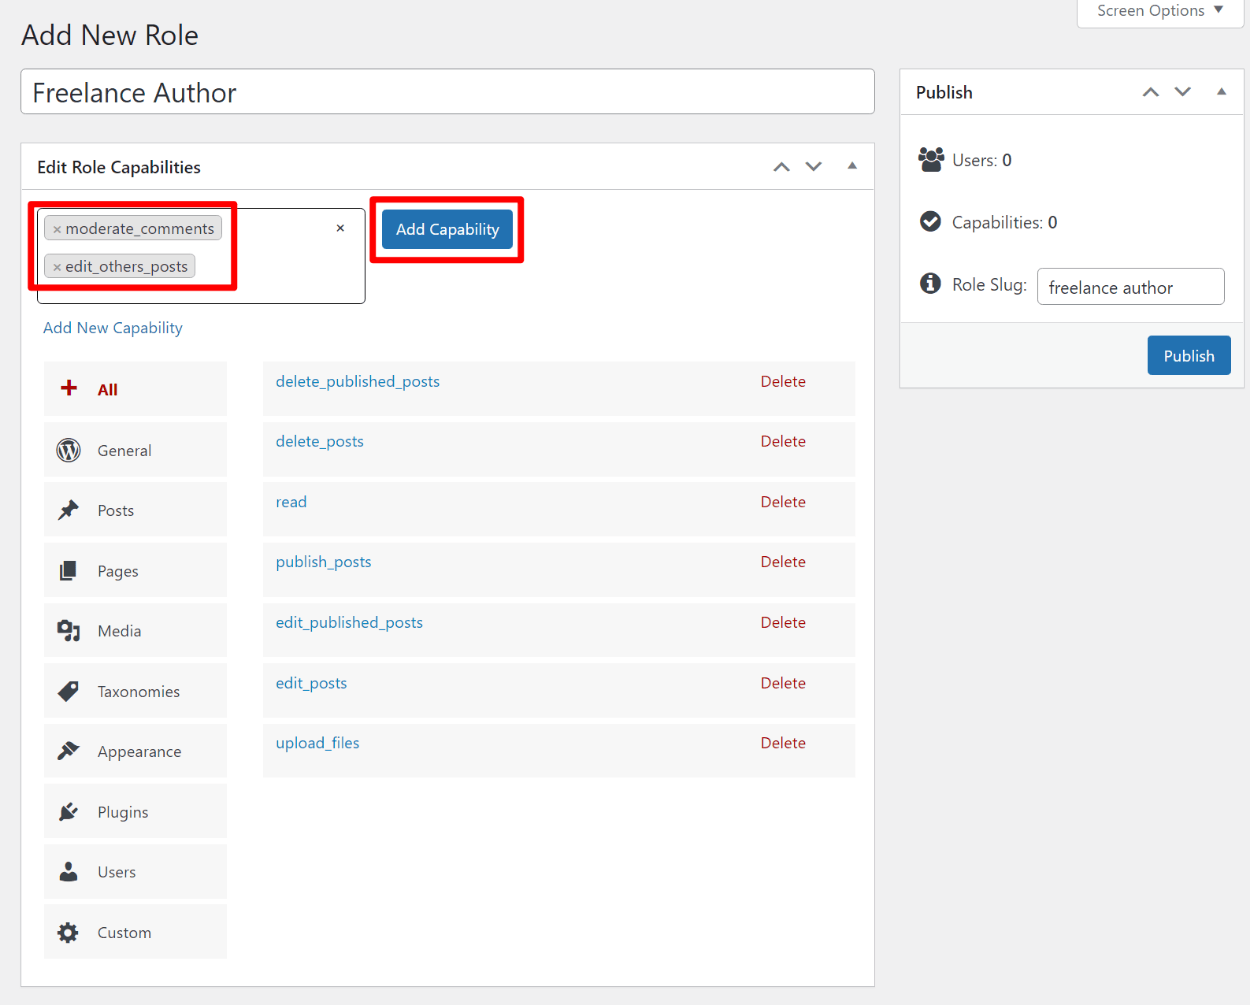
You can select multiple capabilities. Then, click the Add Capability button to assign all of those capabilities to your role:
Profile Builder also lets you create your own custom capabilities in addition to selecting from the existing capabilities. You can do this by clicking the Add New Capability link under the Select capabilities box.
This will let you define your own custom capability name:
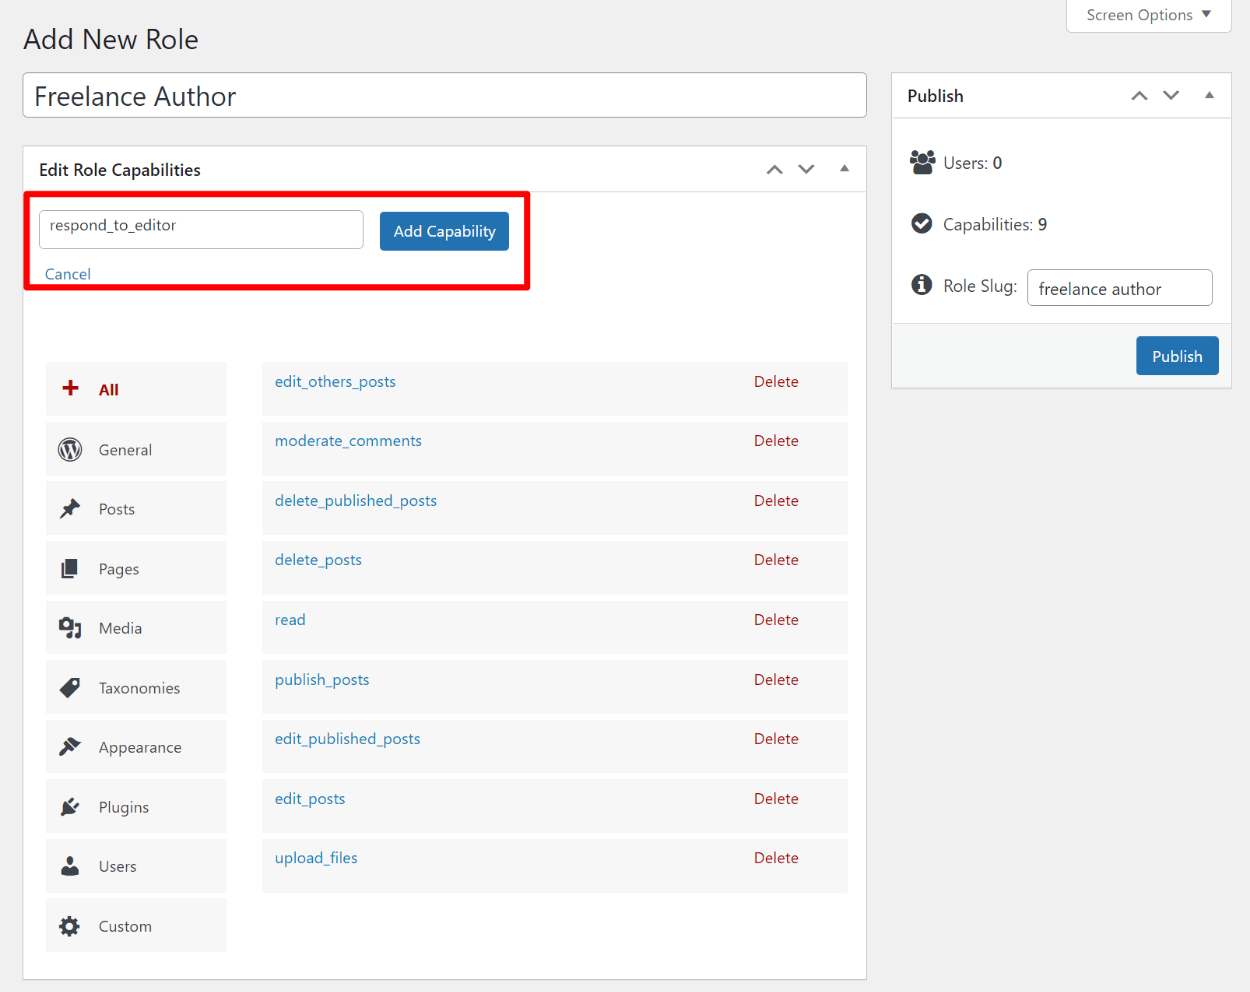
You would need to use code to actually define what that capability lets users do, so this feature is mainly for developers.
And that’s it! Once you publish or update your role, it will have the capability list that you created.
4. Assign User Role(s) to User
To start using your new user role, one option is to manually assign it to users. The other option is to create a custom registration page, which we’ll show you next.
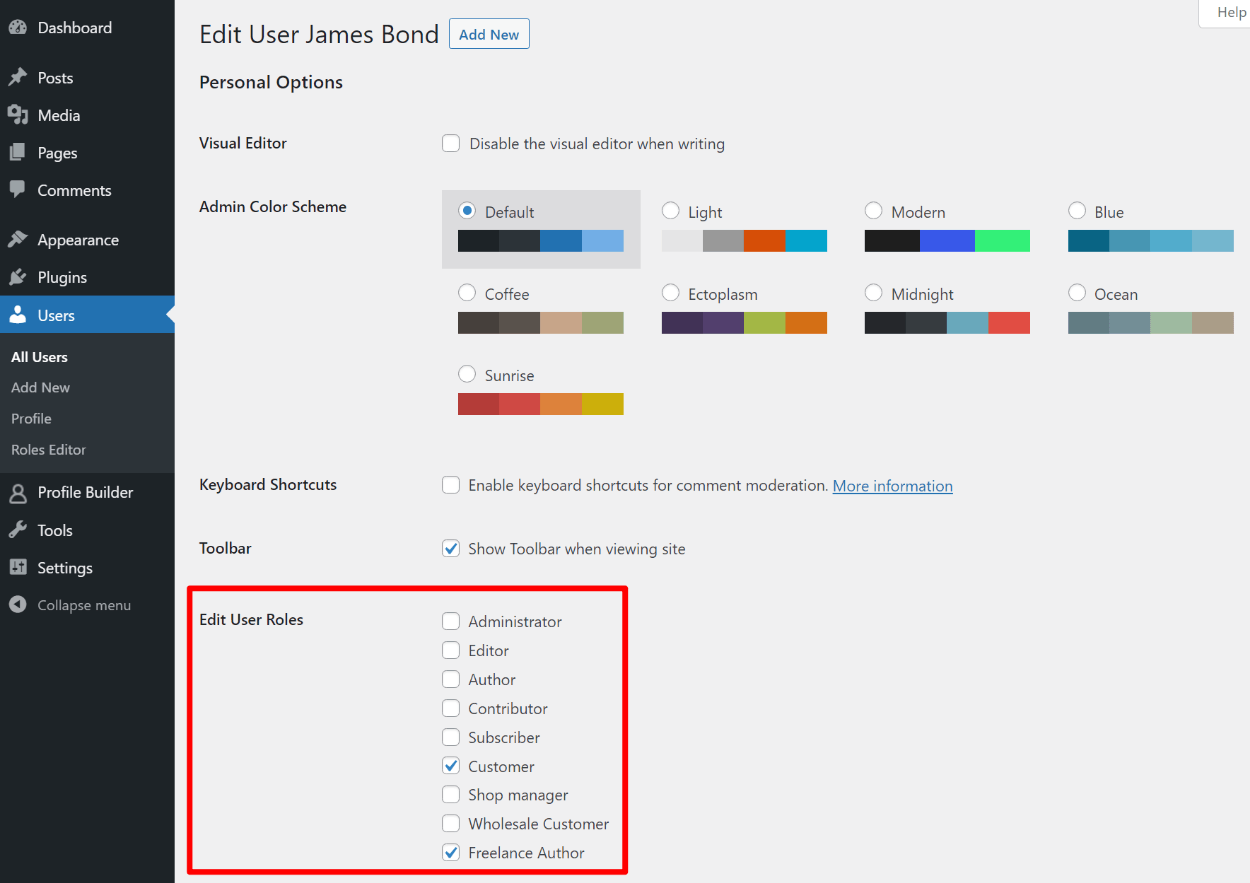
One nice thing about Profile Builder is that it lets you assign multiple WordPress user roles to a single user, whereas normally the core WordPress setup only lets you assign a single role to a user.
To assign a user role, go to Users → All Users and edit the profile of the user that you want to assign to a role.
Then, scroll down to the Edit User Roles section in the edit profile area and use the checkboxes to select one or more roles for that user:
5. Create a Custom Registration Form for Your Role
If you allow public registration on your site, you probably don’t want to have to manually assign user roles to every person that registers.
To help you automate this, Profile Builder lets you create one or more custom registration forms that automatically assign people to a certain user role.
There are a few useful adjustments you can set up with this feature. You can:
- Create multiple registration forms, each with different rules for assigning a user role. For example, you could create one registration form for authors and another for readers.
- Let users choose their role by selecting from one or more options in the form. This lets you create a single unified registration form but assign users to different roles based on how they filled out the form.
- Require manual admin approval for certain user roles. For example, you could automatically approve a “Reader” but require admin approval if someone registers as an “Author”.
You can create a single custom registration form with just the free version of Profile Builder. You can create multiple instances of that form that assign users to different user roles, but you’ll need to use the exact same form fields on each.
To create multiple unique forms and access the admin approval feature, you’ll need to upgrade to the premium version of Profile Builder.
The premium version also gives you access to custom fields, which gives you more control over your registration form.
Create a Custom Registration Form
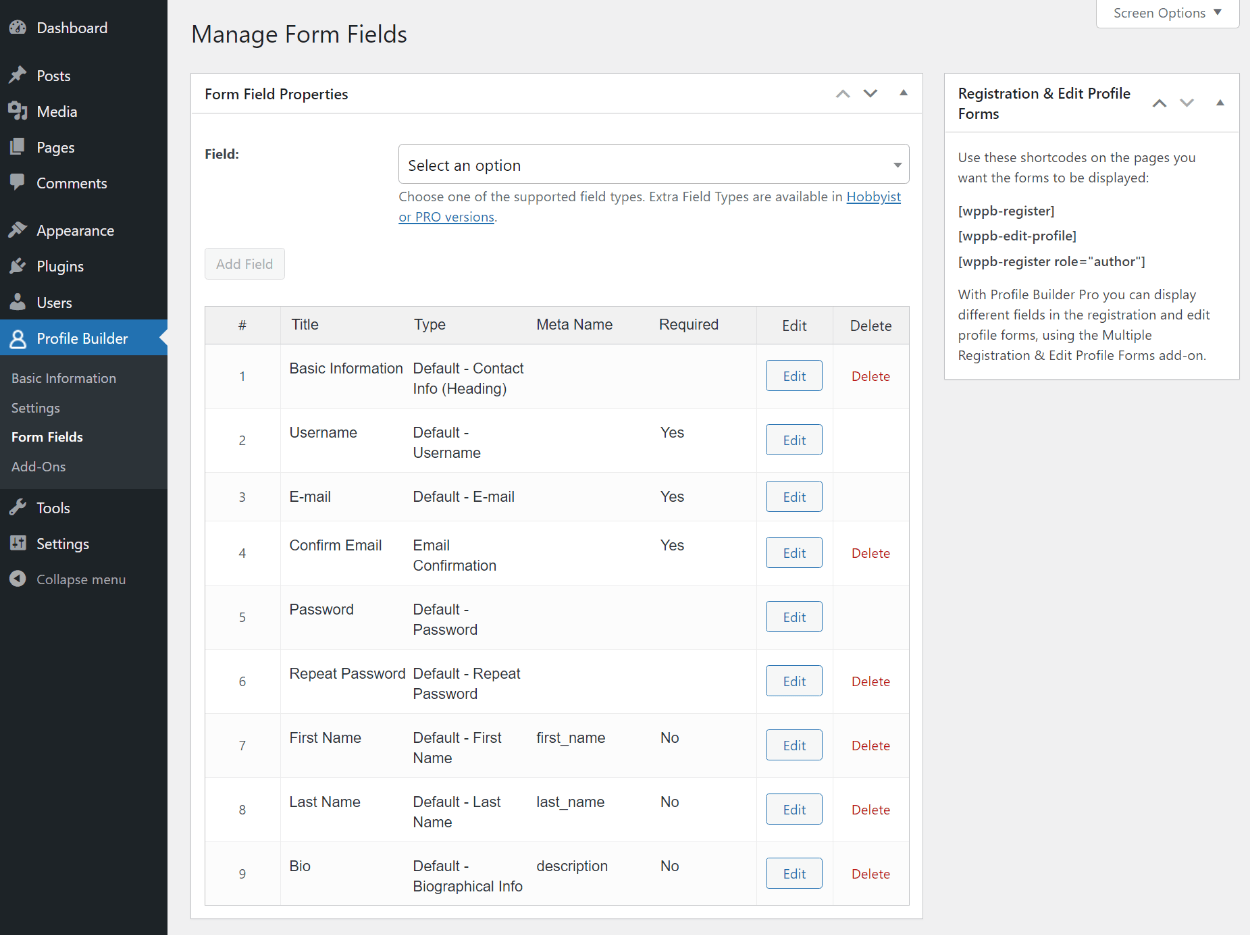
To edit your registration form, go to Profile Builder → Form Fields. Here, you can add, remove, or edit all of the core WordPress profile fields:
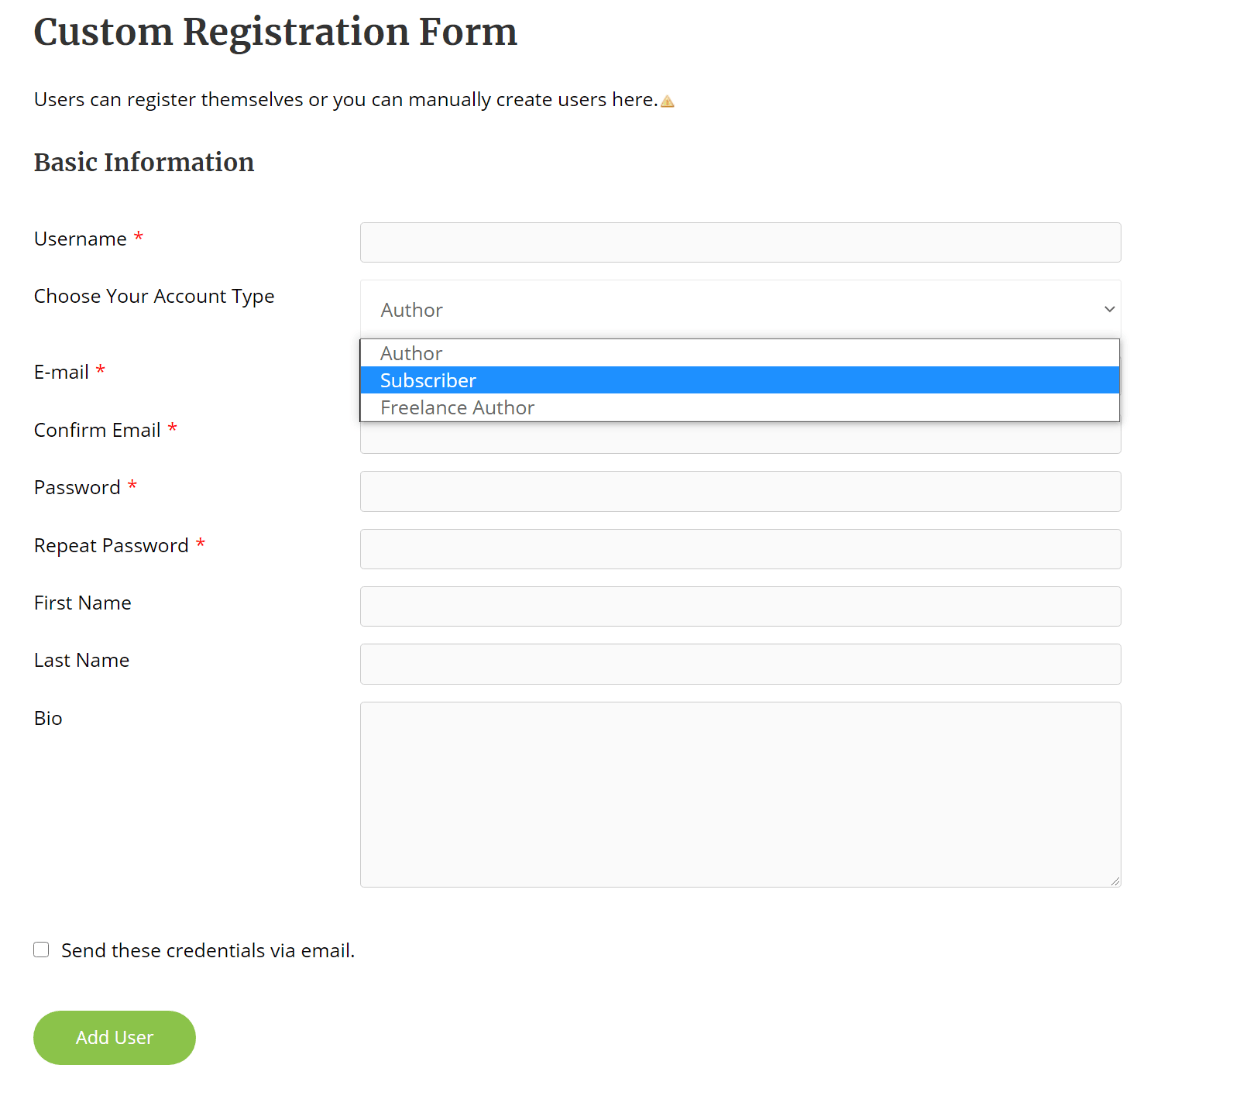
If you want to let users choose their own role, you can add a field for Select (User Role) and use the checkboxes to control which roles are eligible for users to choose:
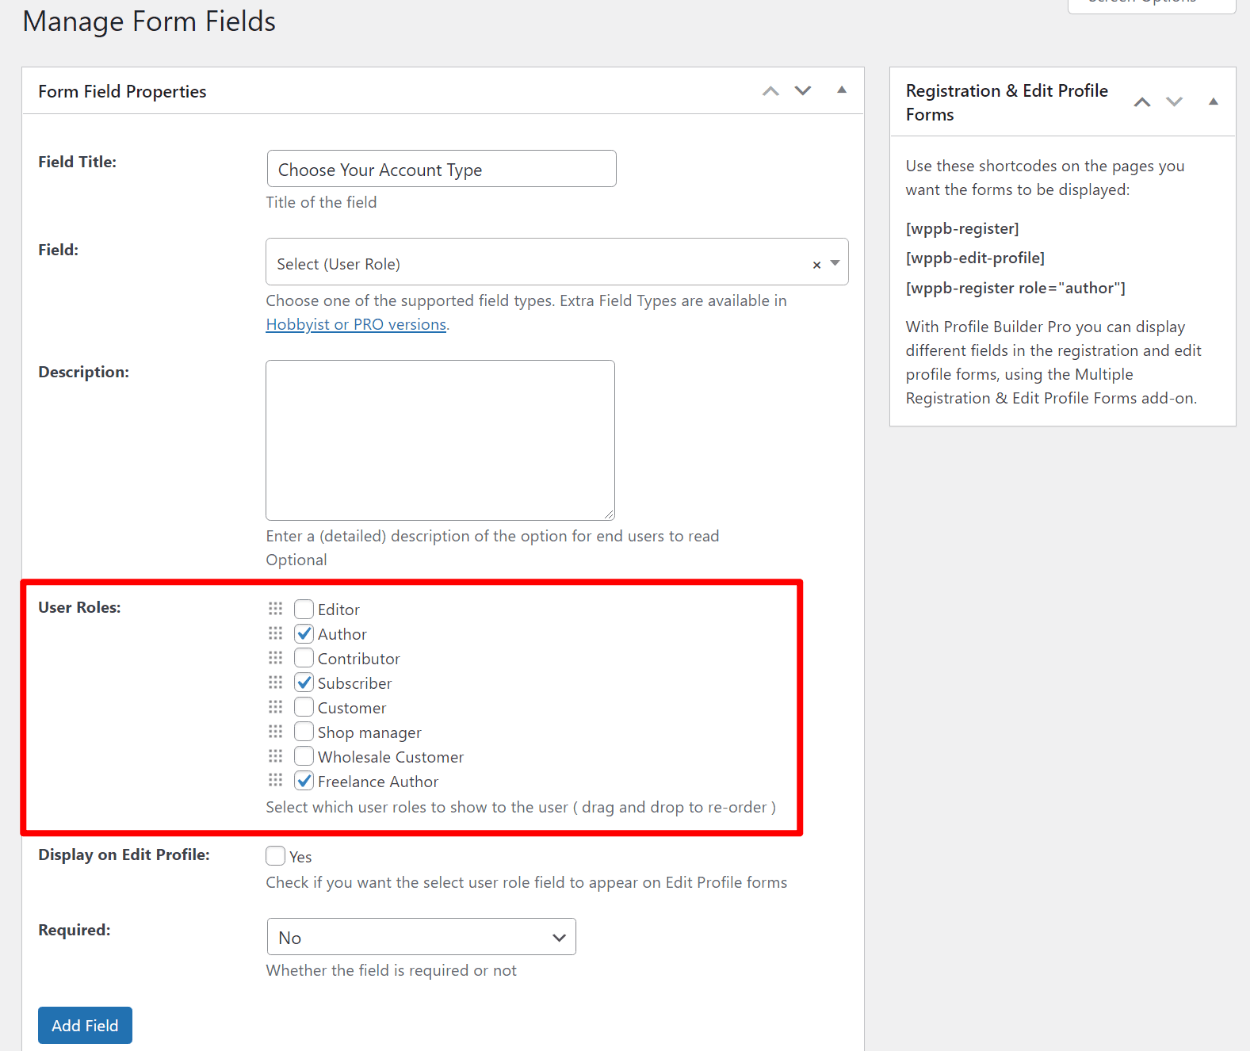
Here’s an example of what it might look like to let users choose their own role:
For more detail, check out our full guide to creating custom WordPress registration forms.
Once you’re happy with your form, you can embed it use the following shortcode, where role equals the name of the user role that you want to assign new users to:
[wppb-register role="author"]
You can place the shortcode in multiple locations and change the role as needed.
If you want to create multiple unique registration forms, you’ll need to upgrade to Profile Builder Pro. Then, you can create a new registration form by going to Profile Builder → Registration Forms.
Hold Certain User Roles for Manual Admin Approval
If you want to require manual admin approval for certain user roles, you need to upgrade to Profile Builder Pro to unlock that feature.
Then, you can go to Profile Builder → Settings and activate the Admin Approval feature. Once you’ve done that, you can use checkboxes to select which user roles should require admin approval:
I1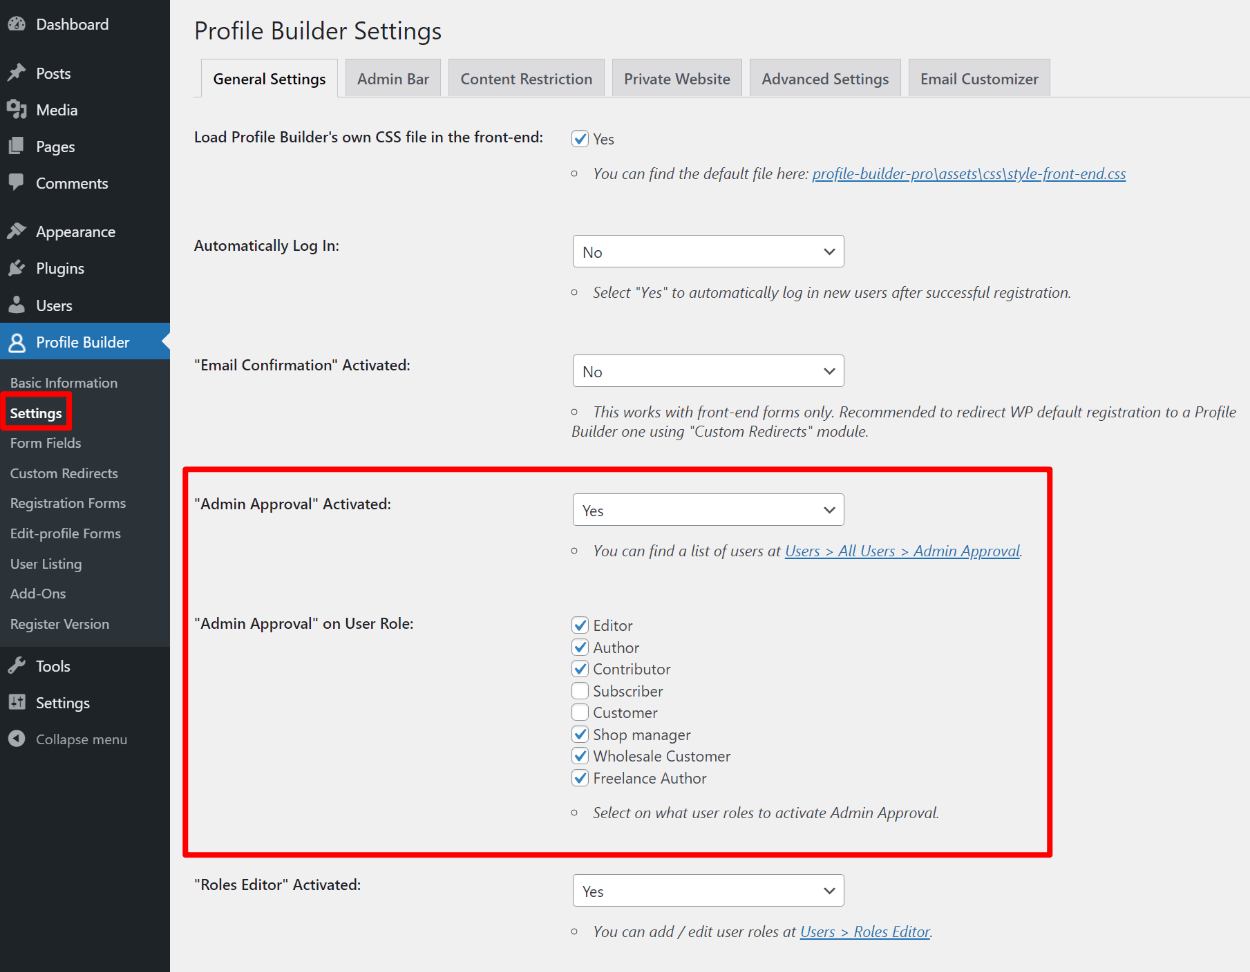
6. Let Users Change Their Role from the Front-End
This last option won’t apply to all sites. But depending on how you’ve set things up, you might want to let users edit their own role from the front-end of your site.
To do this, you can use Profile Builder to create a custom front-end edit profile form that lets users edit some or all of their profile information, including their user role.
With the free version, you can create an edit profile form that includes the same fields as your registration form. So if you added the Select (User Role) field to your registration form, you could let users choose from those same roles on their edit profile page:
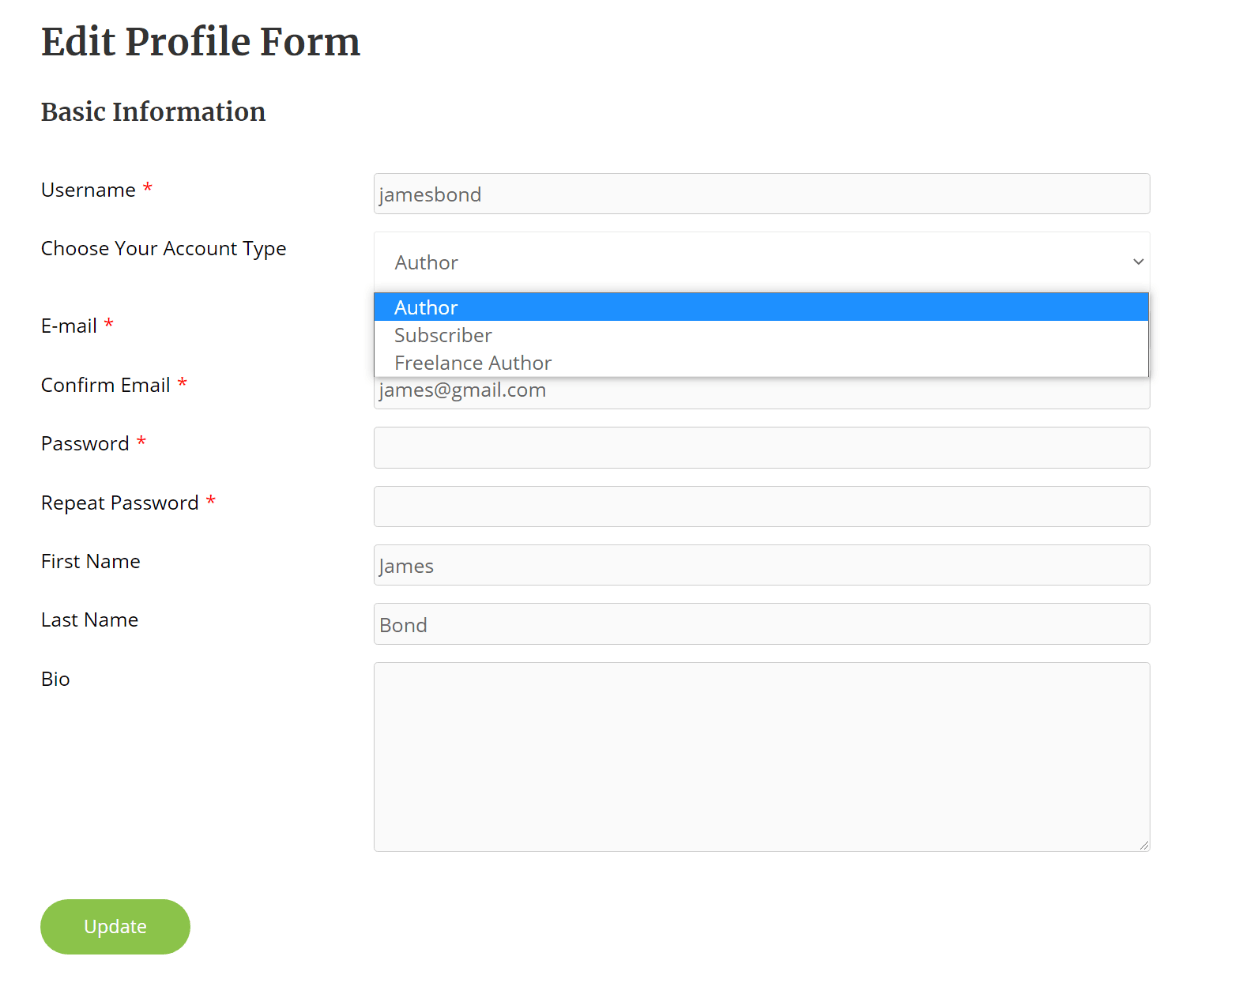
You can embed your edit profile form using the [wppb-edit-profile] shortcode.
If you upgrade to Profile Builder Pro, you can also create your own unique edit profile forms by going to Profile Builder → Edit-profile Forms.
Get Started With a WordPress User Roles Plugin Today
WordPress user roles and capabilities let you control what users can do on your site.
With a WordPress user roles plugin, you can get better control over those settings by creating new roles, editing existing roles, and controlling the exact capabilities that each role has access to.
While there are several popular plugins, Profile Builder gives you access to a full role manager for free, along with other useful features such as custom registration forms and admin approval for certain roles.
To access the core WordPress user role editor and basic registration form features, you can use the free version of Profile Builder at WordPress.org.
Then, upgrade to Profile Builder Pro to access more advanced registration and edit profile forms, manual admin approval for certain user roles, and other useful features for working with WordPress users and user roles.
Do you still have any questions about working with a WordPress user role editor? Let us know in the comments and we’ll try to help!
Source: https://www.cozmoslabs.com/340993-wordpress-user-roles-plugin/
