Searching for a way to create an Elementor pricing table for your membership website?
If you want to create a stylish pricing table for your membership website, Elementor makes a great option. With the tips in this post, you’ll be able to fully control the design and content of your pricing table to create something like this:
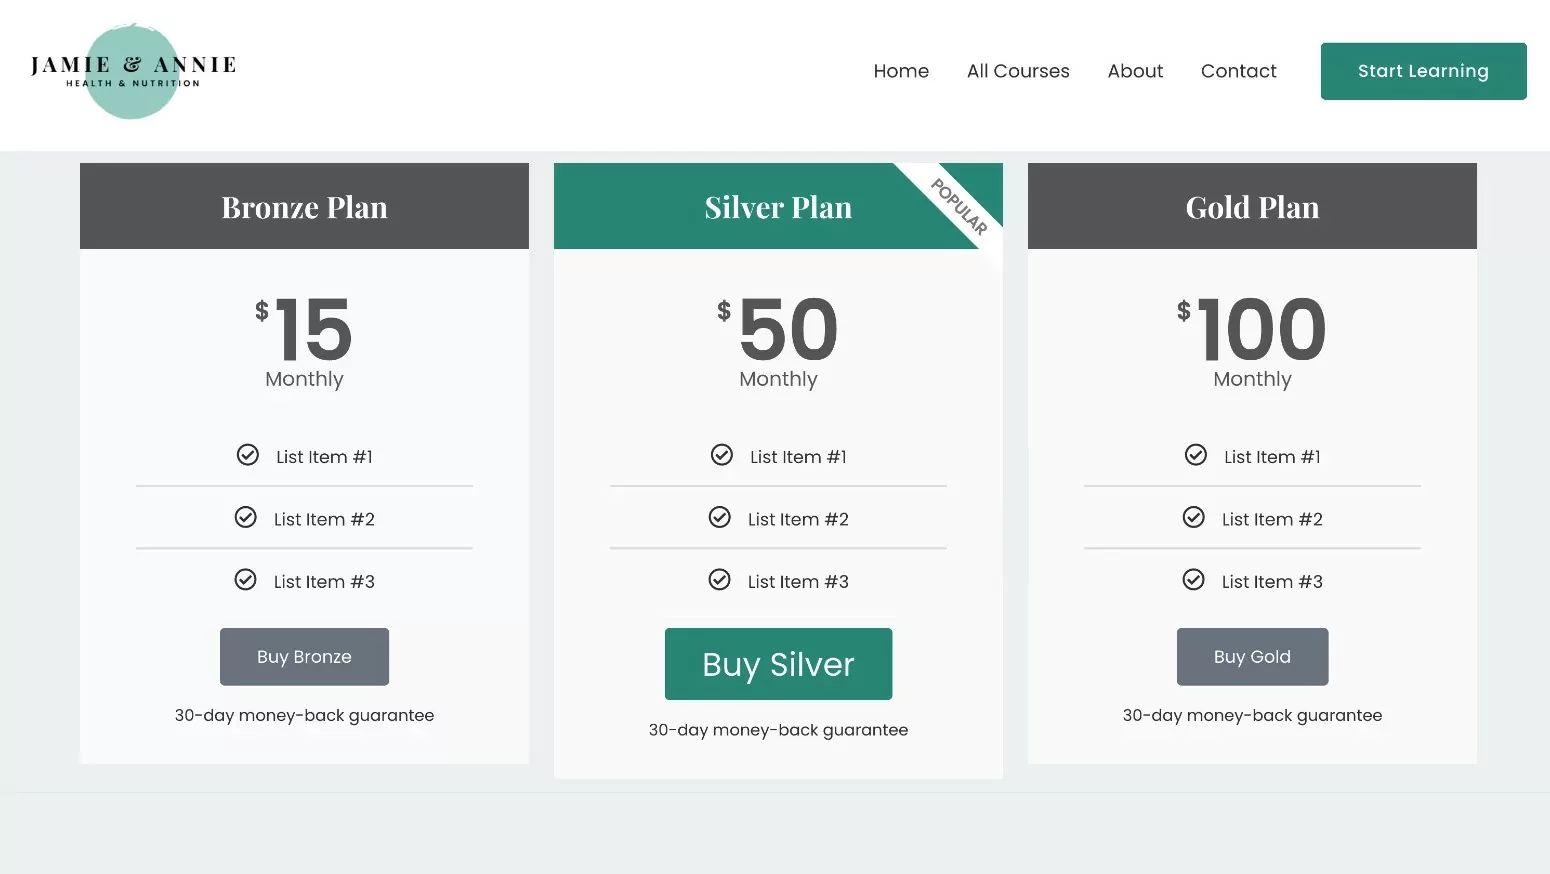
If you’ve created your membership website with Paid Member Subscriptions, Paid Member Subscriptions also offers a dedicated integration with the pricing table Elementor widget that’s available in Elementor Pro.
Or, you can also use third-party Elementor pricing table add-ons. While that’s not the main focus of this post, we’ll also quickly show you how to set that up if you don’t have access to Elementor Pro.
Ready to get started?
In this guide, you’ll learn how to create an Elementor pricing table and integrate it with your membership plans to create a seamless purchase/signup flow.
How to Create An Elementor Pricing Table for Your Membership Website
Without further introduction, let’s get right into our step-by-step tutorial for how to use Elementor to create a pricing table for a membership website.
To create an Elementor pricing table for your membership website, you’ll need to make sure you’ve installed a few plugins:
- Elementor – the core free version at WordPress.org.
- Elementor Pro – if you don’t have access to Elementor Pro, we’ll share an alternative free method in the next section. However, we’re mainly focused on the pricing table Elementor widget in Elementor Pro because Paid Member Subscriptions offers a dedicated integration with Elementor Pro’s dynamic content feature to easily link your subscription plans.
- Paid Member Subscriptions – the method in this post works with both the free version at WordPress.org as well as the premium version.
1. Set Up Your Subscription Plans (If You Haven’t Done So Already)
Before you set up your Elementor pricing table, you’ll first want to make sure that you’ve set up Paid Member Subscriptions and configured your subscription plans. That is, the plans that you want to display in your pricing table.
When you set up the pricing table, you’ll be able to create a column for each plan that you offer, including free and paid plans.
If you’ve already created your plans, feel free to skip ahead to the next section.
If you don’t have any subscription plans yet, you’ll first want to install the Paid Member Subscriptions plugin (you can use the free version or the premium version) and complete the short setup wizard.
Then, you can create your first subscription plan by going to Paid Member Subscriptions → Subscription Plans → Add New.
Give your membership plan a name and then fill out the pricing details.

Repeat as needed to create as many plans as you want to show in your pricing table. You can also link plans together in a hierarchical relationship so that users can easily upgrade/downgrade in a defined path.
We’re keeping this brief because we’re focused on creating pricing tables in this post. But if you want more detailed instructions for setting up your membership site, you can check out our full guide on how to create an Elementor membership site.
2. Add the Price Table Widget in Elementor
Next, open the Elementor editor for the post or page where you want to add your pricing table.
Then, add the Price Table Elementor widget where you want your pricing table to appear. This widget is available via Elementor Pro, so it will appear in the Pro widget section.
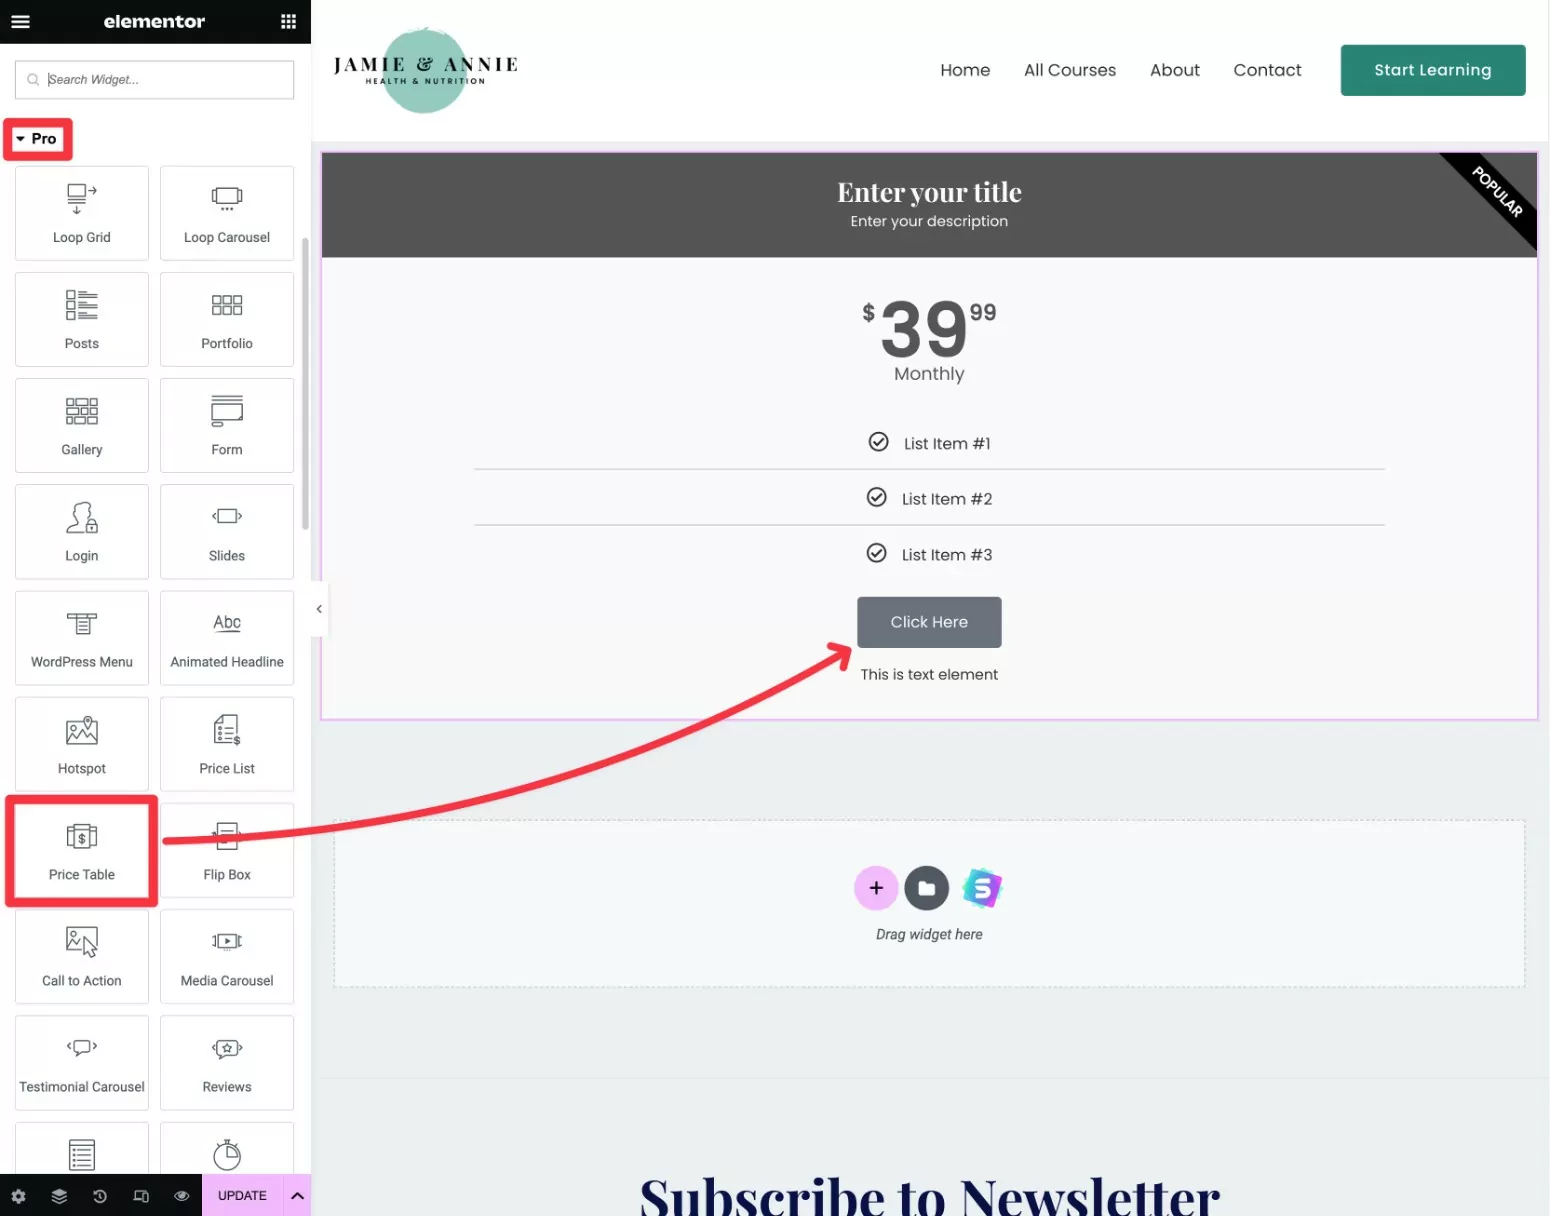
When you add the Price Table widget, it will only show one pricing table column at first.
To create additional columns, right-click on the existing column:
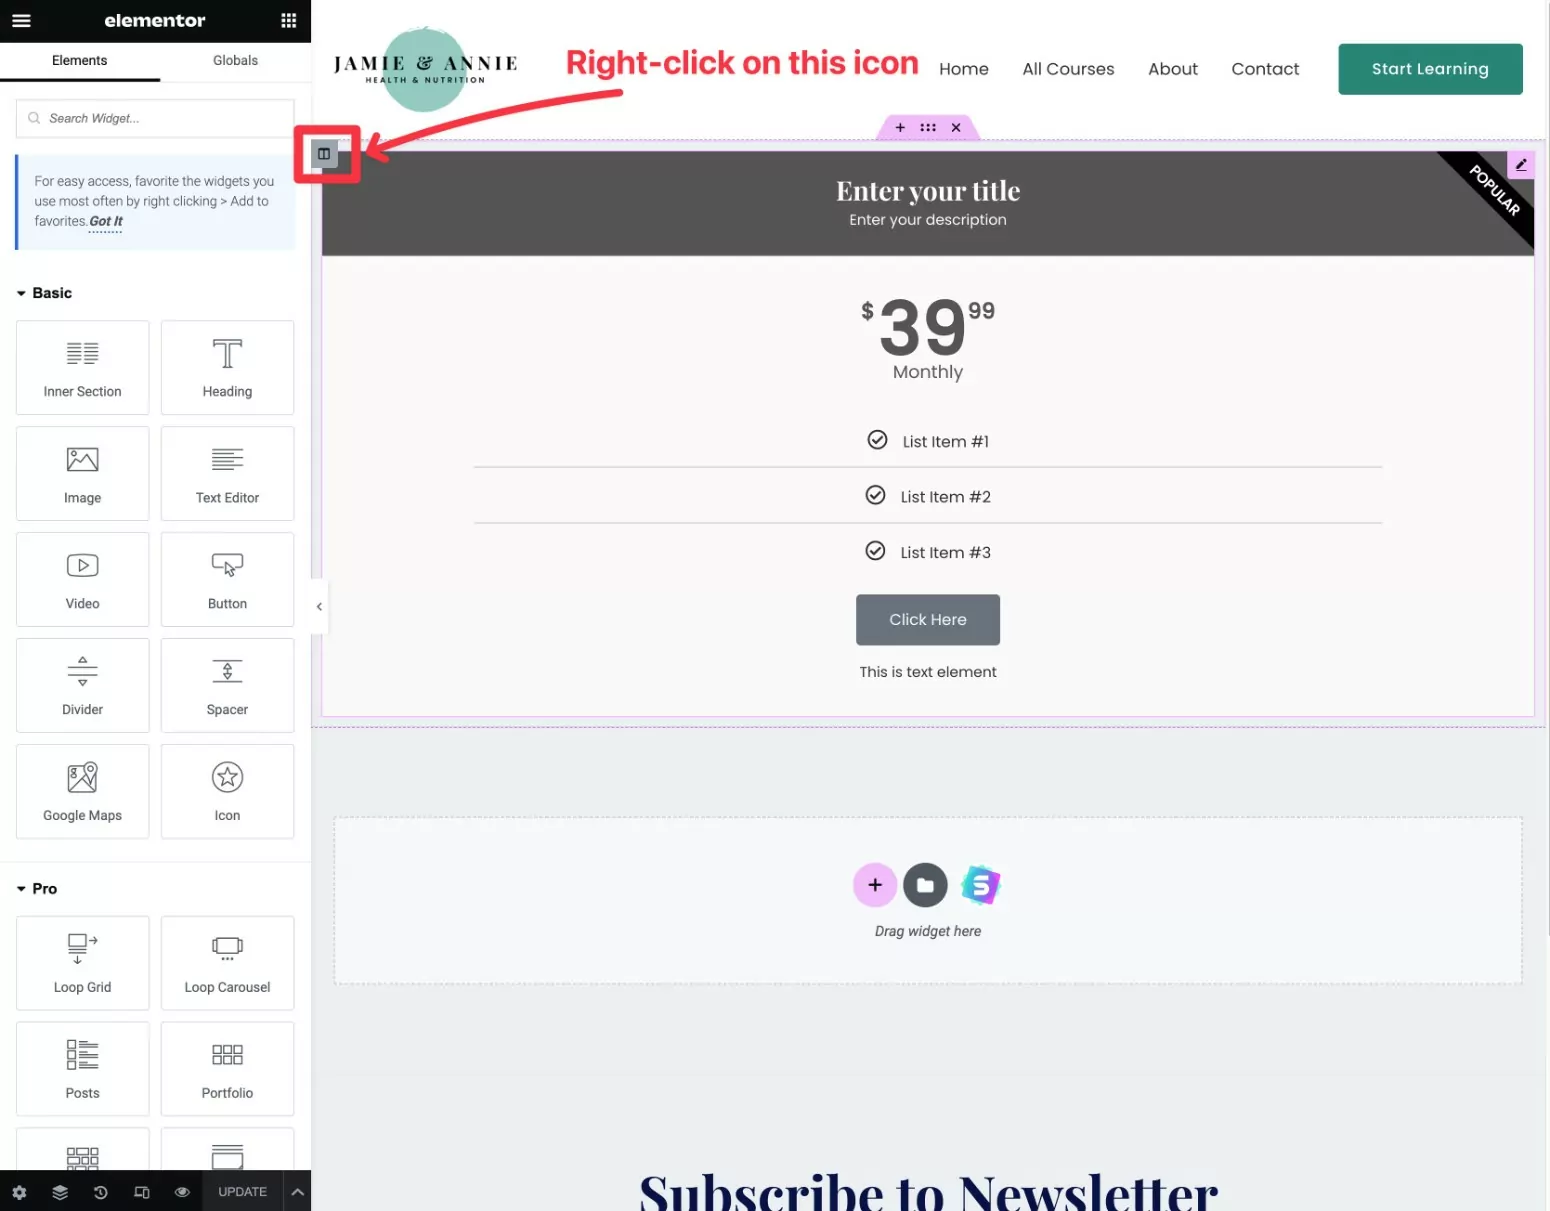
Make sure you right-click on the icon marked in the screenshot above. If you right-click on the widget instead, it will create a new pricing table below the existing one instead of beside it. That’s not a problem, but you’ll need to manually move that widget beside the other one if you do that.
Then, select Duplicate from the drop-down.
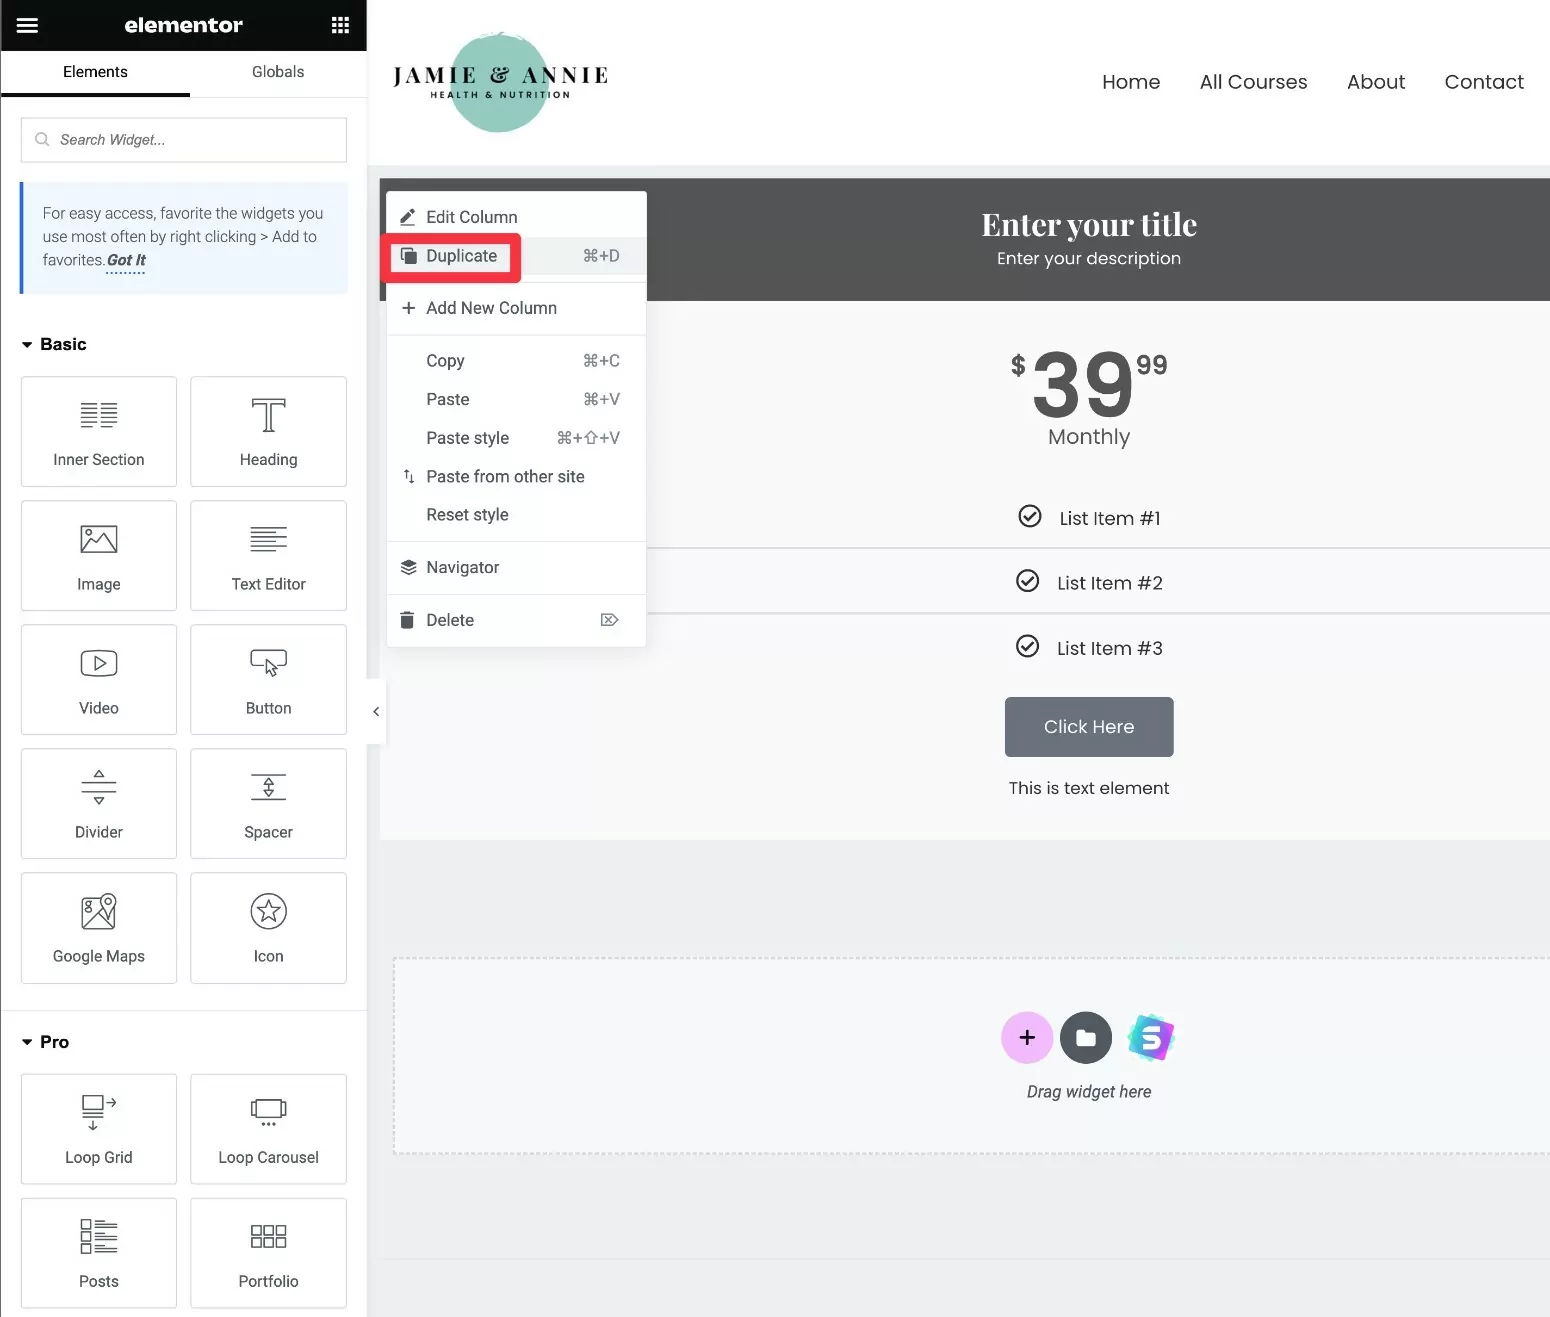
You should see another column appear beside the original one.
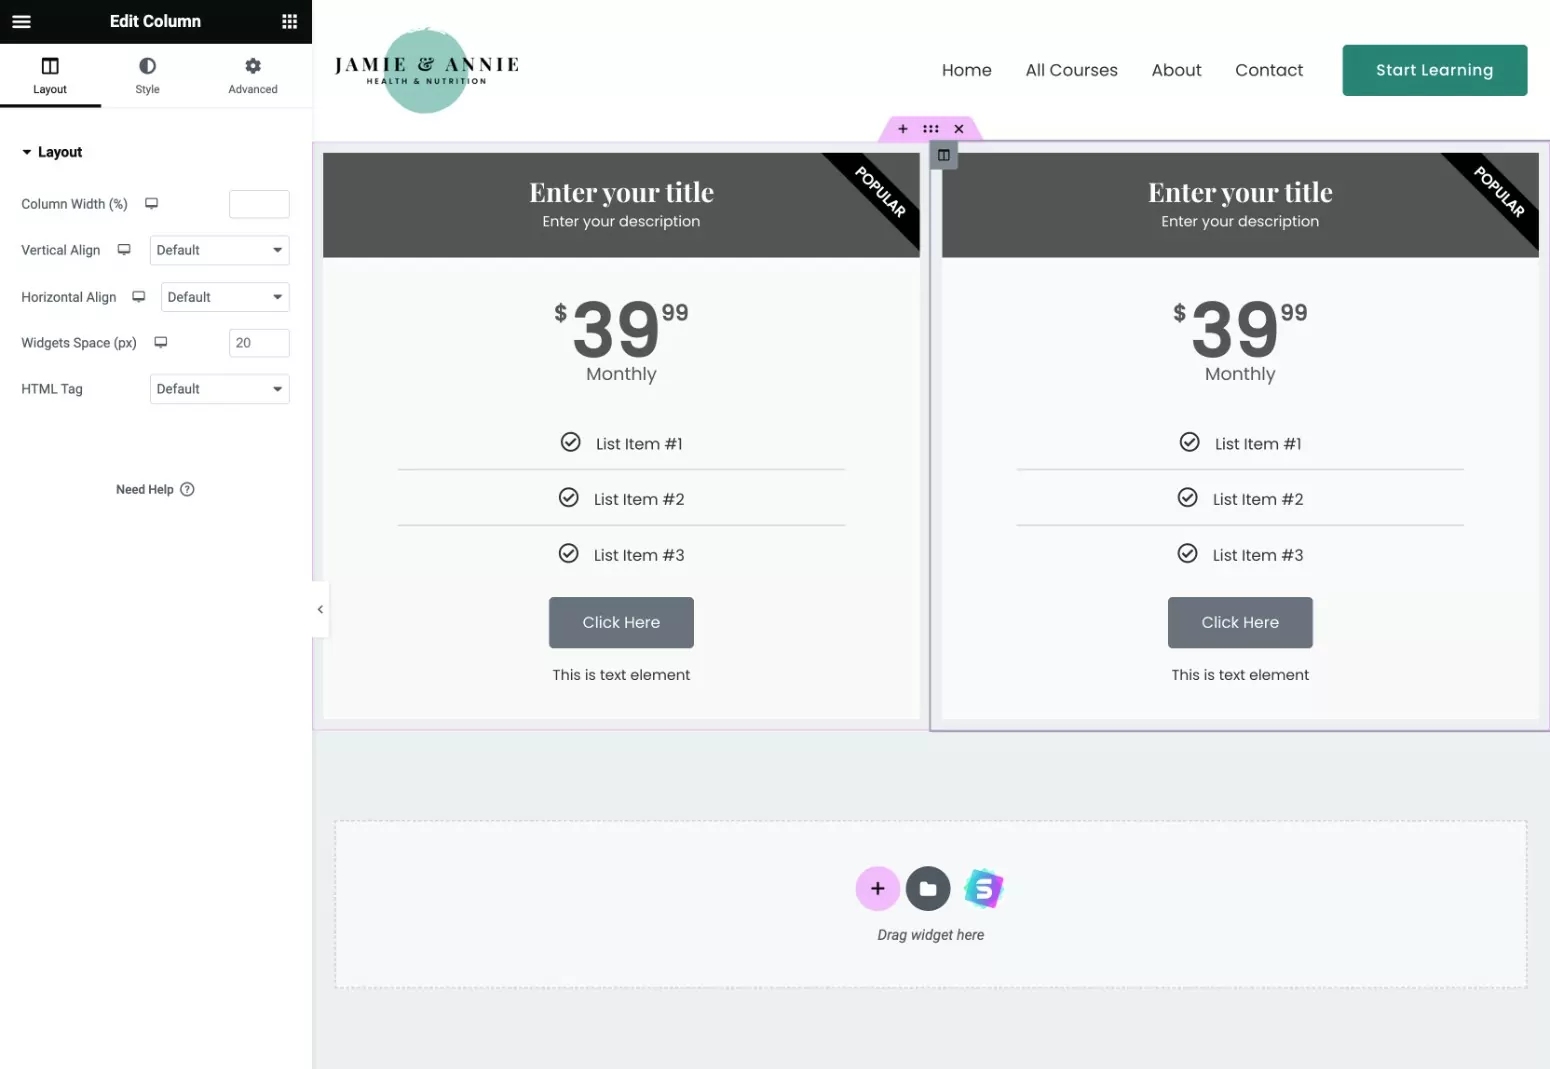
To set up additional pricing table columns, just repeat the same step as many times as needed.
Note – you might find it easier to set up the style of your pricing table before you duplicate the columns. Alternatively, you can also use the copy/paste styles feature to copy styling between different pricing table columns.
3. Set Up the Design and Content of Your Pricing Table
Once you’ve added the widget, you can use Elementor’s settings sidebar to control the content and design of your pricing table.
You can add content using the different sections in the Content tab. For example, this is where you can control the title, feature lists, pricing, CTA button text, and so on.
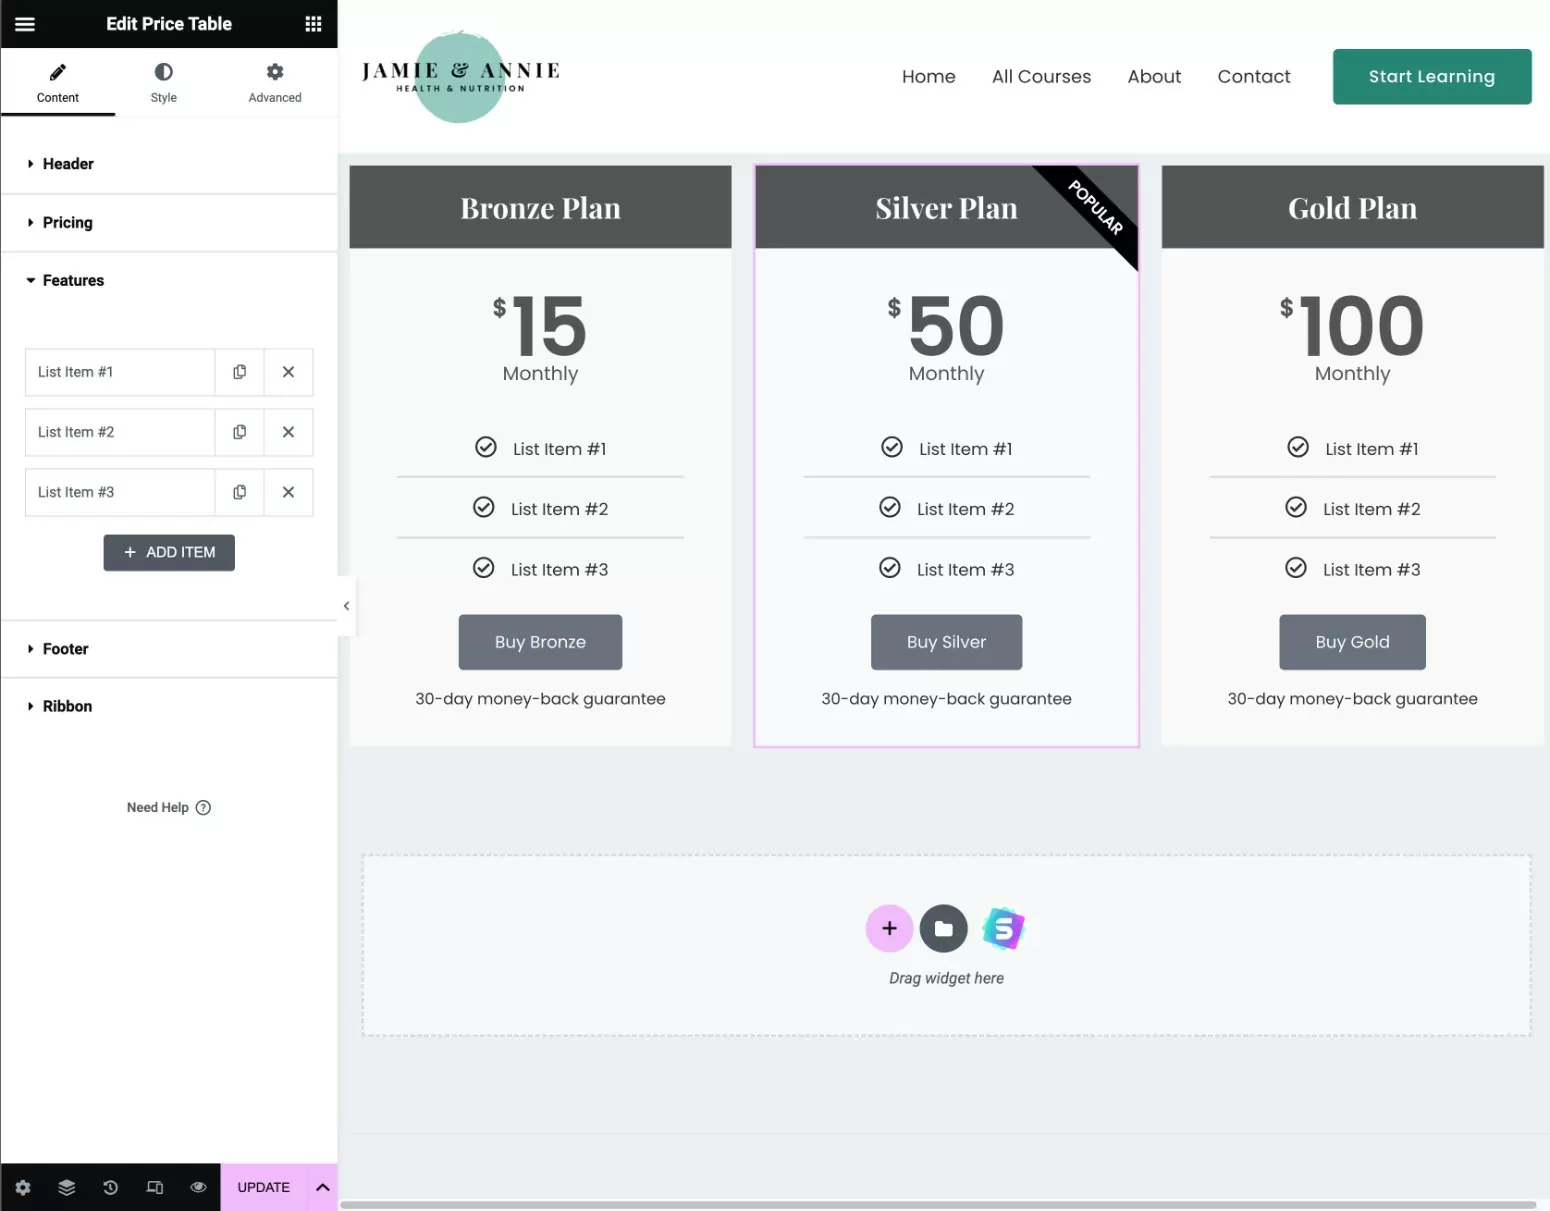
Once you’ve set up the content, you can move to the Style tab to configure the design of each pricing table.
We recommend using an accent color to draw attention to your most popular plan. You can also use the built-in ribbon feature to further draw attention, such as the “Popular” ribbon on the Silver plan in our screenshots.
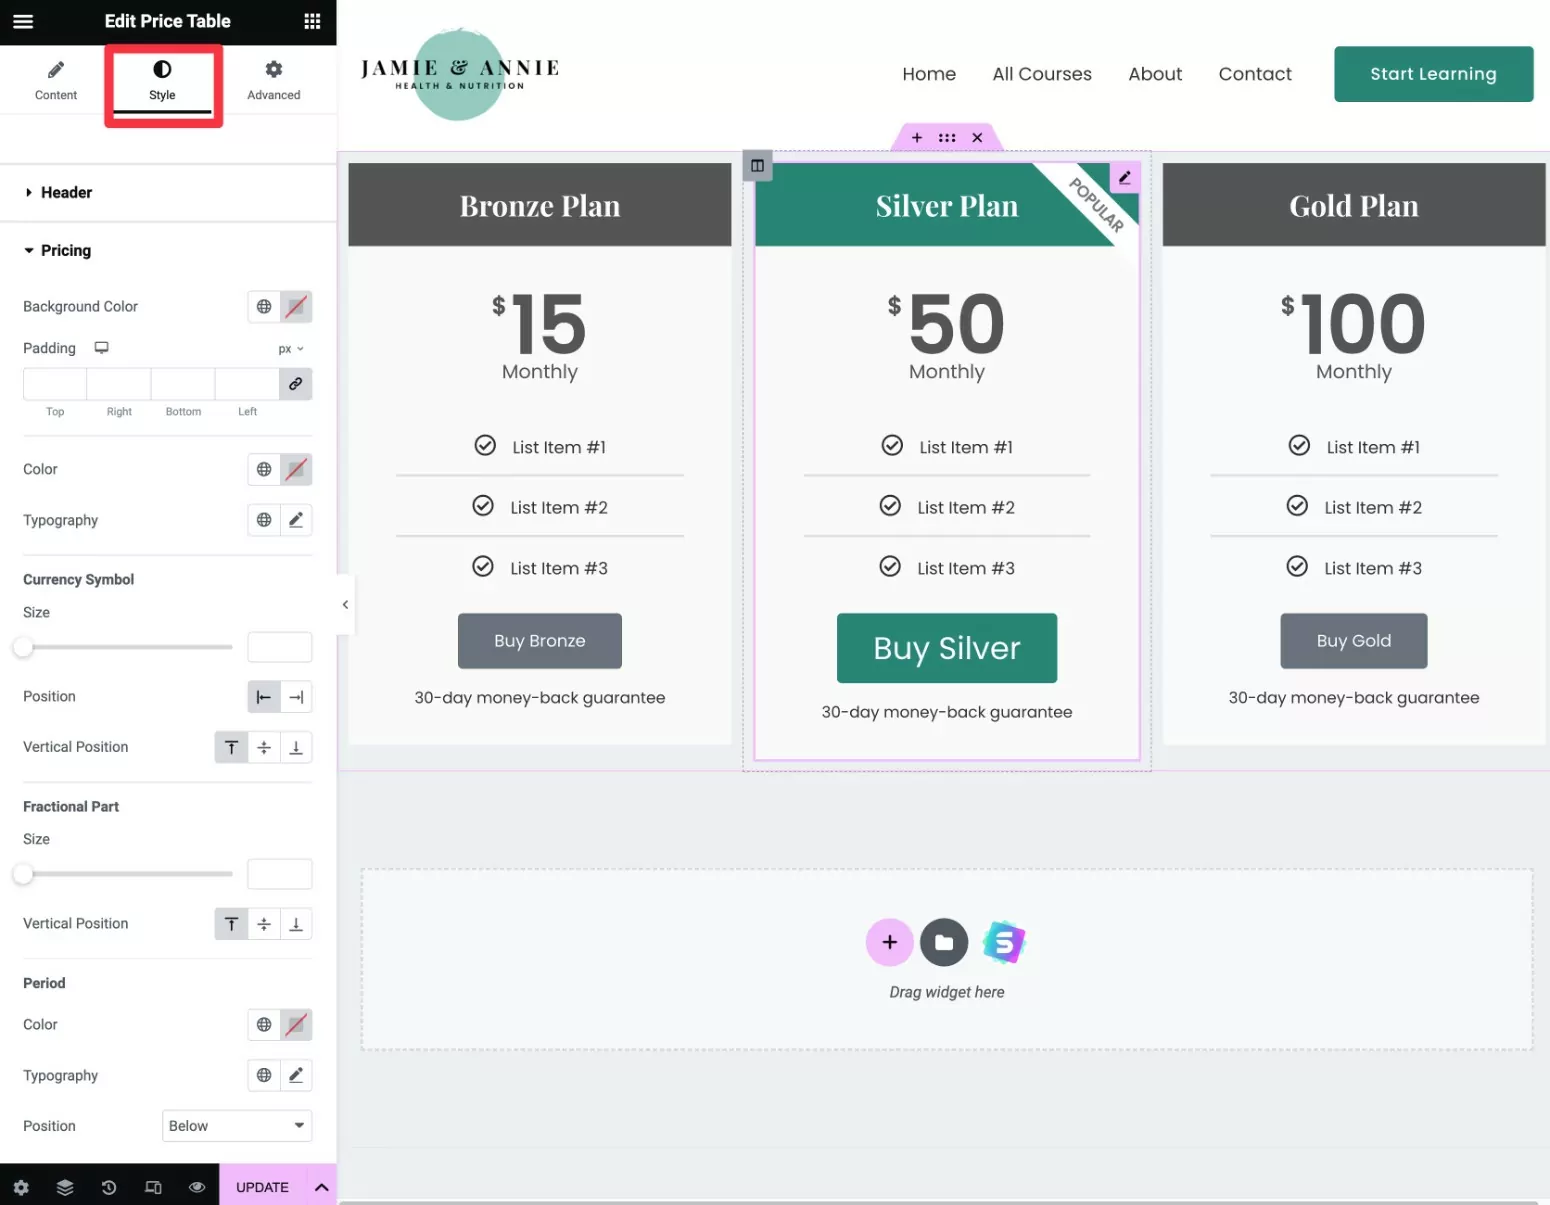
You can also explore the Advanced tab to access additional settings if desired, but you normally don’t need to change anything there.
4. Link Your Pricing Table to Your Membership Plans
Once you’re happy with the content and design of your pricing table, the next step is to link your pricing table CTA buttons to your subscription plans in Paid Member Subscriptions.
To do this, open the settings for one of your Price Table widgets and go to the Footer settings in the Content tab.
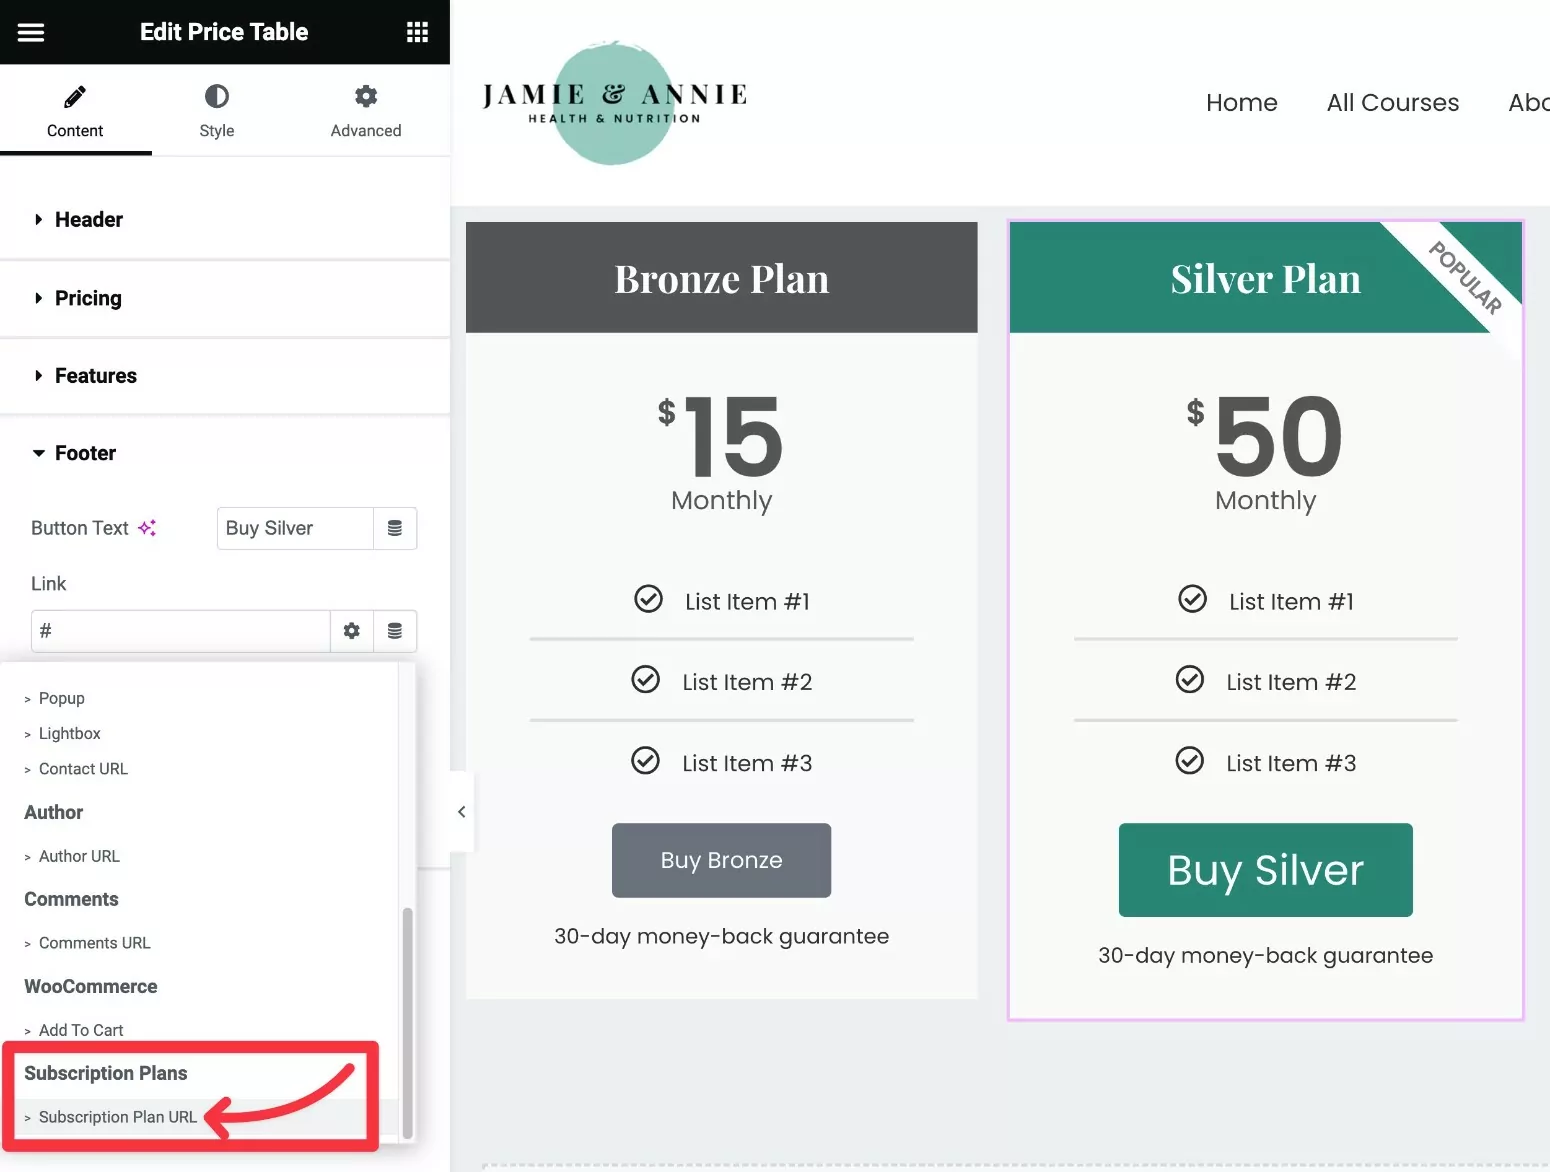
Find the Link section and click the Dynamic Tags icon next to it.
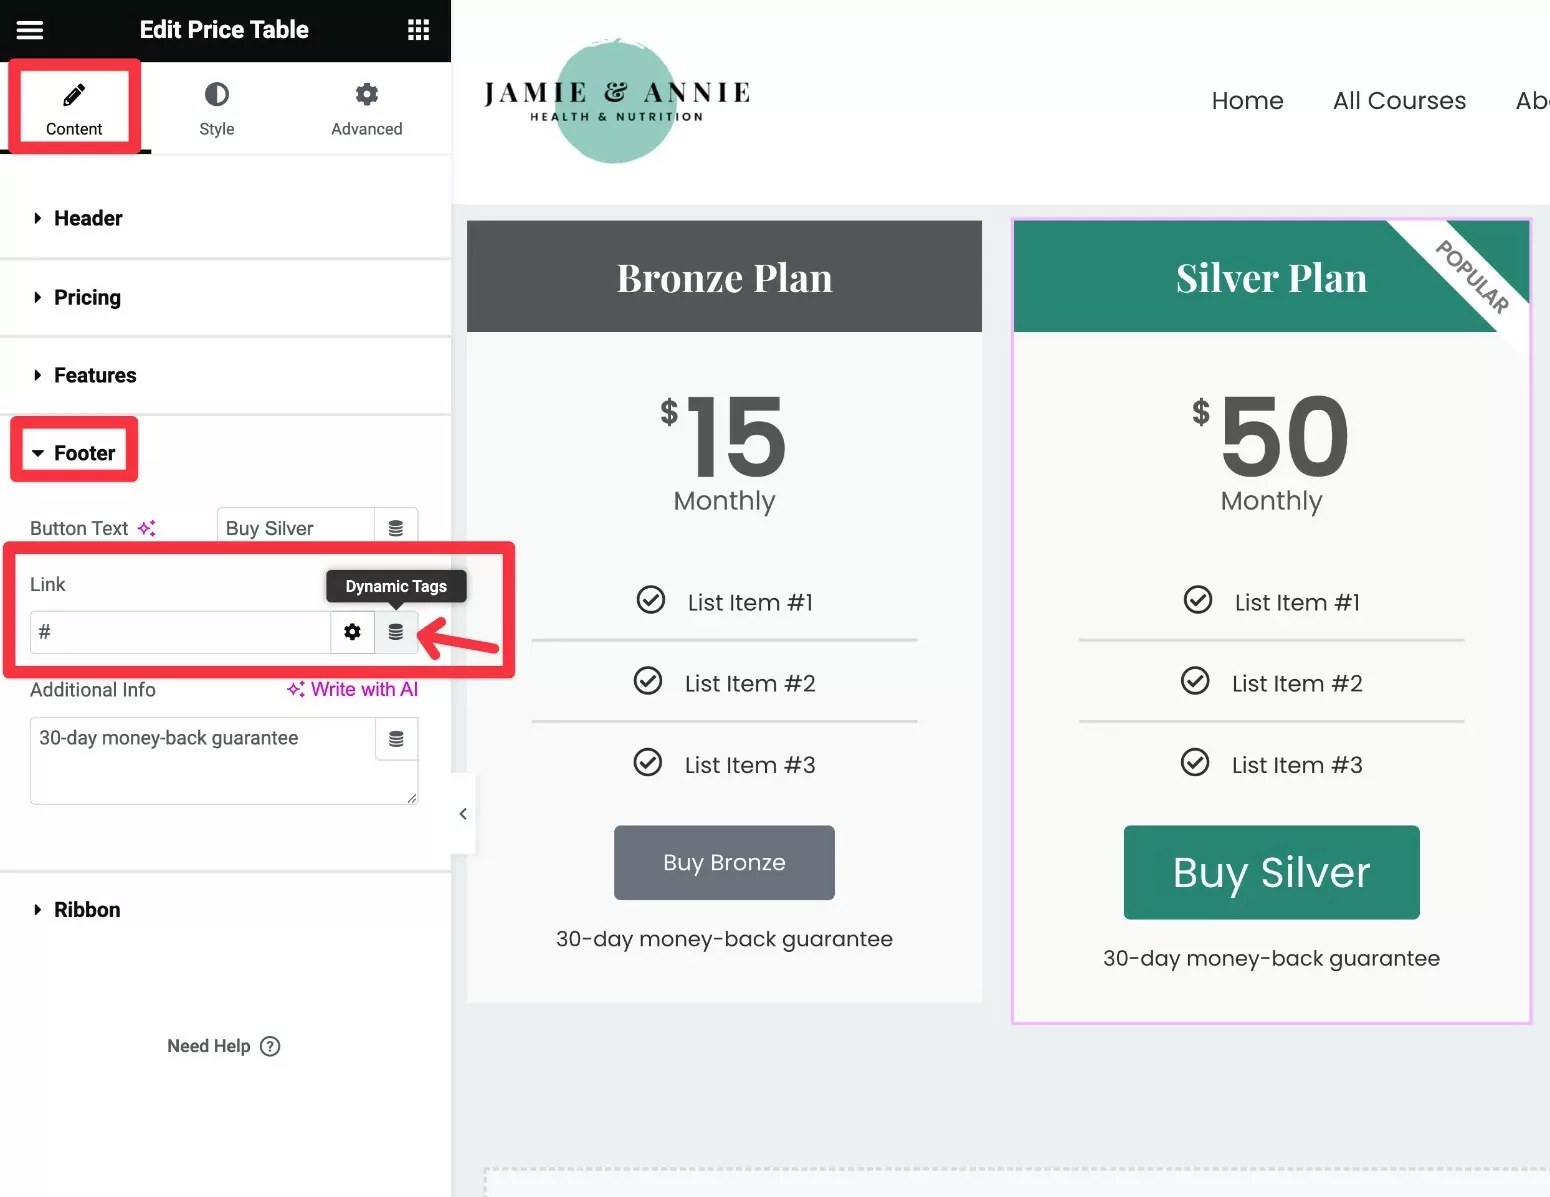
You should see a drop-down appear. Select the Subscription Plan URL option under the Subscription Plans heading.
Then, click the wrench icon next to the Subscription Plan URL text to expand the settings panel.
Use the Subscription Plan drop-down to choose the specific membership plan that you want to link to this pricing table.
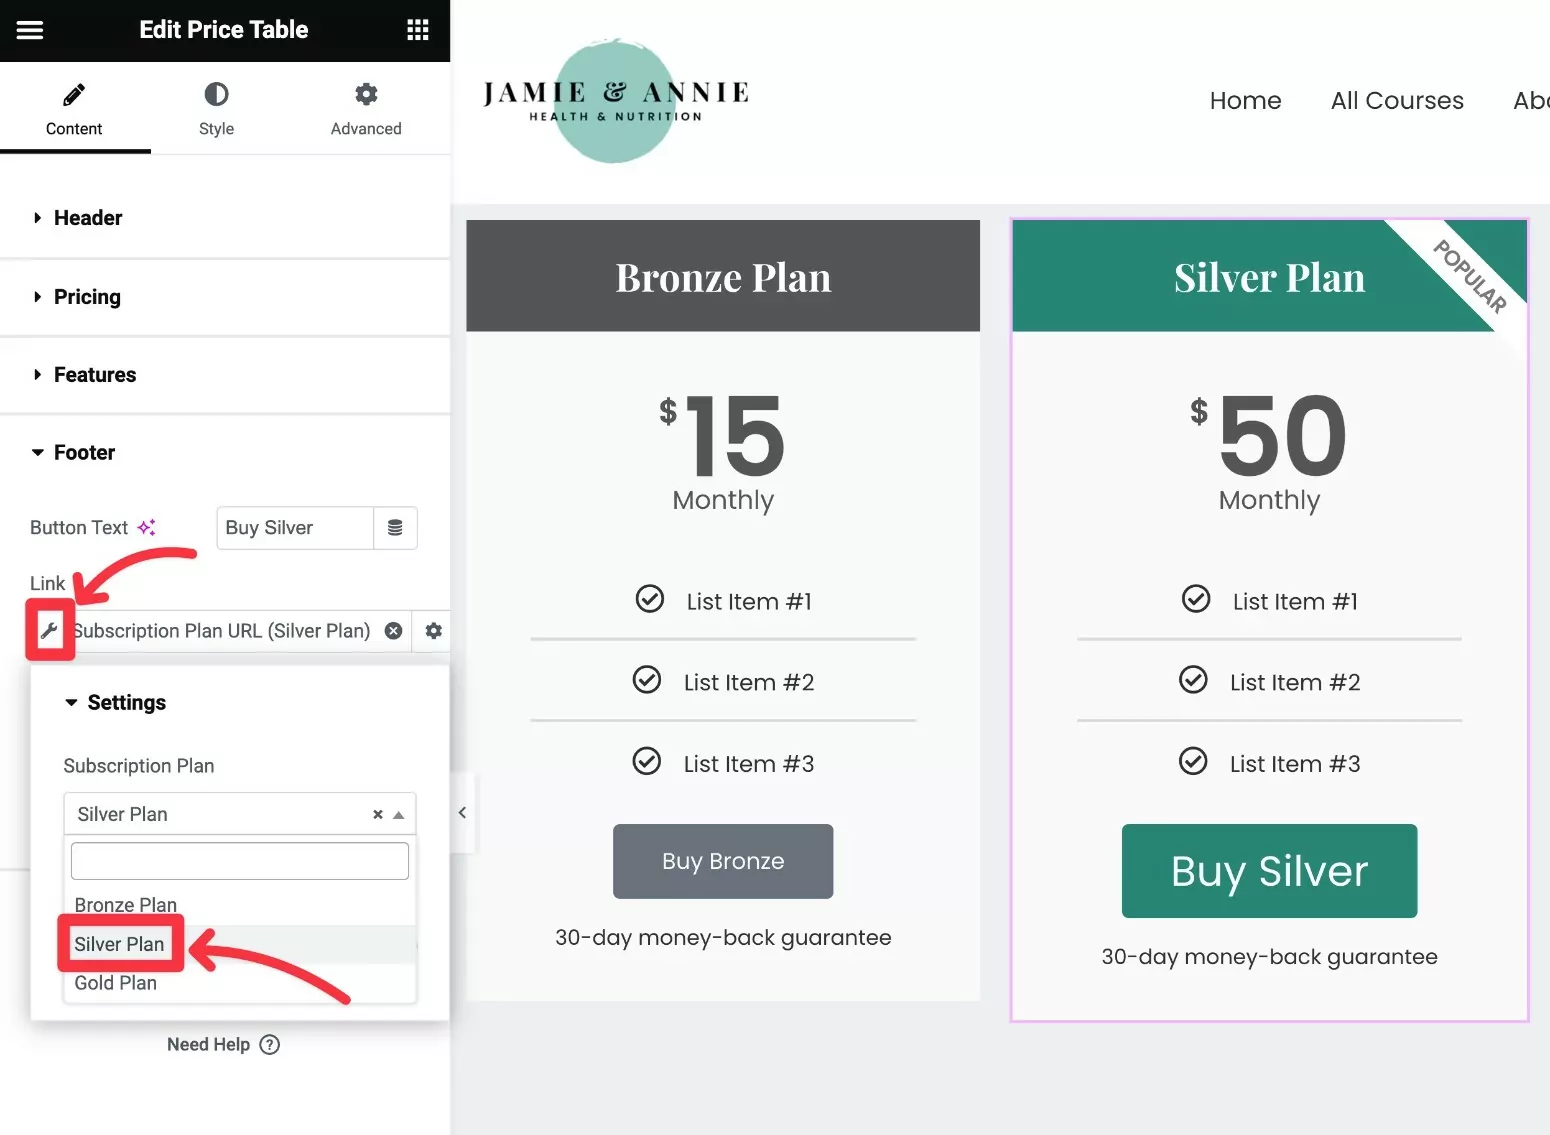
That’s it! Repeat the same steps for all of the other columns in your pricing table, making sure to link each column to the right plan.
5. Test Your Elementor Pricing Table
To finish things out, we recommend testing your Elementor pricing table to make sure that it’s behaving as you expect.
For example, if a user clicks Buy Silver under the Silver Plan…
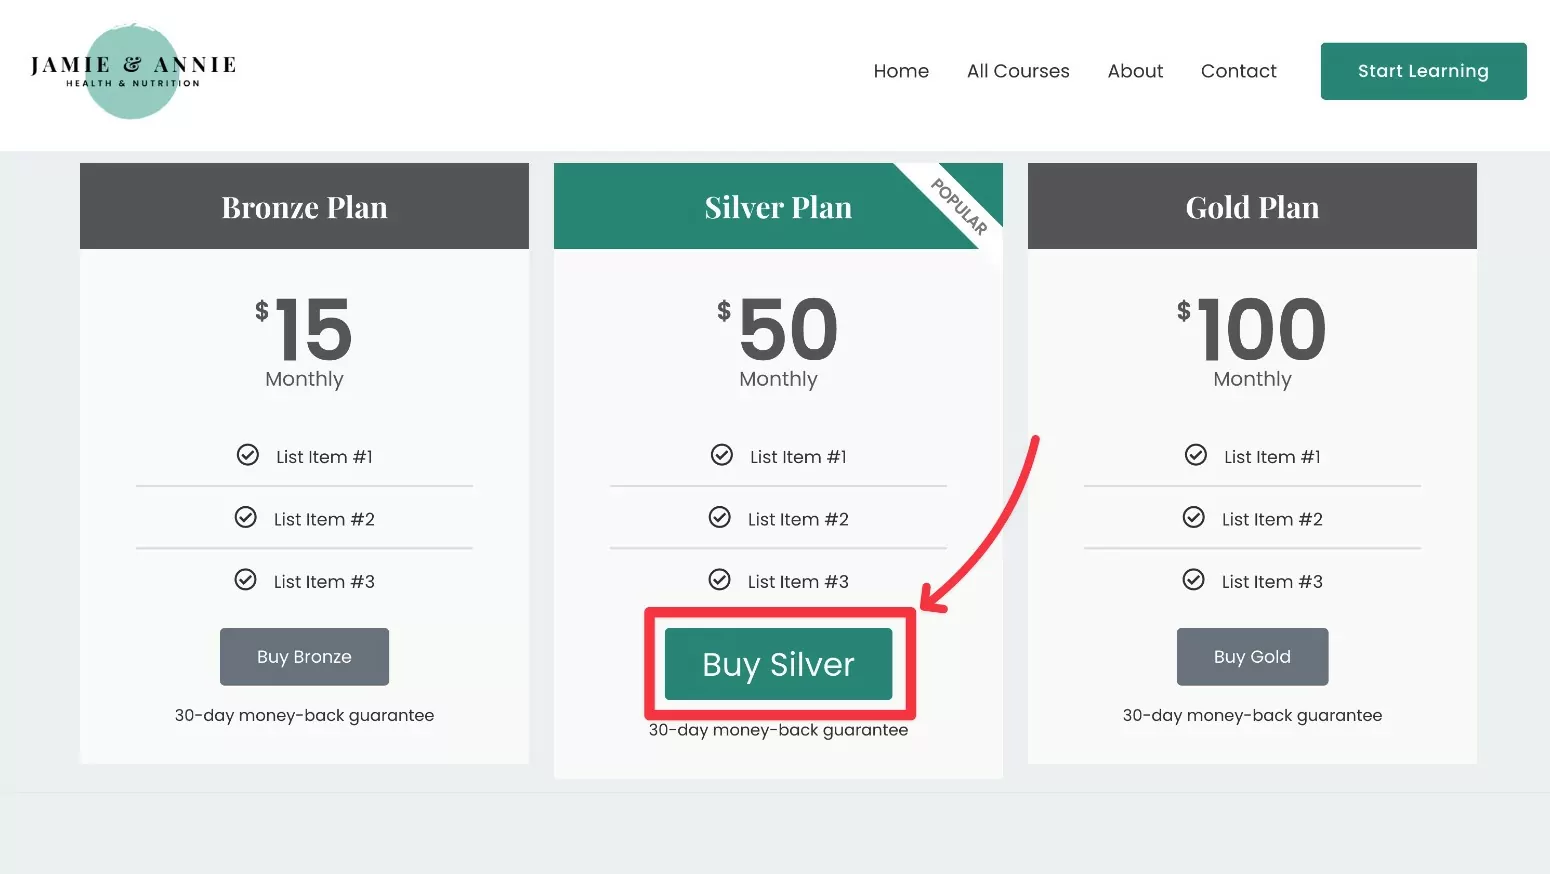
…it should take them straight to the registration/checkout page with the Silver Plan pre-selected.
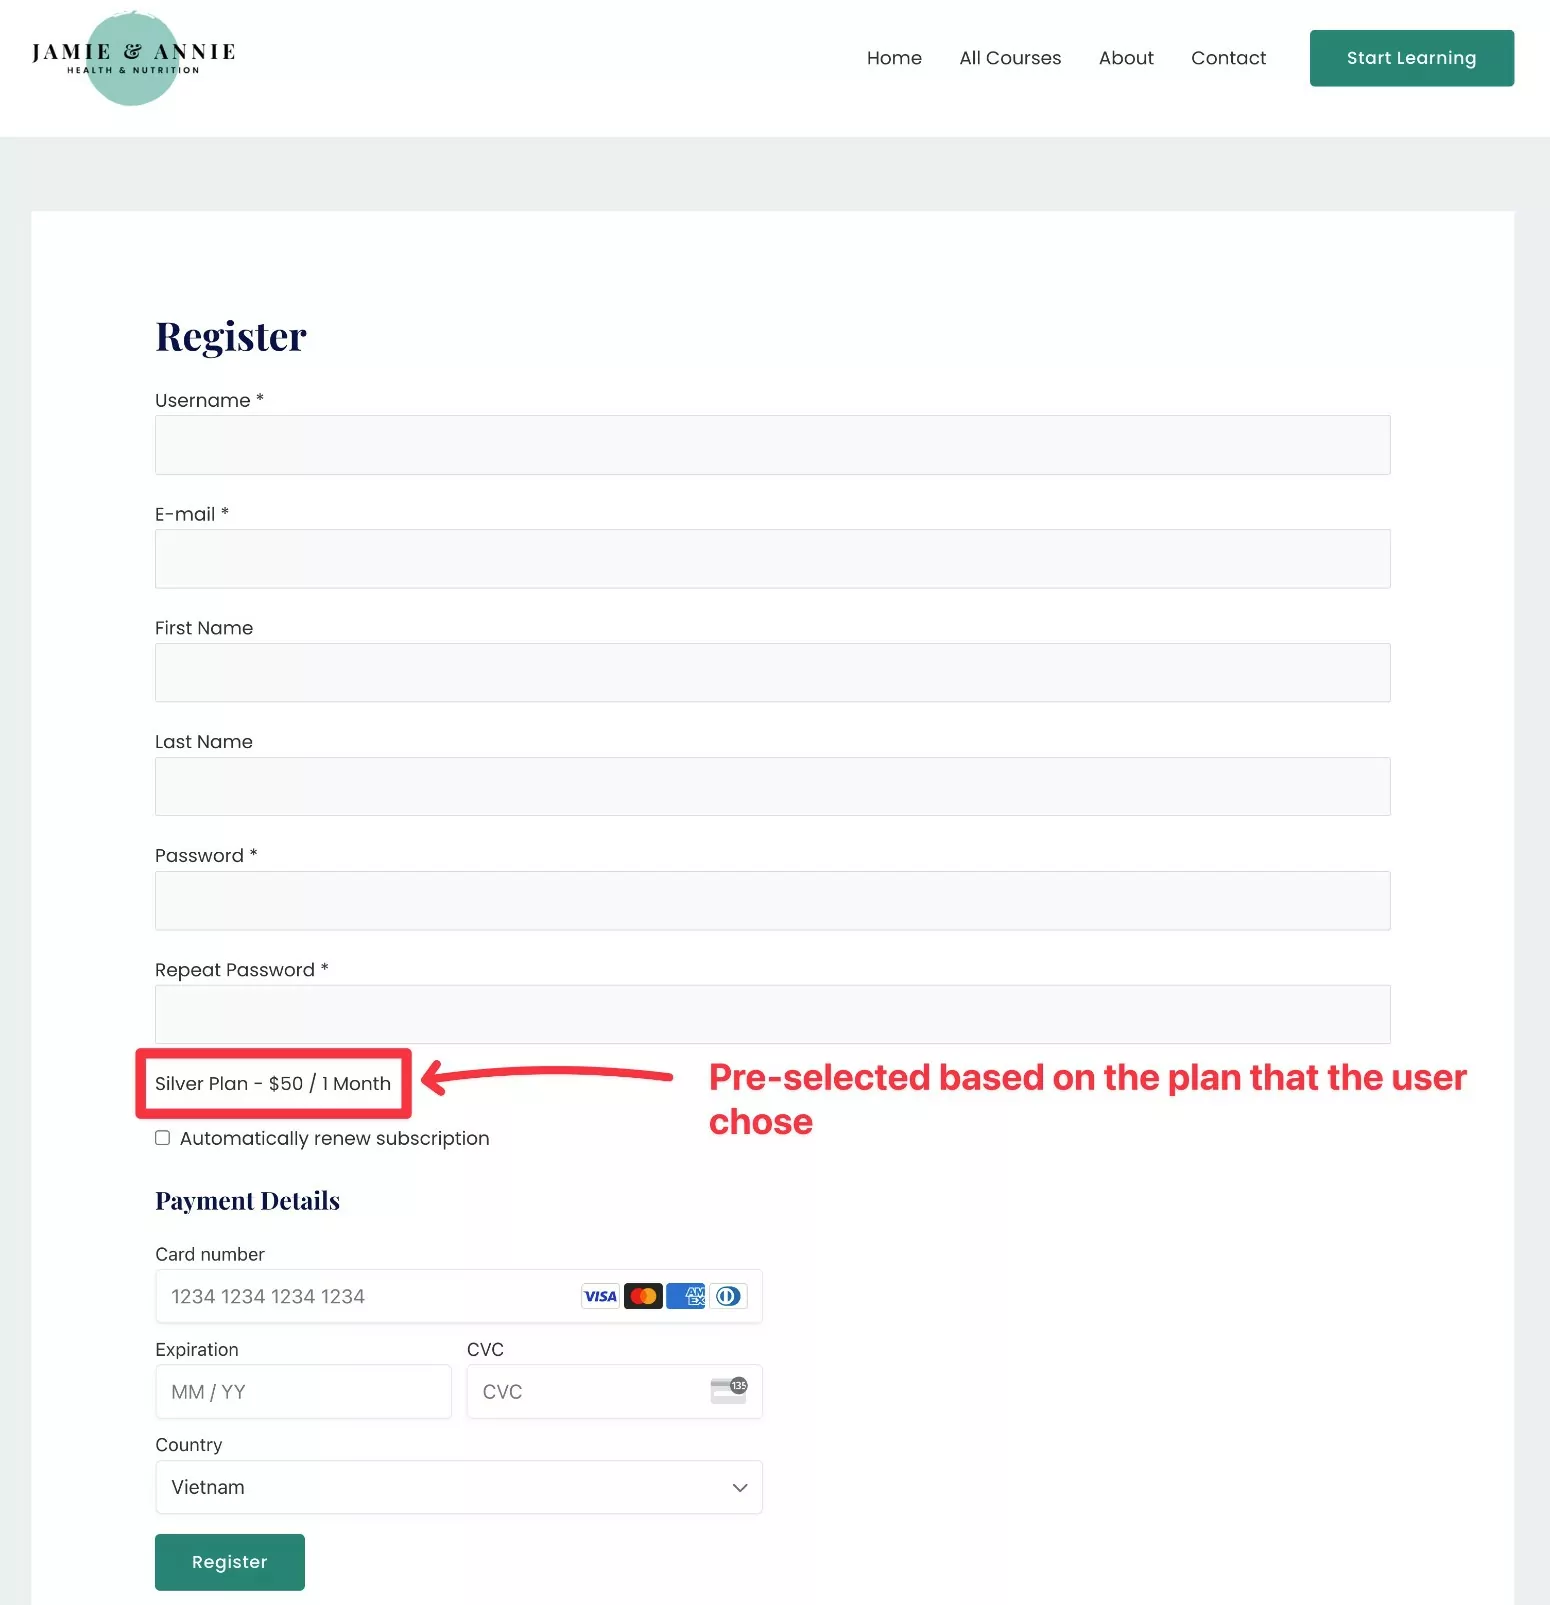
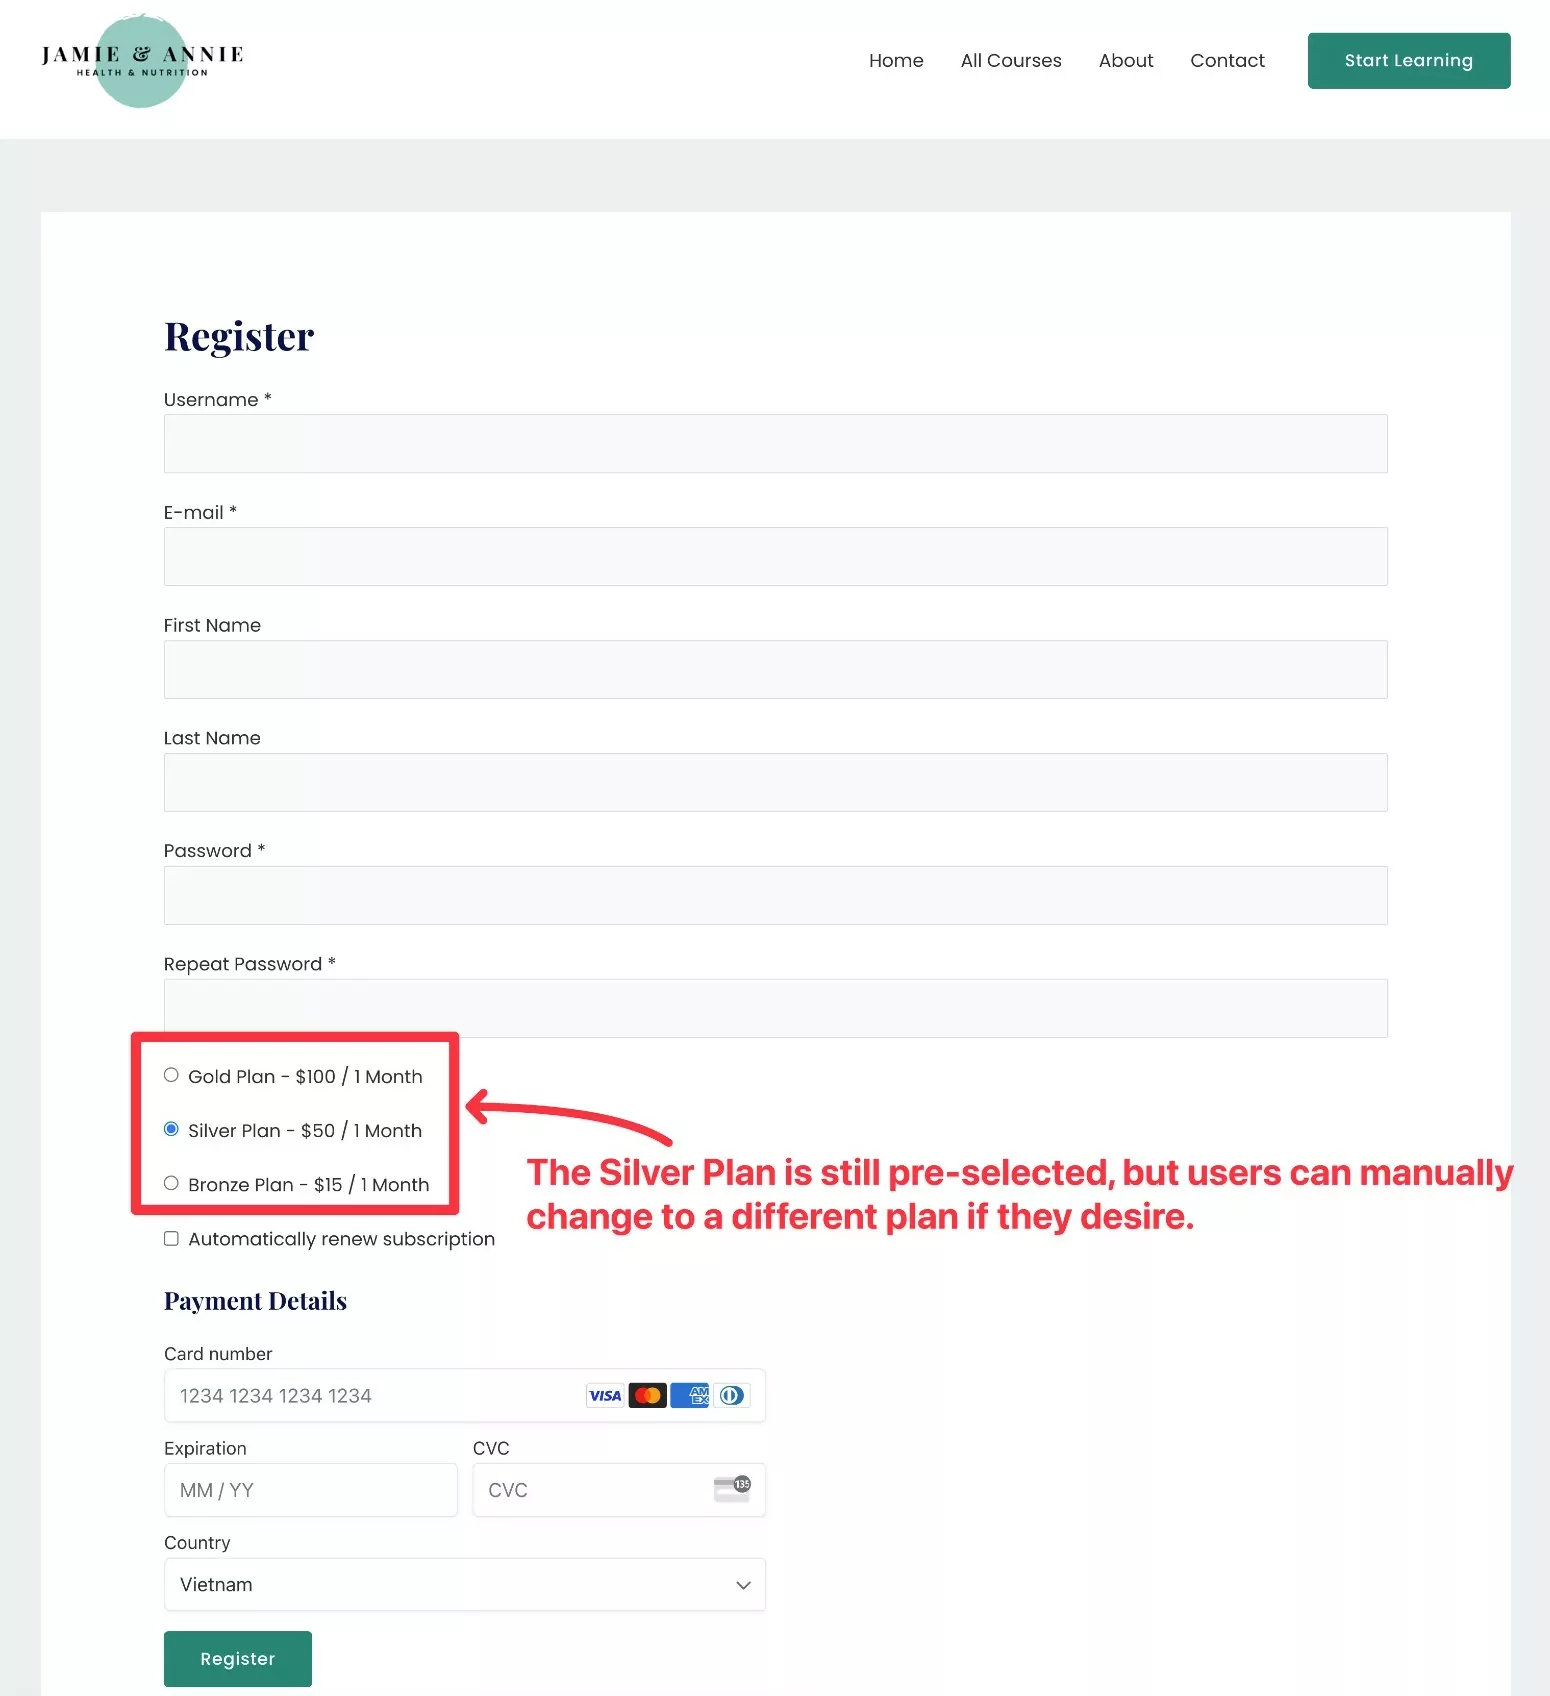
If you want to give users the option to change their plans on the registration page, you can disable the Single Plan toggle in the Elementor settings when you link to the subscription plan.
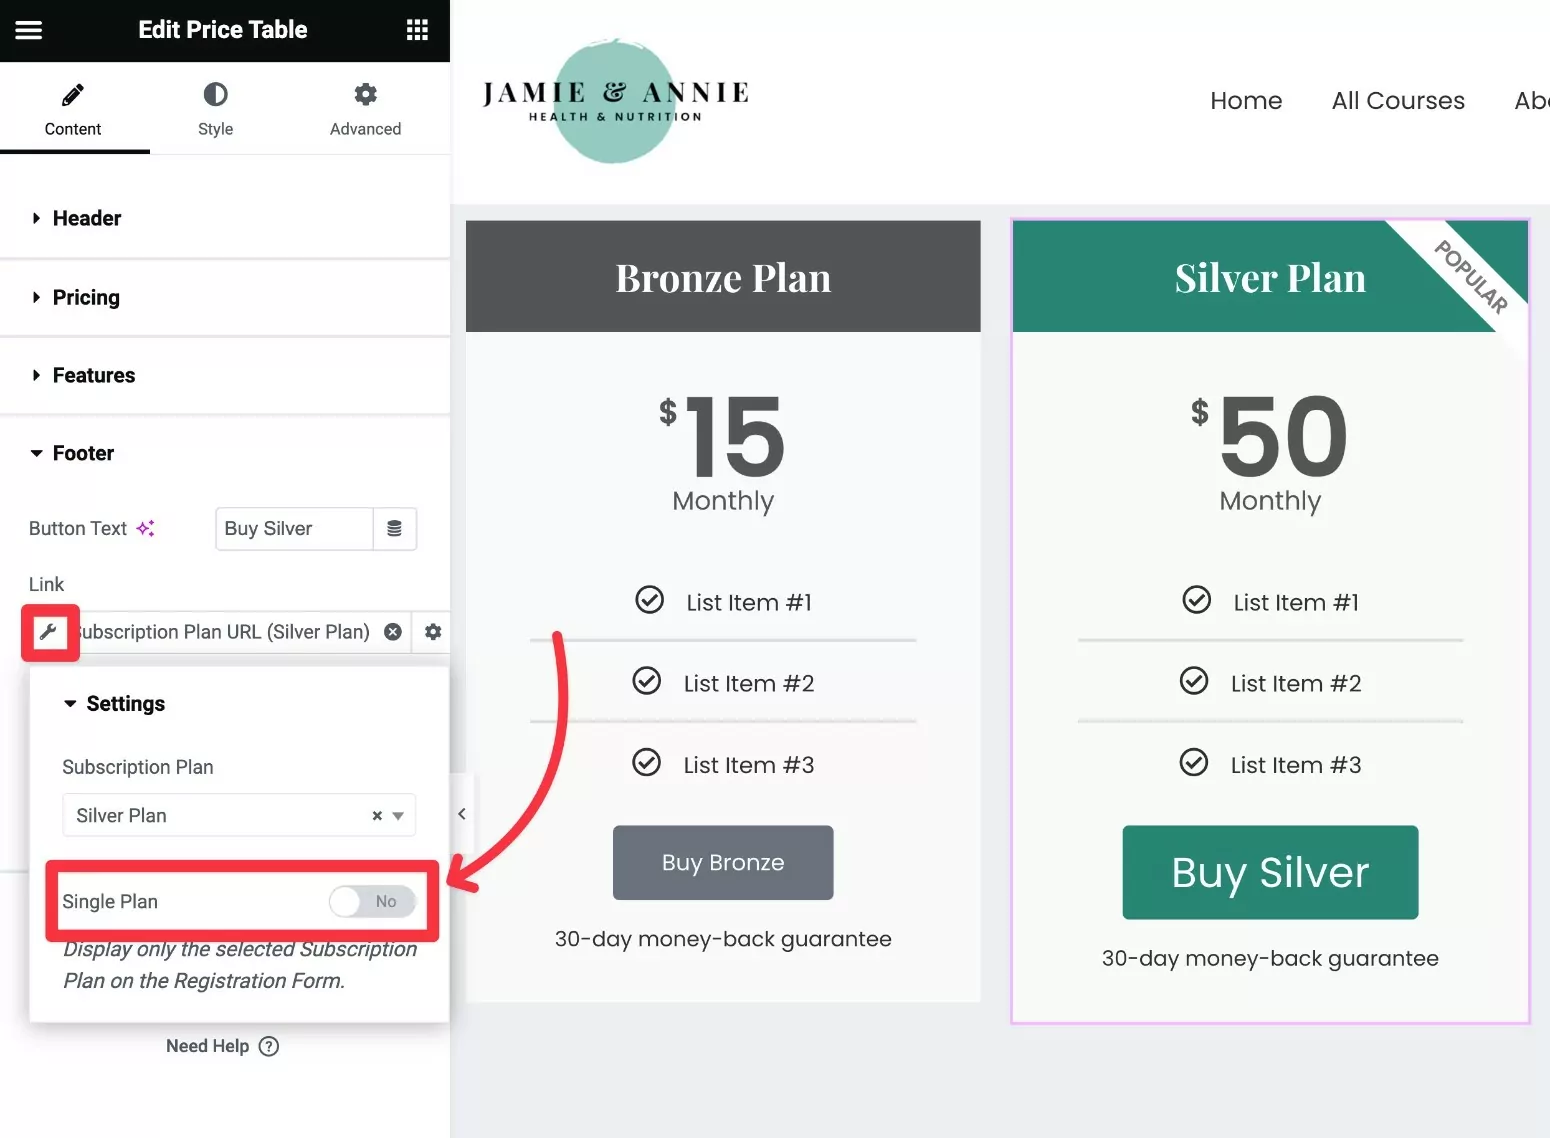
When you disable this toggle, Paid Member Subscriptions will still pre-select the chosen plan on the registration page. However, users can manually change the plan if they desire.
How to Create a Pricing Table for Elementor With Add-Ons
If you don’t have access to Elementor Pro, you can also use a third-party Elementor pricing table template or add-on.
There are tons of quality Elementor add-on plugins, including many that will help you add a pricing table.
The only downside is that you’ll need to manually link to your membership plans instead of being able to dynamically link them like Elementor Pro allows with its Dynamic Tags feature.
Don’t worry, though – it’s still not too complicated to set this up.
We won’t go as in-depth here, but here’s a quick guide on how you might do this…
1. Install a Free Pricing Table Elementor Plugin
While the free version of Elementor doesn’t have its own pricing table widget, you can find lots of free add-ons that do.
Here are some options to start you off…
You can find lots more by searching “Elementor pricing table” at WordPress.org.
We’ll use ElementsKit for this example, but the basic idea will be the same for any plugin. So – if you prefer the design options/style of a different add-on, you’re free to use that one instead.
2. Create Your Pricing Table
Next, use the pricing table Elementor widget in your chosen plugin to create the content and design of your pricing table.
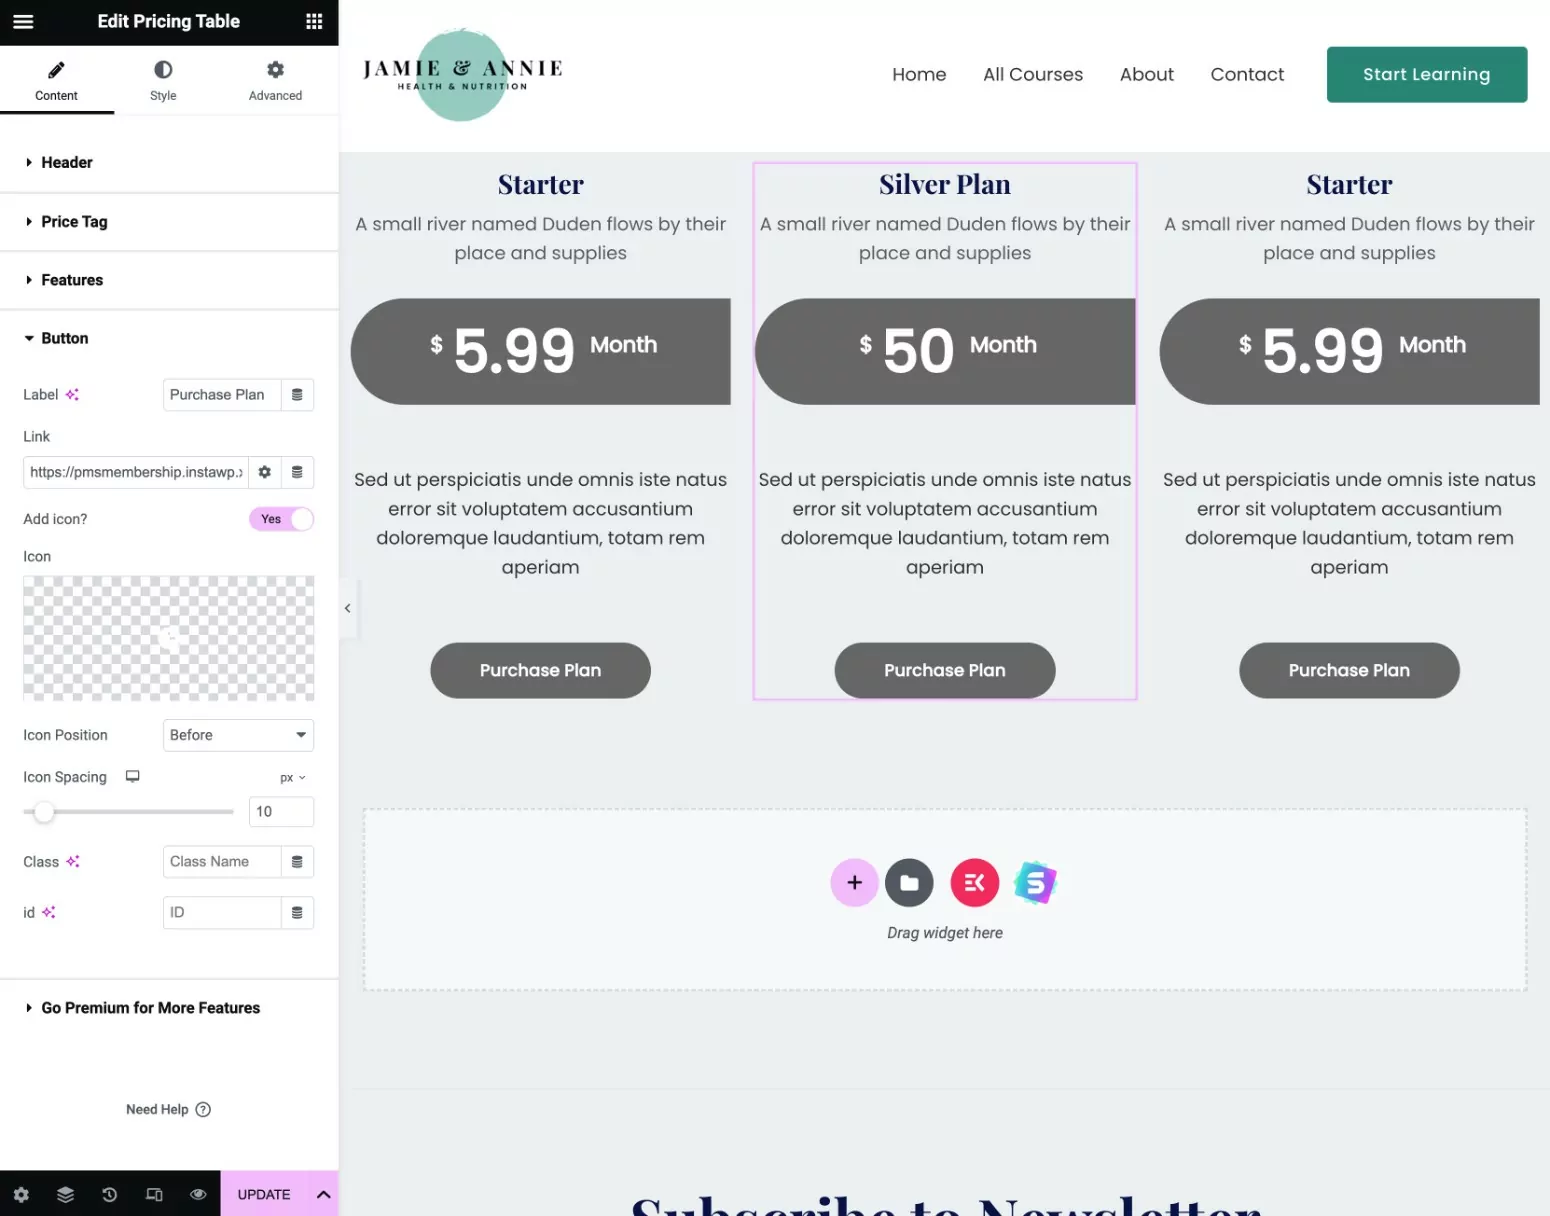
Here’s what it might look like with the ElementsKit Pricing Table widget:
3. Manually Link Pricing Table to Subscription Plans
If you don’t have Elementor Pro, you can’t access the Dynamic Tags feature to automatically link to your subscription plans.
However, you can still manually link your pricing table CTAs to the relevant subscription plan.
Here’s how to manually create a direct link…
First, you need to find the ID of your subscription plan:
- Go to Paid Member Subscriptions → Subscription Plans and edit the subscription plan for which you want to find the ID.
- Look at the URL of the subscription plan edit page.
- Find the number after post=[number] in the URL. This is your subscription plan ID.
For example, if the URL of the edit screen is like this:
https://yoursite.com/wp-admin/post.php?post=24481&action=edit
Then the membership plan ID is 24481.
Then, add the plan ID to this URL structure (making sure to also replace the example domain name with your real domain name).
https://yoursite.com/register/?subscription_plan=[ID_NUMBER]
For example, if the membership plan ID is 24481, the correct URL would be as follows:
https://yoursite.com/register/?subscription_plan=24481
Once you have the direct link to your subscription plan, manually insert that link into the button of whatever pricing table widget you’re using:
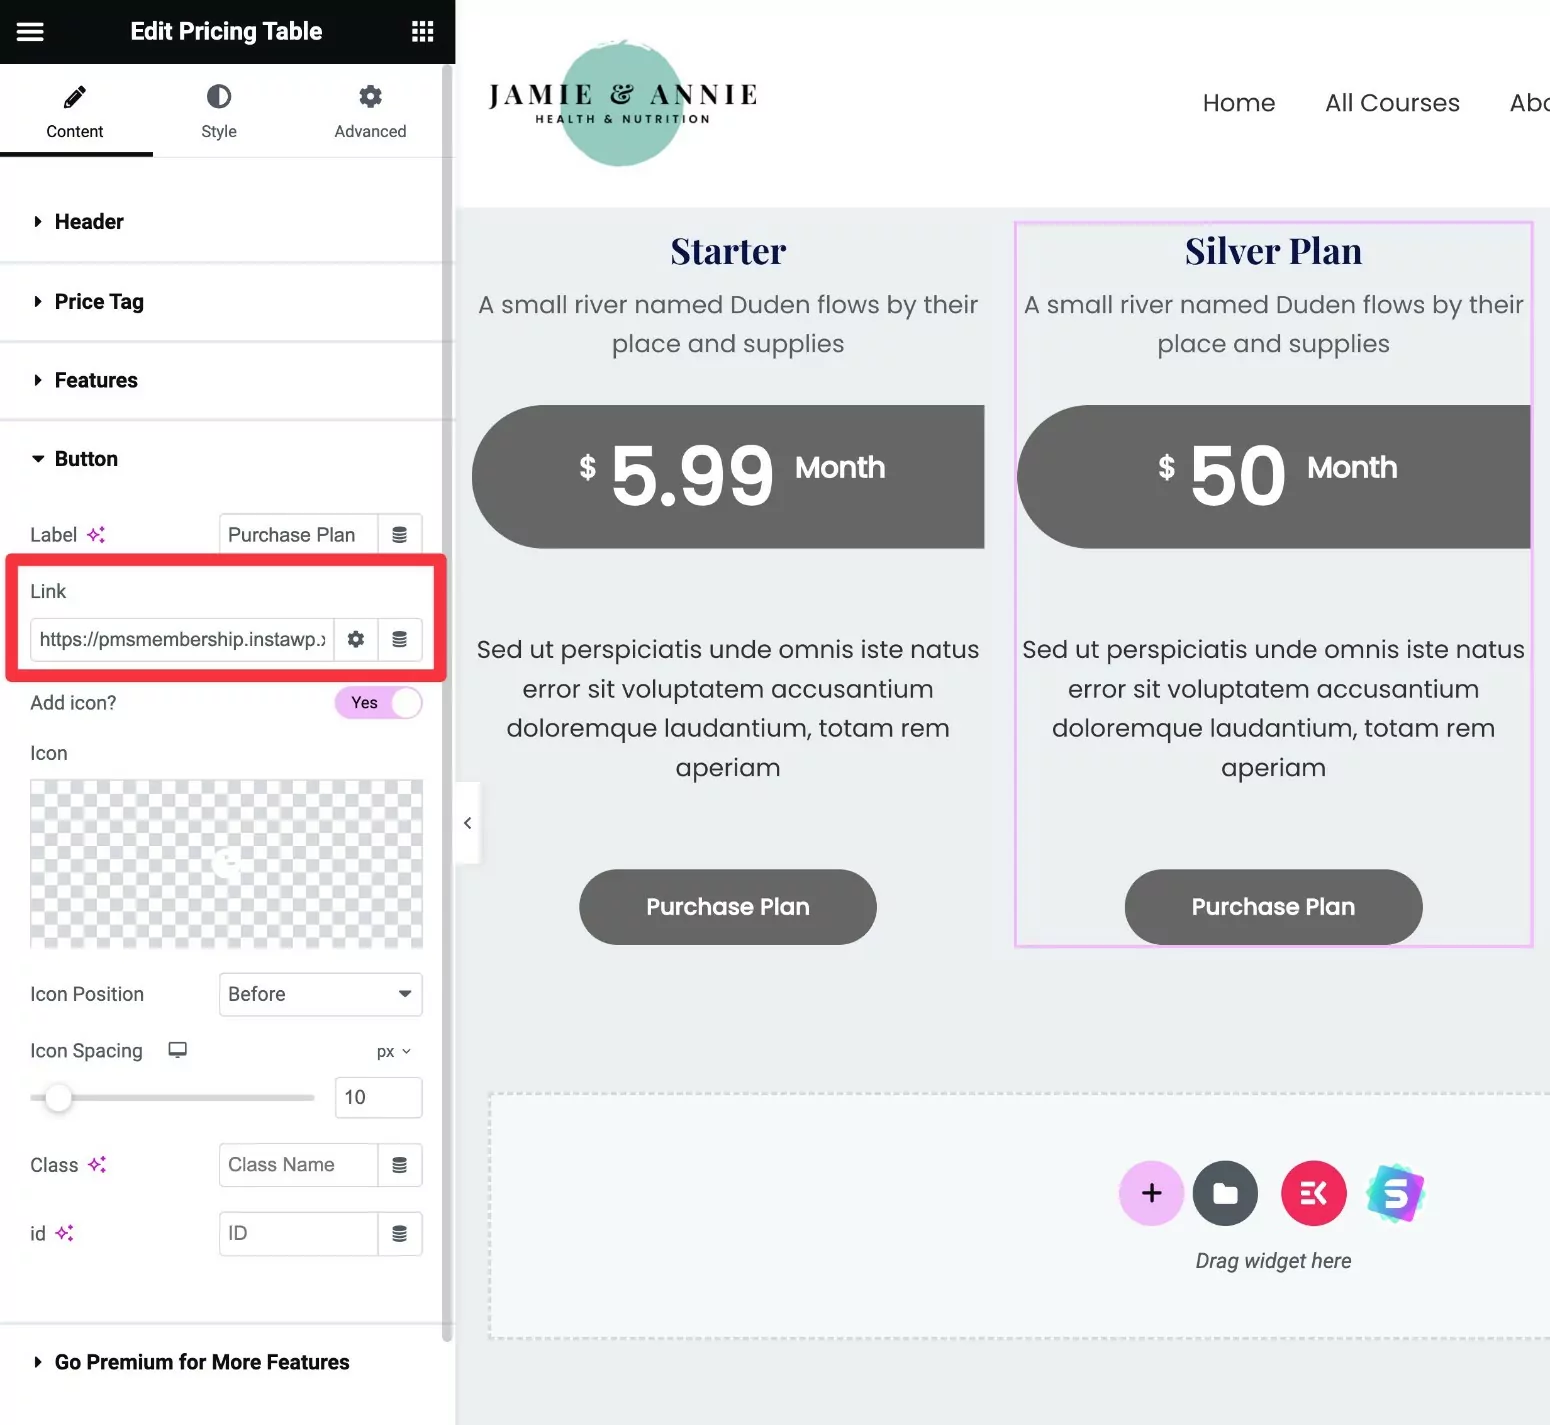
Repeat the process for other subscription plans.
Create Your Elementor Pricing Table Today
That wraps up our guide on how to use Elementor Pro and Paid Member Subscriptions to create a pricing table for your membership website.
Or, if you’re ok with manually inserting links, you can also use a third-party pricing table Elementor add-on with the free version of Elementor.
The great thing about Paid Membership Subscriptions is that it integrates with Elementor in more ways than just pricing tables.
You can also use your membership plans to restrict access to certain Elementor sections, columns, and widgets (as well as other content on your site), customize your registration and login pages, and more.
We have a whole guide on how to create an Elementor membership website with Paid Member Subscriptions.
If you’re ready to get started, install Paid Member Subscriptions today.
Subscribe to get early access
to new plugins, discounts and brief updates about what’s new with Cozmoslabs!
Source: https://www.cozmoslabs.com/1638784-elementor-pricing-table-for-subscription-plans/
