One of the biggest advantages of using WooCommerce for building and operating an online store is the flexibility it offers. Its huge collection of plugins ensures that store owners can add every type of specific functionality they need without knowing how to code or even being very technically savvy for that matter.
We will be discussing one such functionality in this post, which is how to disable the cart and/or checkout on your WooCommerce store. To simplify, we will be discussing 3 different functionalities here.
- Disabling the cart page;
- Disabling the checkout page;
- Disabling both the cart and the checkout page.
But before we get into the technical stuff, let us take a quick look at some of the common reasons store owners add these functionalities to their stores.
Reasons for Disabling Cart and Checkout in WooCommerce
The reasons for disabling the cart and the reasons for disabling checkout often tend to be very different. So again, let us discuss them separately.
Why Do Some Store Owners Disable the Cart?
Disabling the cart can be a sound strategic decision for many stores. One prime example is stores selling a single product.
If you’re selling just one product on your store, it doesn’t make sense to have a cart page on your store. It just adds one extra step to the checkout process.
And as we all know, every extra step is a hindrance to your conversion rate. To be specific, the statistics reveal that up to 80% of all carts are abandoned during online shopping, and extra steps during checkout or a complicated checkout process are definitely prime contributors to it.
The same goes for stores selling products that are very different or unrelated to one another. Say for example a small marketplace that doesn’t allow more than one product to operate in every category to avoid competition for their merchants.
For these stores or marketplace-based stores, eliminating the cart page would improve the conversion rate. This is because if the products are completely unrelated to one another, it’s very unlikely that the customer would be interested in adding multiple products to their cart.
What are the Reasons for Disabling the Checkout?
While disabling the cart is understandable in some cases, disabling the checkout might sound a bit ridiculous to do as a store owner, especially to those who aren’t aware of all the nitty-gritty that goes into running a store.
First things first, seasonal stores might not want to sell or operate once their preferred season is over. So, they might want to disable the checkout after the season until the next year when their season returns.
Second, there are also cases where a large store is asked to temporarily stop its operations by regulators for an investigation or other reasons. In those cases, the store owners would have no option but to simply comply with the regulatory agencies, and disabling the checkout functionality would be the best way to do it.
There are also store owners who create a store-like website just to display their product catalog. They want their customers to directly talk to them for placing orders, and not allow it online.
Similarly, store owners wanting to disable the checkout functionality for maintenance reasons is also pretty common.
Finally, some store owners also want to run a private WooCommerce store. For that, they need to disable the checkout functionality for their general visitors while using a tool to help them create and run a private store.
But there’s a better way to build a private WooCommerce store. More on that towards the end of this post.
How to Disable the Cart Page in WooCommerce?
As explained above, disabling the cart page and disabling the checkout functionality are two different tasks. So they will need different solutions, too.
Let us first discuss how to disable the cart page on your store. Now, there are two different ways of doing it.
First, you can modify the code to remove the cart functionality on your store. Of course, most store owners would struggle to disable the cart this way.
Using a Plugin to Disable the Cart Functionality
And that brings us to the second method, which is simply using a plugin. The beauty of WooCommerce is that there’s a plugin available for pretty much everything you need, so why not use it in this case?
Well, there’s a plugin out there designed to do just that. Just go to Plugins → Add New Plugin and search for “Disable cart page for WooCommerce” using the search bar.
Then install and activate the Disable cart page for WooCommerce plugin.
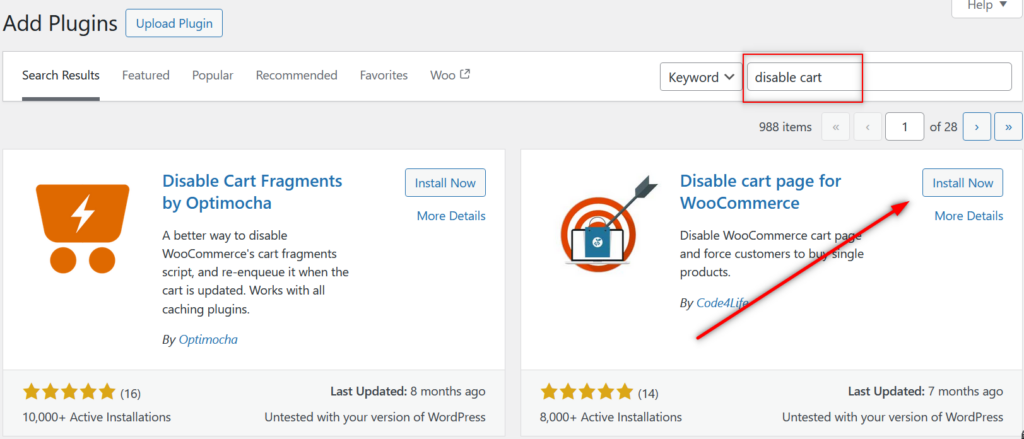
Once installed and activated, you will find it under WooCommerce → Settings → Disable cart page. All you need to do is check the ‘Disable cart page and redirect directly to checkout’ checkbox and click on the Save changes button.

Using WooCommerce Settings
Now, there might be someone who doesn’t want to use a plugin for some reason but also doesn’t have the resources to hire a WordPress professional to make the necessary code modifications to add this functionality. In that case, we have a little-known method here that might still get the job done for you.
You just need to put the WooCommerce settings to your use. To do that, go to WooCommerce → Settings → Advanced. Here, you can choose which page will be your cart page.
You can simply choose your checkout page to be your cart page. So when the users go to the cart, they land on the checkout page.
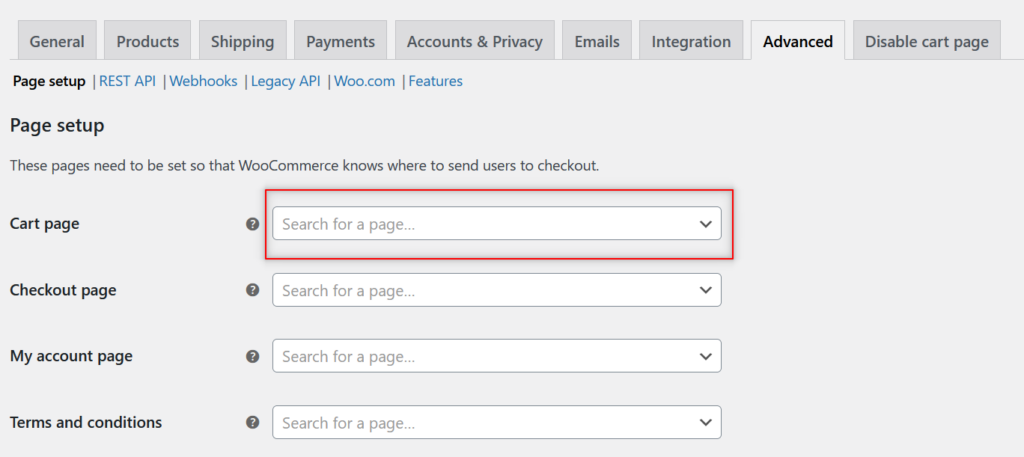
Of course, you will need to scroll down to the bottom of the page and click on the Save changes button too for this change to take effect. This will set up a kind of redirect for your cart page and lead your users directly to the checkout page.
There’s one more thing. If you’re running a single-product store or just want your users to land on the checkout page right after they add a product to the cart, you can also create a setup for that.
Go to WooCommerce → Settings → Products. Click on the checkbox that says Redirect to the cart page after successful addition.
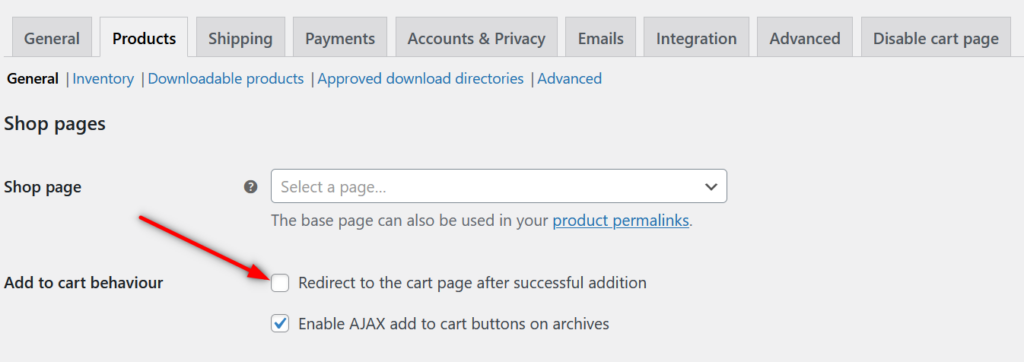
This setup will create a redirect from the product page to the cart to the checkout page, and it will get triggered as soon as a user adds a product to their cart. Again, don’t forget to scroll down and click on the Save changes button.
How to Disable WooCommerce Checkout?
Stick around if you also want to learn how to disable the checkout functionality on your WooCommerce store.
Again, there are two methods available here. While you can find readymade snippets of code that you can directly add to your store’s core setup, you need to add them to the right places and remove them when you want to take your store live again.
This means that you still run the risk of messing something up if you’re not familiar with code modifications. Assuming the vast majority of store owners fall into this category, we get right into the second method, which is using a plugin designed to temporarily or permanently disable checkout on your WooCommerce store.
But before we get into that, please note that you don’t need to disable the checkout entirely if your issue is just limited to a few products on your store. There are various ways to hide certain products based on user role, put all the products you want to stop selling into a category and hide that WooCommerce category, as well as even create private WooCommerce products if you don’t want to make certain products accessible for everyone.
However, if you do want to disable the checkout functionality entirely, then use our recommended free plugin to do it in a few easy steps.
Using the Woo Store Vacation Plugin to Disable Checkout in WooCommerce
We recommend using the Woo Store Vacation plugin to disable the checkout functionality on your store. This plugin is designed in a way that while it prevents any users on your store from making any purchases, it doesn’t interfere with any other element of your store.
So your store functions as usual, except for the checkout not working. The product pages stay intact, the category pages are visible, the blog posts remain as is, and nothing changes on the design front as well.
Technically speaking, this plugin doesn’t make any changes to the meta tags or add any ‘no-index’ to any of your store’s pages or content. This means that your store’s SEO isn’t disturbed, and your site retains all its search engine rankings.
To install the plugin, you need to follow the same steps as we outlined above when installing the other plugin for disabling the cart page.
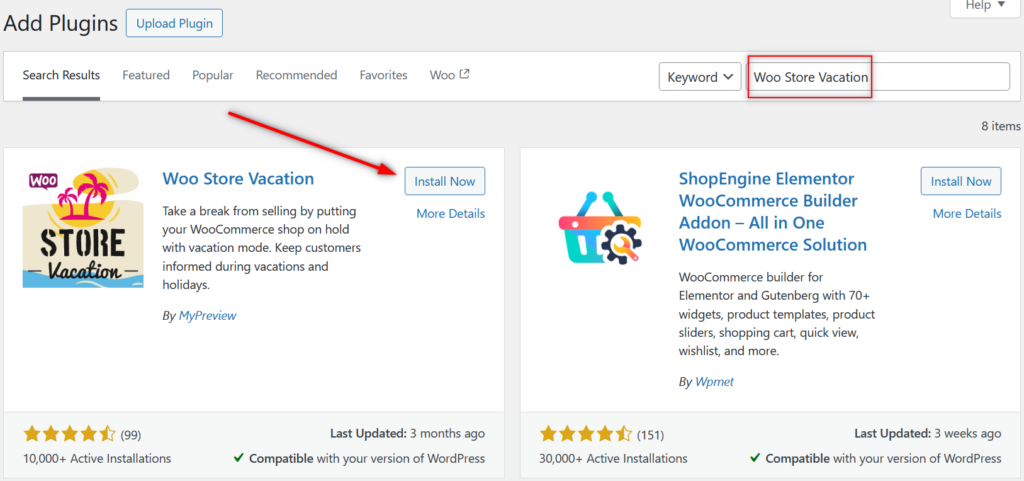
Once activated, you can disable the checkout on your store by specifying a ‘start date’ and an ‘end date.’ The plugin automatically re-enables the checkout functionality after the end date.
You can do this under WooCommerce → Settings → Store Vacation.
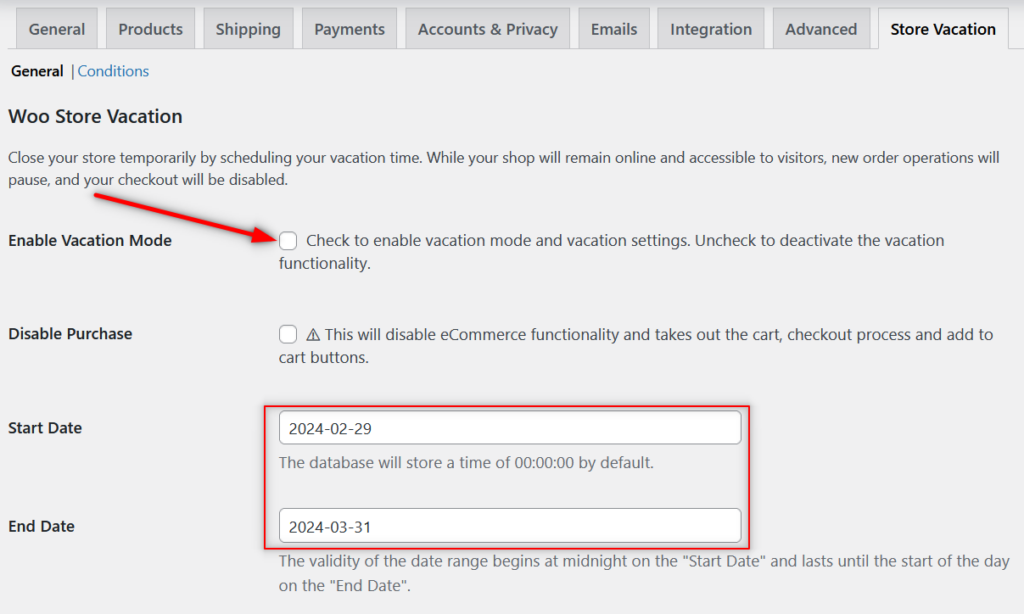
Make sure you also click the checkbox for enabling the vacation mode and vacation settings. We have highlighted it in the above image.
Finally, you need to scroll down and click on the Save changes button. Once you do that, the checkout on your store will be disabled for the specified period.
However, if you want to re-enable the checkout functionality before the end date, you can do that too. In other words, you can re-enable the checkout any time you want.
You just need to go back to this plugin settings page and uncheck the vacation mode checkbox.
But that’s not all. You can also notify your users about the checkout being temporarily disabled through ‘vacation note.’
You will find this option as you scroll down the plugin settings page.
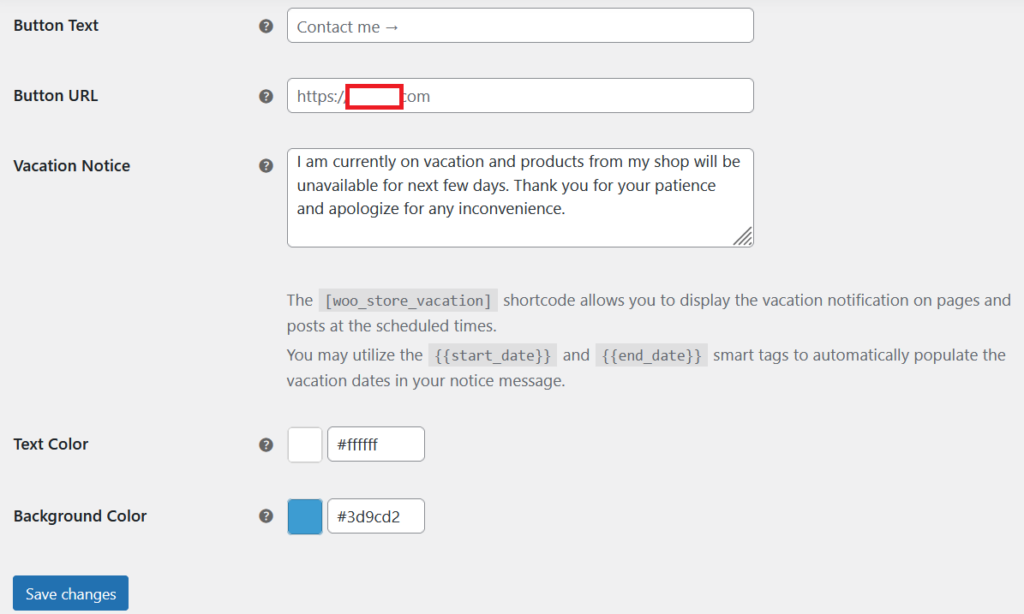
Your users will be shown this note on the product and shop pages. You can also mention the start and end dates of the unavailability period in your message.
How to Disable Both the Cart and Checkout in WooCommerce?
Disabling both the cart and the checkout functionality is not much different than disabling the checkout functionality. In fact, you can use the same plugin recommended above for disabling the checkout functionality.
Just check the checkbox that basically says that it will disable the cart, checkout process, and also the ‘add to cart’ buttons.
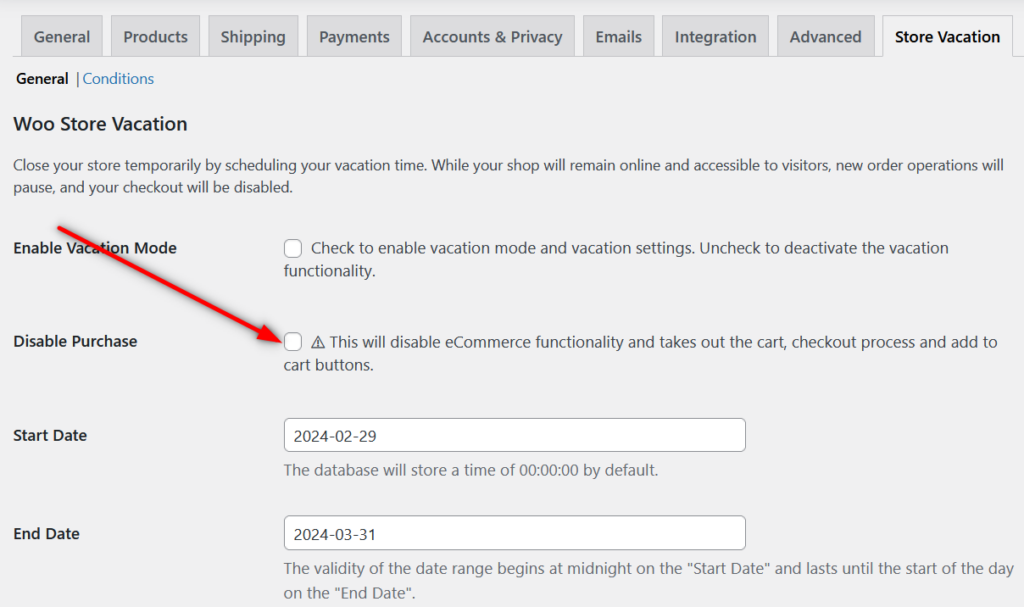
Then scroll to the bottom of the page and click on the Save changes button. That’s it. No more cart and checkout on your store until you decide to bring them back.
However, this still isn’t the recommended way if you want to disable the cart and checkout on your store permanently. In that case, you would be better off transitioning your online store into a WooCommerce private store instead.
You can easily do that using Paid Member Subscriptions, which is a WooCommerce membership site plugin and a payments management plugin.
Take Your WooCommerce Store to the Next Level with Cozmoslabs Products
Now that you have learned how to disable the cart and/or checkout functionalities on your store any time you want, let us shift your focus to other important elements of running your store.
Cozmoslabs products offer a range of features that allow store owners to significantly upgrade the overall functionality and stability of their store. While Paid Member Subscriptions is an all-round plugin to handle recurring payments and sell membership products or online courses, Profile Builder would help you manage your users in the most effective way possible.
Paid Member Subscriptions Pro
Paid Member Subscriptions is a must-have plugin for every store owner selling membership products or accepting recurring payments.
Ranging from managing WooCommerce user roles to functioning as a social login plugin to your store for building a frictionless checkout process for your users, it offers a huge variety of features.
So check them out based on your needs. You would be able to run your store in a way never before!
Source: https://www.cozmoslabs.com/2877237-woocommerce-disable-cart-and-checkout/

