Are you wondering how to use pricing table templates on your membership website? If that’s a resounding yes, you will love today’s post.
Unbeknownst to many beginners, pricing tables play an important part on a membership site especially if you sell multiple subscription plans.
Adding a well-thought-out pricing page to your membership site is a fantastic way to improve the user experience and boost conversions, among other things.
Here’s a short and quick story to build momentum.
Not long ago, I went searching for a file-sharing service. You know, something like Dropbox or Google Drive.
After a few clicks on Google, I came across Bigfilebox.com and decided to check out their service.
But guess what?
After looking for several minutes, I couldn’t find a pricing page or any way of subscribing to their service.
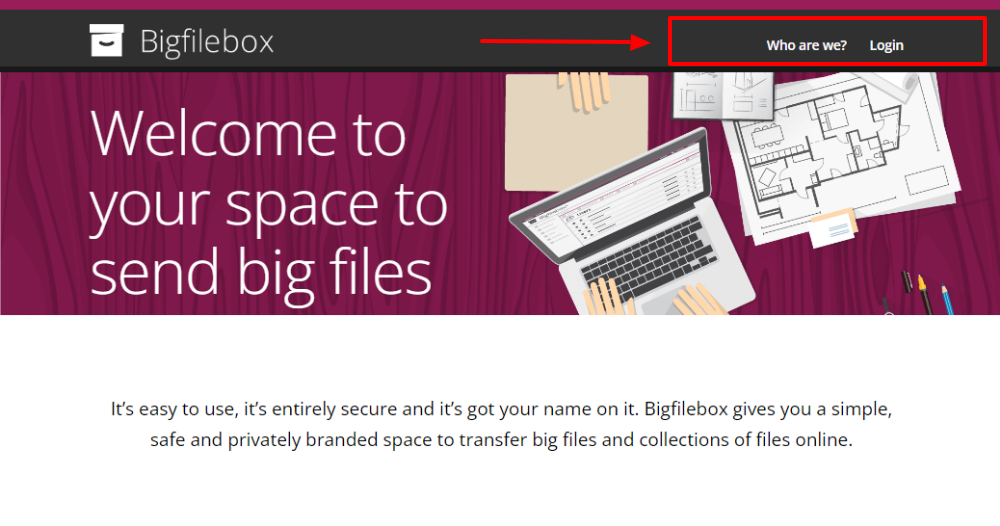
I mean. Who doesn’t have a pricing page on their subscription-based website?
After another unnecessary Google search, I found this sorry excuse of a pricing table:
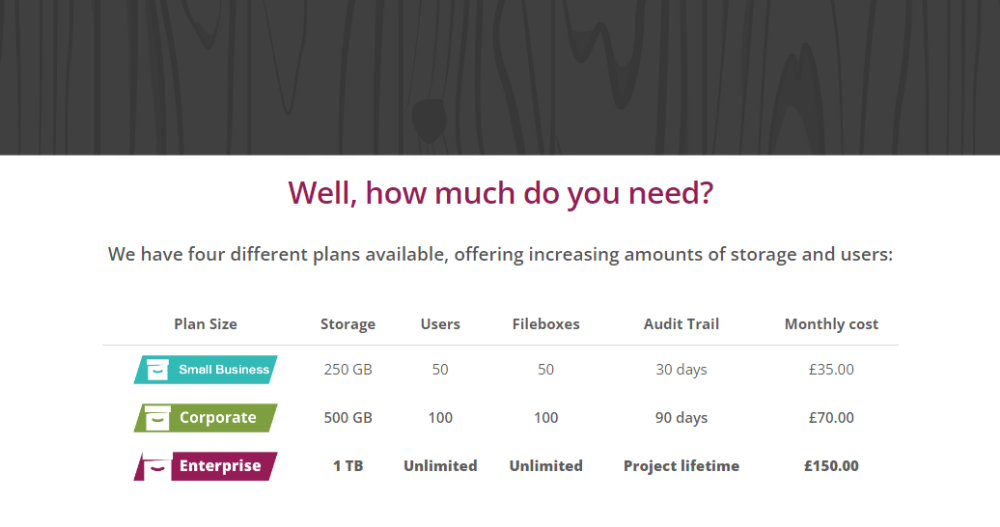
The pricing table doesn’t even have sign-up buttons! It’s an example of a company that missed the mark with pricing tables.
Was I disappointed? You bet! I clicked the back button and left never to return obviously.
I can bet all my money that every other prospect who visits their website leaves disappointed just like I was.
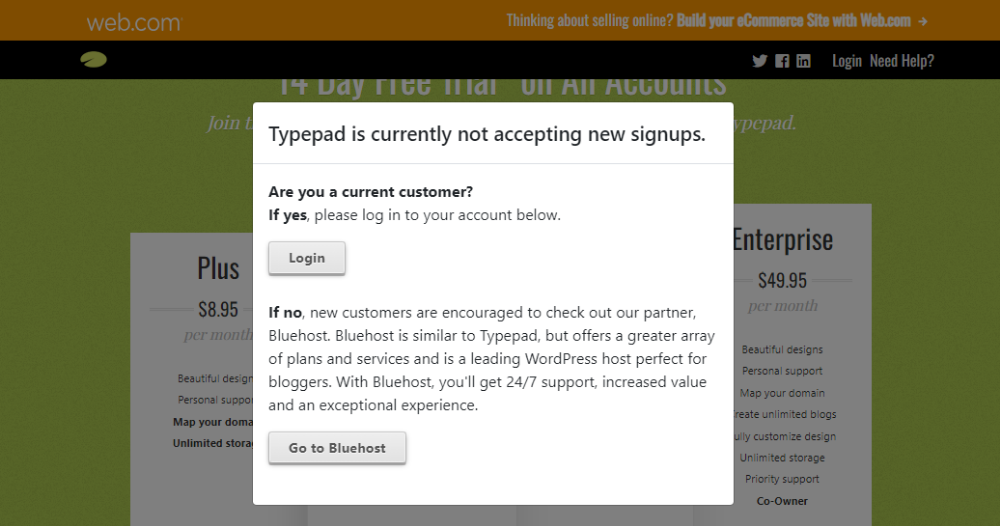
But perhaps they are not accepting new signups. If that is the case, it would be better to make it clear on their website or be creative like Typepad.com, which has this popup on the pricing page:
Later in the article, we will share examples of companies that got their pricing tables right.
In addition, we will highlight several pricing table best practices and then show you how to use pricing table templates with Paid Member Subscriptions.
Let’s dive right in.
Importance of Pricing Table Templates
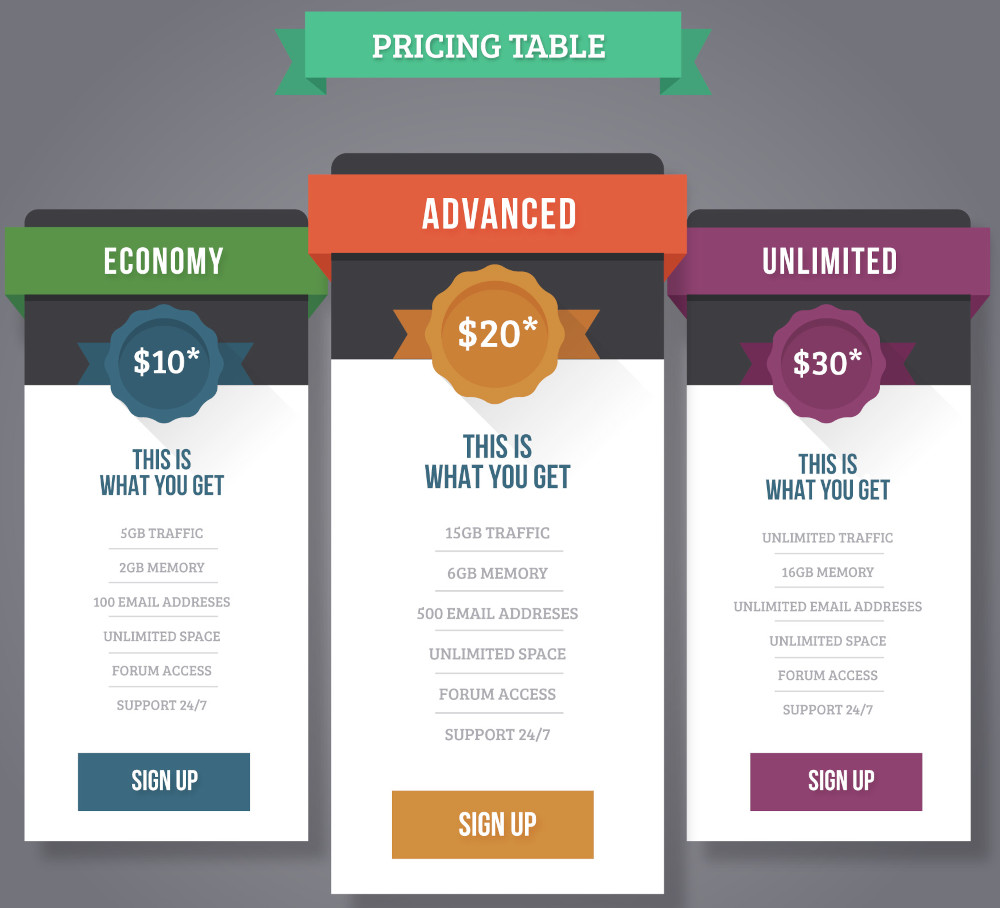
A pricing table template is a pre-made design that lets you create pricing tables easily. Templates save time and money and are perfect for people without coding knowledge.
It is probably why you see pricing tables all over the internet since using a pricing table template is super-duper easy. It is a no-brainer. I mean. You’d be crazy to reinvent the wheel when solid solutions such as Paid Member Subscriptions are readily available.
What’s more? Pre-made pricing table templates are attractive and functional since experienced website developers design them.
This, of course, is compared to something an inexperienced user might create from the ground up.
Instead of coding a pricing table from scratch, which is time-consuming and requires HTML and CSS skills, templates let you start with a pre-built pattern that you can customize inside the WordPress block editor.
It also means you don’t need to waste time or money hiring a designer who might not get your vision of a fantastic pricing table.
As mentioned above, we will use the free and ready-to-customize pricing table templates that are part of the Paid Member Subscriptions WordPress membership plugin.
So you now know you’re in good hands. That plus you have an awesome support team to help you every step of the way.
That said, why are pricing tables important to a membership website?
Pricing Tables Increase Conversions and Sales
The first benefit of pricing tables is increasing conversions and sales.
For our scenario today, a conversion could be signing up for your free plan or trial, trying the demo you took years to build, or downloading a resource such as free membership software..
And…If you’re wondering…
Pricing tables help big-time when you want to showcase more details about your product or service.
First, pricing tables greatly impact the customer’s purchasing decision. It’s the first thing they see when they want to subscribe to your membership plans.
So…
You should present the information prospects need clearly and concisely making it easy for them to buy.
Remember our Bigfilebox.com example? I couldn’t find the information I needed easily. Plus, there were no signup buttons when I found what I will not regard as a pricing table.
The result? I left never to return.
Aside: Don’t make the same mistake especially when a tool such as Paid Member Subscriptions ships with free pricing table templates that you can easily add to any page and customize to your heart’s content.
Back to our Bigfilebox.com example.
A solid pricing table would have made things a whole lot easier for yours truly and other prospective clients, which inspires the confidence necessary for a purchase.
This is what I mean.
An excellent pricing table gives customers all the details they need, allowing them to quickly see the features they are getting and compare subscription plans.
This enables customers to decide the best package for their budget and needs, encouraging them to proceed to checkout.
If customers can’t find the information they need or a poorly designed pricing table throws them off, they will feel frustrated and leave without converting or buying any of your membership plans.
Pricing Table Templates Can Improve Your SEO
Search engine optimization (SEO) is the multi-faceted process of tweaking your content and website structure to rank higher in search engine result pages (SERPs).
Performing proper SEO lets you increase the visibility of your products and drive more traffic to your membership site.
That said, traffic generation is an uphill task, and you can use all the help you can get.
But how is using pricing table templates going to improve your SEO score? Perk up, that is a good question.
Well-designed pricing table templates allow you to provide relevant and detailed information to search engines.
In addition, it’s important to ensure your pricing table templates are mobile-friendly, responsive, and load fast to attract more customers and sales via SEO.
This includes adding appropriate SEO keywords to your pricing table titles, headings, descriptions, feature lists, and other parts of your pricing page. And if you use visuals on your pricing page, don’t forget these 15 tips for image SEO.
Opportunity to Upsell or Cross-Sell to Your Customers
Did you know that cross-selling, upselling, and other category penetration techniques can boost sales by 20% and profits by 30%? That’s right, according to a study by McKinsey & Company.
For perfect newbies, upselling involves persuading prospects and existing customers to purchase additional features or a more expensive subscription plan. These could be add-ons, upgrades, or pricier items.
A pricing table template lets you invite customers to purchase upgrades that the customer may not have considered previously.
You can use visually appealing pricing table templates to highlight the benefits, features, and value of higher-priced membership plans or add-ons.
On the other hand, cross-selling involves selling related products to existing customers. It sounds much like upselling. Right? I know. These things can be confusing.
Nevertheless, a nifty pricing table template is a fantastic opportunity to present related products or relevant features to your customers.
It’s your golden opportunity to solve additional problems for the customer and hit your sales and revenue goals.
At the end of it all, you can effectively increase the average order value and income from your membership site.
Using Pricing Table Templates Improves the User Experience
Convenience is a priority for online shoppers. If people are having a rough time on your membership site, they will leave and probably never return. Now you don’t want this.
Bearing this in mind, pricing tables can improve user experience on your website since prospective customers can easily see benefits, features, and pricing options to make an informed buying decision.
In addition, customers can easily compare different subscription plans to determine what’s best for their needs.
Deploying succinct pricing tables eliminates confusion, chaos, and frustration, offering customers a pleasant buying experience.
A better user experience often translates to more sales, longer dwell times (which BTW is good for SEO), return visitors, and a better brand image.
Let us agree that you want to optimize every part of your pricing page to speed up the sales process, not the other way around. Using pricing table templates allows you to create a user-friendly experience that excites your customers enough to take the plunge.
Now that you know a few benefits of using pricing table templates, let us forge ahead and discover what it takes to create an effective pricing table.
What Makes a Compelling Pricing Table?
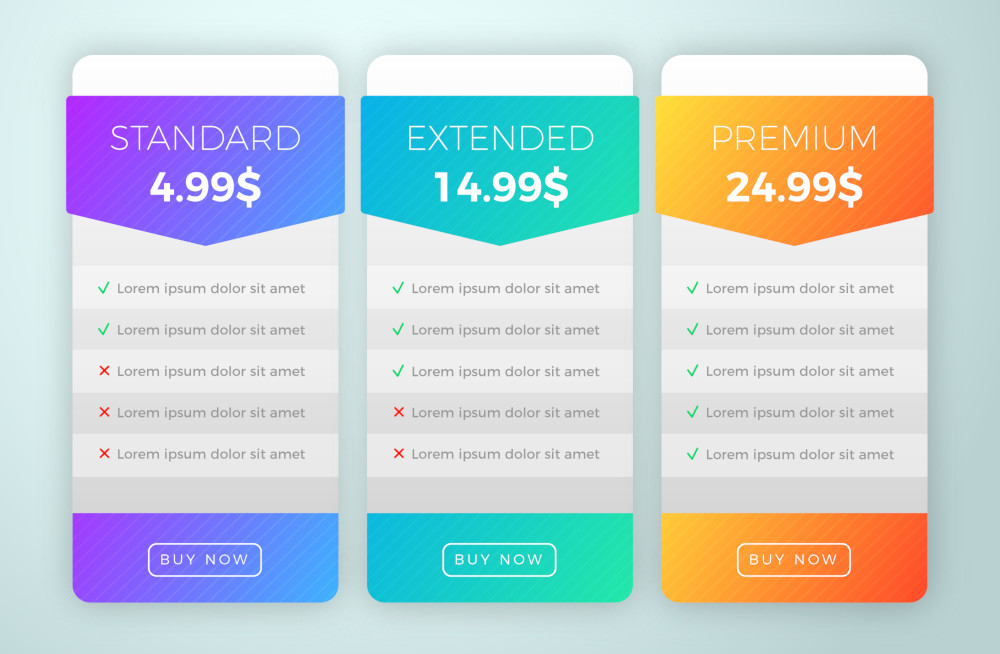
The pricing table is arguably one of the most crucial aspects of your pricing page. If you get the pricing table wrong, you will leave a lot of money on the table and that’s guaranteed.
Conversely, if you get it right, you can convert mere visitors into customers since they can easily see the features and value they are getting and compare different pricing tiers.
The design of your pricing table is so important that a single misplaced or unclear line item can create confusion and send a prospective customer away.
This is why it is vital to take time to develop your pricing table intelligently. Otherwise, you will end up wasting time, effort and money.
Here are some actionable tips to point you in the right direction.
Place the Pricing Table Above the Fold
If an individual visits your pricing page, they are highly motivated and want to know how much you charge for your product, service, or membership plan.
With that in mind, you want to show the prospective customer the prices of your subscription plans as quickly as possible.
Hiding this crucial information will create anxiety and doubt, two feelings that don’t facilitate seamless conversion and signups.
What to do?
Place your pricing table above the fold. This is the part of a web page shown in the browser window before scrolling.
Because of its high visibility, the content that you place above the fold should be the content that is most important to achieving your business goals. The content should immediately grab the user’s attention and present them with the content that they are looking for so that they don’t bounce and visit another site. – Optimizely
We can all agree that, since a price table helps visitors make a purchase decision, it qualifies as one of the most important pieces of content to smash your business goals.
Placing the pricing table above the fold on your pricing page ensures that customers can quickly find the information they need to subscribe.
Aside: This is a good rule of thumb even though you can place the pricing table further down on your landing page. You know that is if you don’t have a standalone pricing page.
Let’s move on.
Highlight Your Best Deal/Emphasize One Option
If you offer multiple membership plans, it’s essential to highlight the plan you want customers to focus on.
Why is this important? It’s simple.
Highlighting one option makes it easier for customers to make a purchase decision after comparing the different plans on offer.
By clearly emphasizing one option, you can attract your customer’s attention to one specific offer and boost your sales.
Here’s an excellent example: Paid Member Subscriptions.
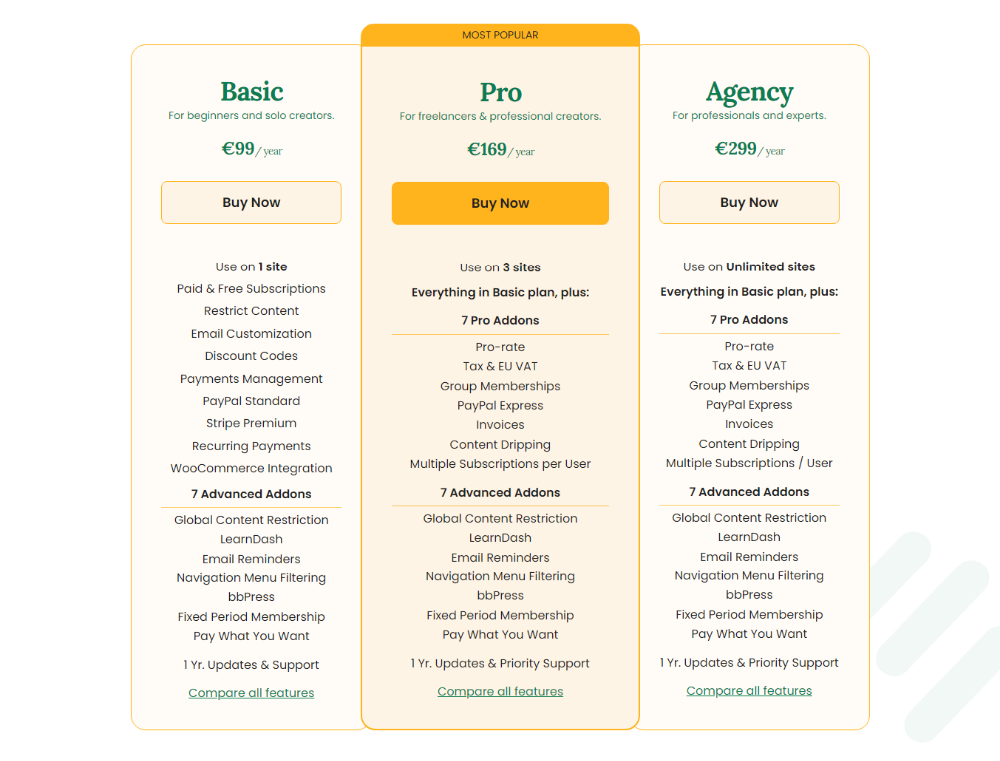
There are several ways to add emphasis on one membership plan. Many site owners prefer to highlight the “Most Popular” offer.
It’s important to remember that the most popular offer doesn’t necessarily mean the cheapest or most expensive plan. If you emphasize either, you will fall flat on your face.
The trick here is to emphasize a subscription plan that is “just right” but not too costly or ridiculously cheap for the customer.
Granted, it takes a bit of planning to ensure you’re offering a fabulous deal without losing conversions or making losses. This also keeps you from low-balling customers, which as you’d expect, doesn’t end up well later.
So, how do you emphasize your best subscription plan as far as the design of your price table goes?
First, you can use different sizes for your highlighted deal. This means making one column bigger than the rest. This is a common approach many business owners take.
Second, let color variation work in your favor. In other words, you should change the column, header, and call-to-action (CTA) button background colors to make your best deal stand out. But don’t overdo it or you will ruin the aesthetics and user experience.
Thirdly, other than “Most Popular,” you can use other badges such as “Best Value,” “Recommended,” “Buyer’s Choice,” etc., and special discount offers to differentiate your best membership plan.
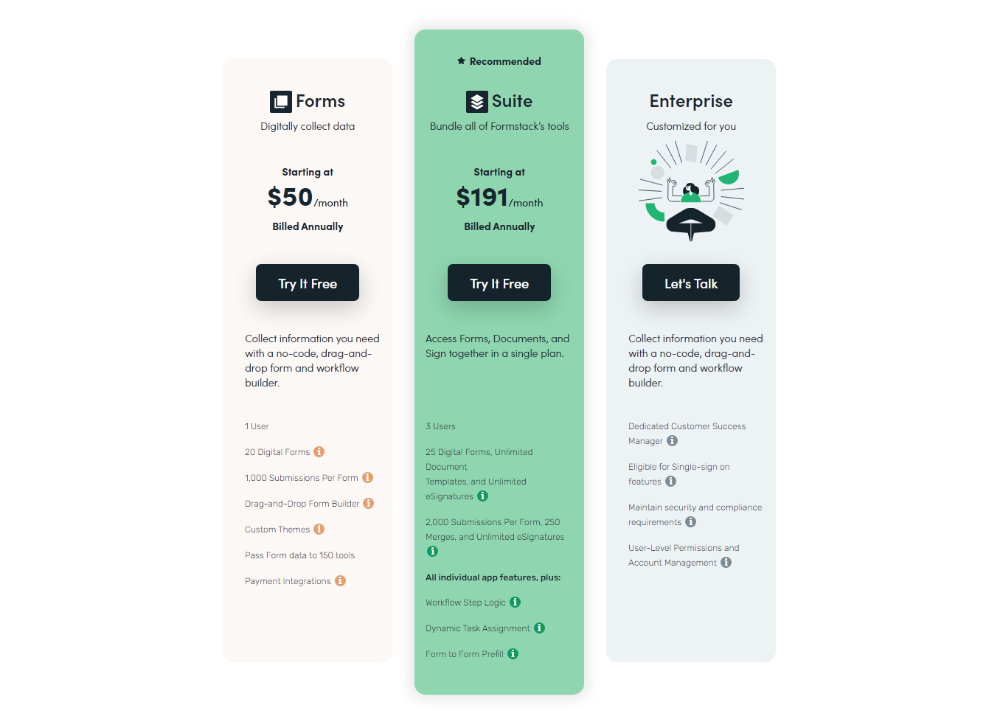
The point is to make your best deal stand out from the other plans. Here’s another example by Formstack, that employs the above techniques.
Another thing. You might assume adding many different packages to your pricing table is ideal but you couldn’t be further from the truth.
You might think: “After all, I am offering my customers more options from which to choose.” But don’t make this mistake, because, contrary to your assumptions, you will make it harder for customers to decide.
Offering, on average, three to five well-laid-out membership plans on your pricing tables is the best way to drive more conversions and sales. Having more than five offers on your pricing tables will backfire.
Outline Your Plans Intelligently
Pivoting from the previous point, make an effort to outline the features and benefits of your subscription plans clearly and intelligently.
What does that mean?
First, don’t swamp your customers with too many details in your pricing tables. You want to make it easy for them to understand your offer.
In other words, you don’t list every feature of your membership plans on the pricing table.
Instead, use your product pages to establish the value of your subscription plans long before customers get to your pricing page.
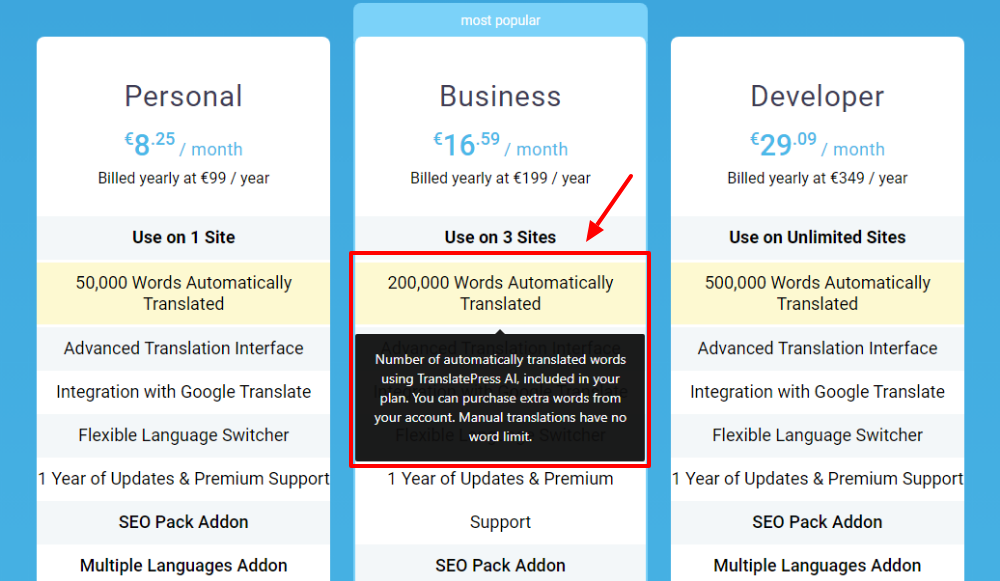
If you must add extra details to your pricing table items, consider implementing hover details for key features, as shown in the screengrab below.
If a user mouses over the key feature, a tooltip appears with more details. Here is an example from the TranslatePress pricing table.
Adding an extensive list of features to your pricing table might make it hard for customers to zero in on features that truly matter to them.
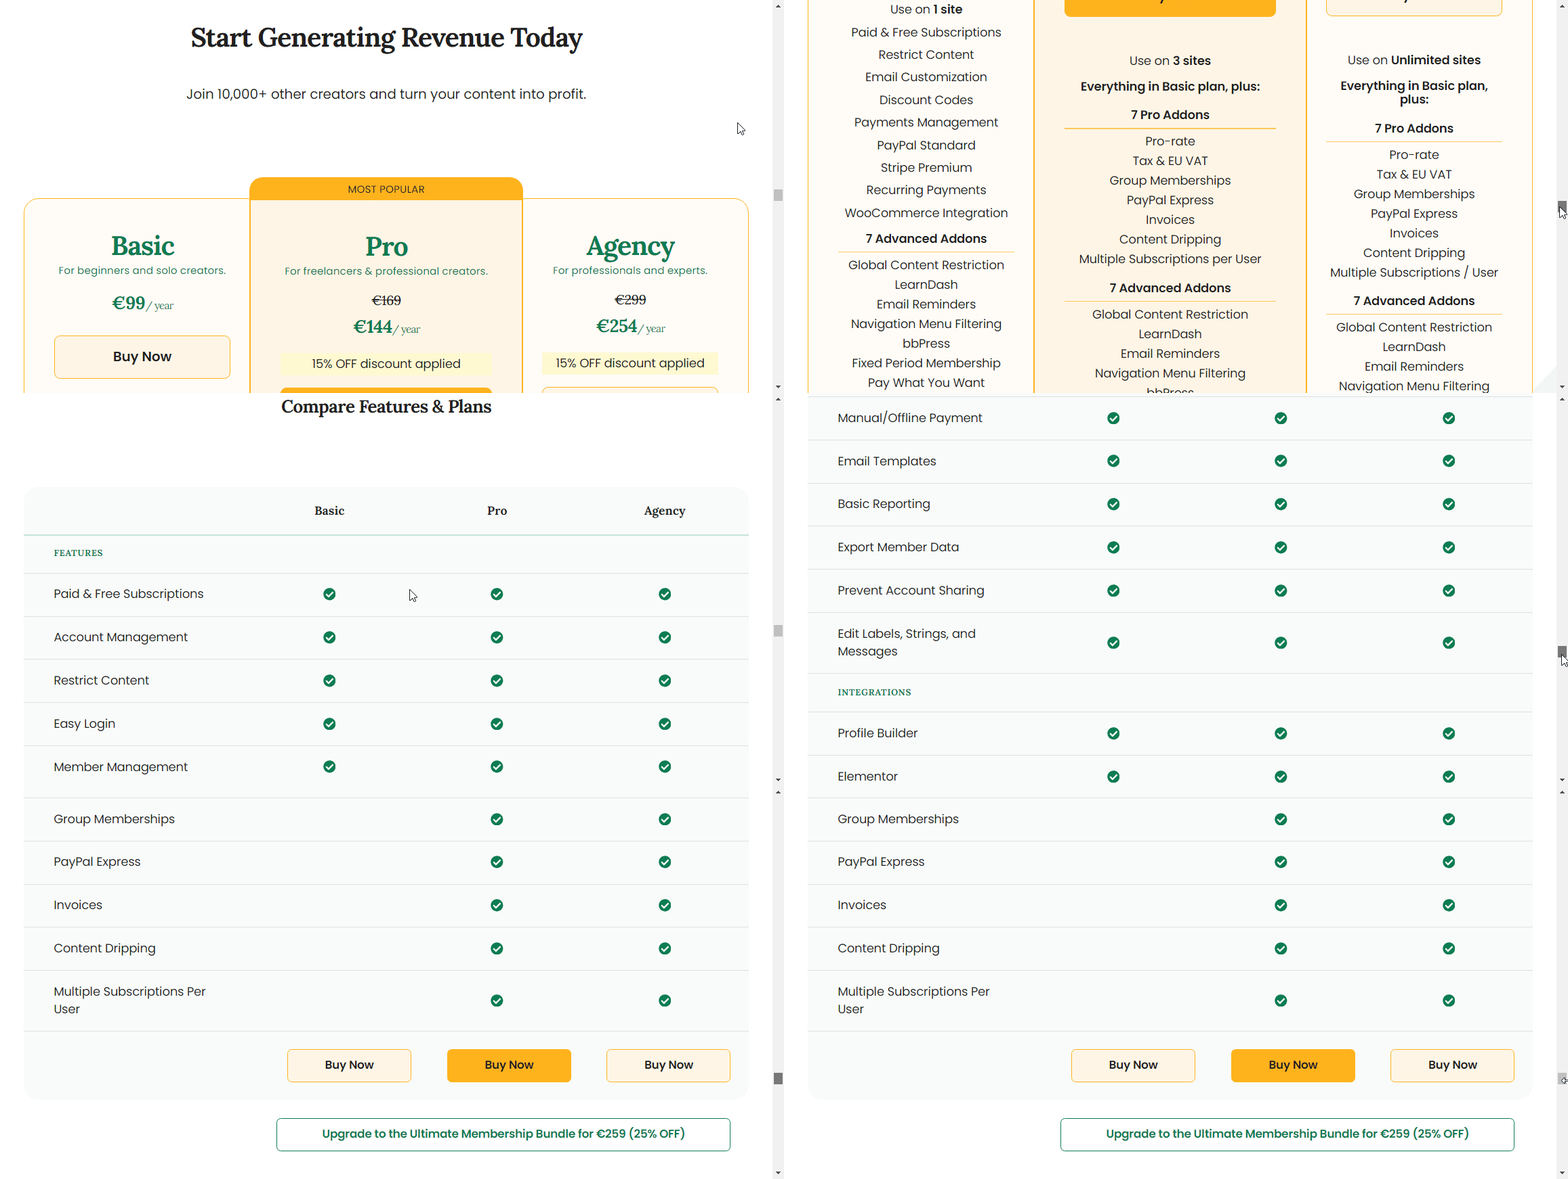
If adding hover details proves difficult because you lack the coding skills, add a “Compare all features” or “View all features” link that directs users to a section or page with the full list of features.
Need an example? Cozmoslabs pulls this off successfully with the Paid Member Subscriptions pricing table.
Have a look:
I hope you’re having fun and learning something here today 🙂
Let us move on.
Make Your Call-to-Action (CTA) Buttons Stand Out
Don’t give your visitors a chance to bounce and leave. Instead. make your call-to-action (CTA) buttons stand out.
A price table without call-to-action buttons defeats the purpose (like our bigfilebox.com example). Your customers will leave since they can’t buy what you’re selling.
The visitors should always know what to do next and CTA buttons are your chance to lead them to your checkout page.
Consider the wording of your CTA carefully and design distinctive buttons for every membership plan.
This is also an opportunity to use eye-catching colors to distinguish the subscription plan you wish to boost signups.
Keep your CTA language simple but straightforward. The same goes for the rest of your pricing table.
With the tips out of the way, let us learn how to use the pricing table templates that ship with the Paid Member Subscriptions plugin.
How to Use Pricing Table Templates On Your Membership Website
We are using the Paid Member Subscriptions WordPress membership plugin for this section. While you can start with the free version, I highly recommend the premium version since it packs a lot of exciting features.
Install and Activate Paid Member Subscriptions Free Version
First, we will install Paid Member Subscriptions to create our subscription plans and the registration page. This is easy peasy.
If it’s your first time, you must install the main (free) plugin for the pro version to work.
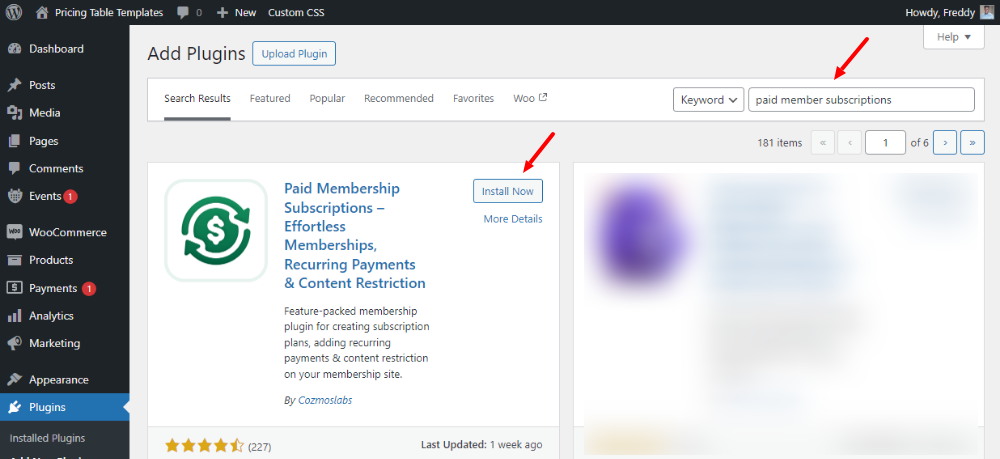
To do that, log in to your WordPress admin dashboard, and navigate to Plugins → Add New Plugin:

Enter “Paid Member Subscriptions” in the keyword search box and once you find the plugin, hit the Install Now button.
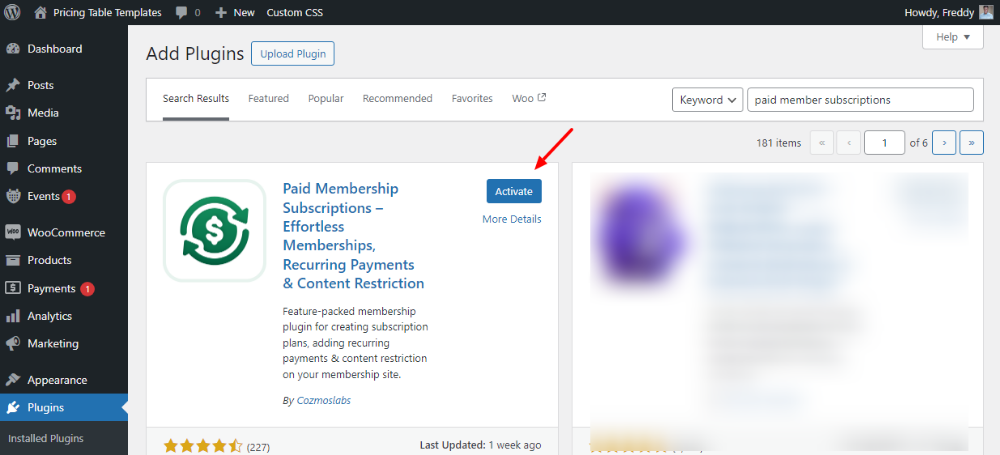
After that, Activate Paid Member Subscriptions:
Launch The Intuitive Setup Wizard
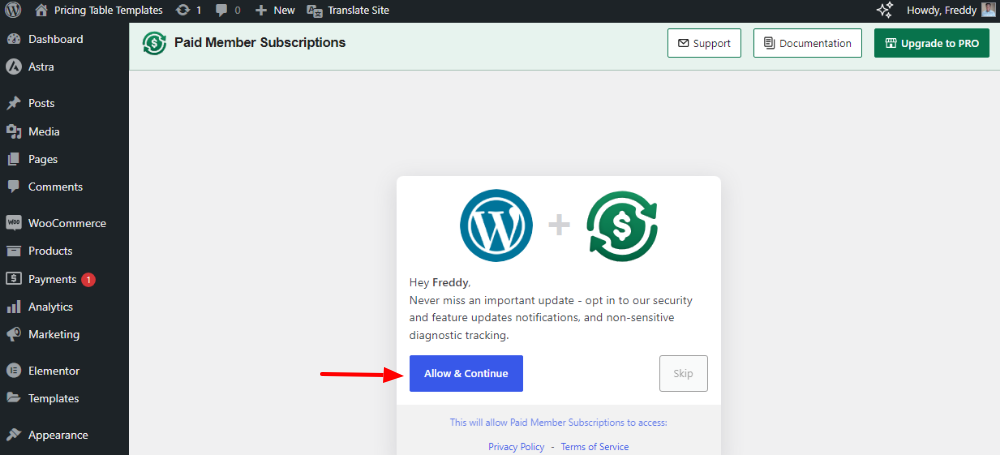
The setup wizard should launch automatically at this point. If it doesn’t open, refresh the page or click Paid Member Subscriptions on your WordPress admin menu.
After that, click the Allow & Continue button to receive important feature and security updates:
If you can’t access the setup wizard automatically, you can launch it manually.
How?
Click Paid Member Subscriptions on your WordPress admin menu.
After that, navigate to the Setup Progress Review section and click the Open Setup Wizard button, as shown below.
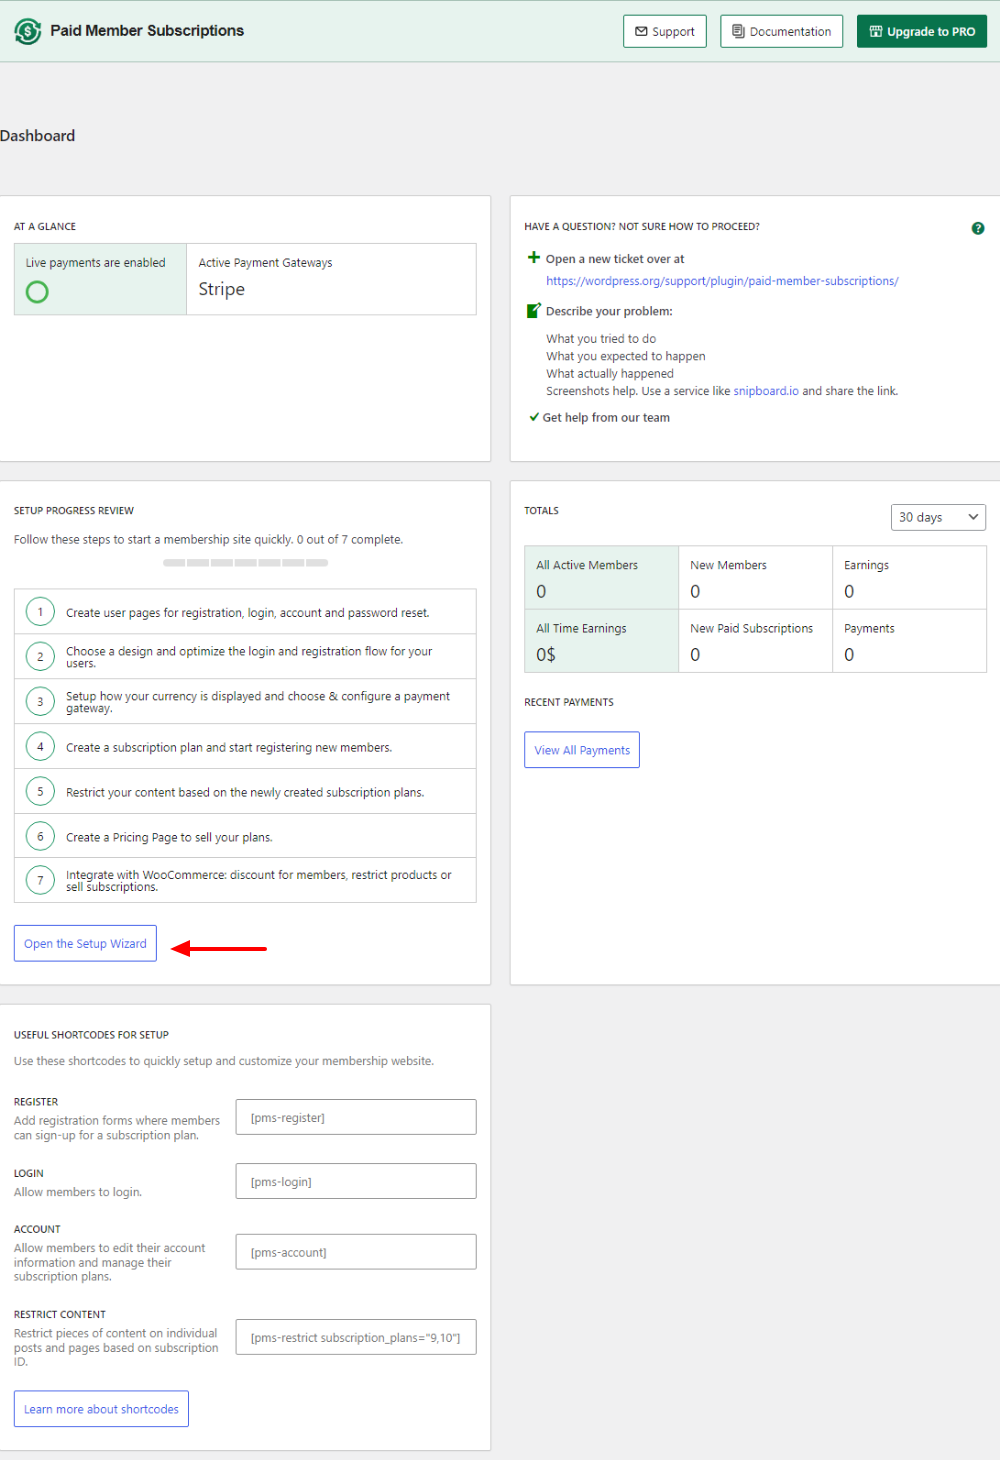
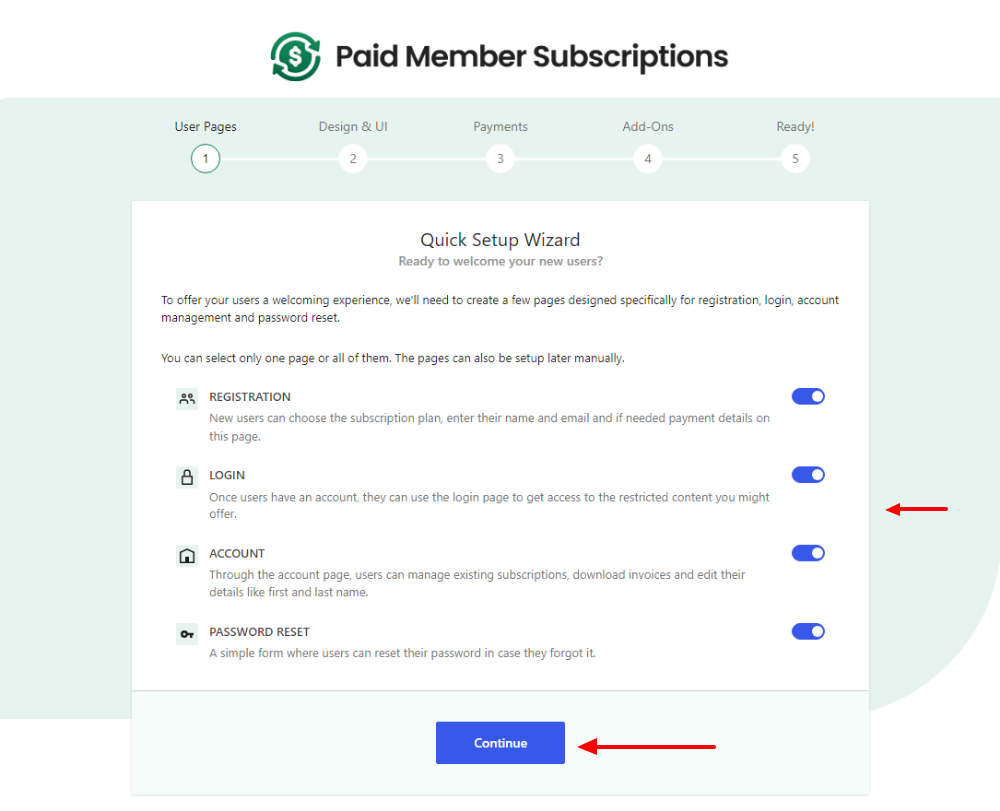
Next, tick all the user pages and click Continue:
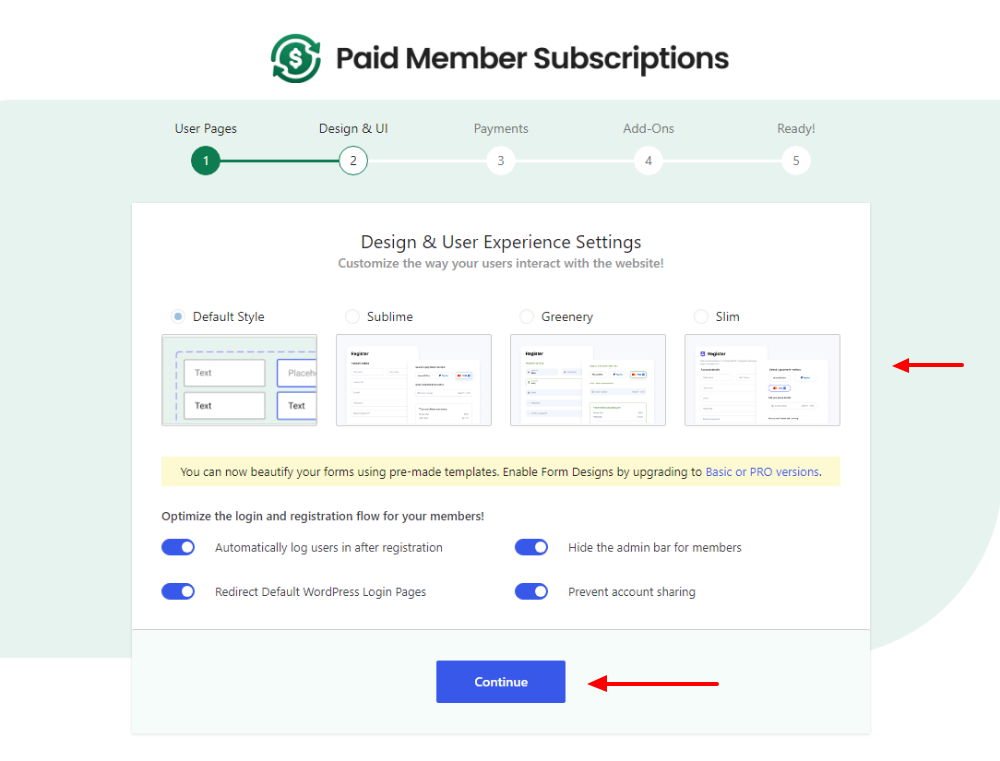
After that, choose your design and user experience settings and hit Continue:
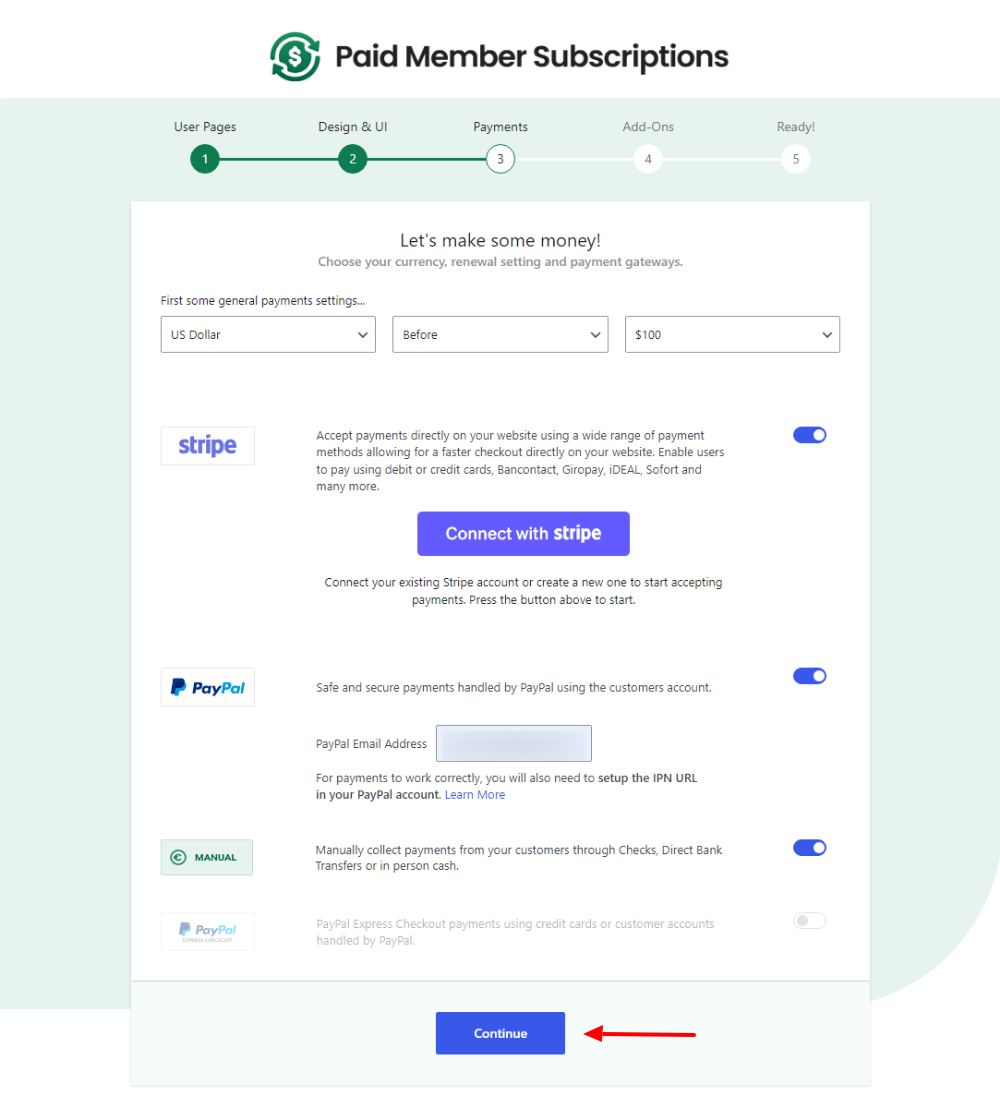
Next, choose your currency, renewal setting, and payment gateways and click Continue:
You are doing just fine.
Tip: WordPress will prompt you to create and add your PayPal API credentials later. If you use Stripe, just click the Connect with Stripe button to link Paid Member Subscriptions with your account. You have nothing to worry about since these procedures are as simple as A, B, and C.
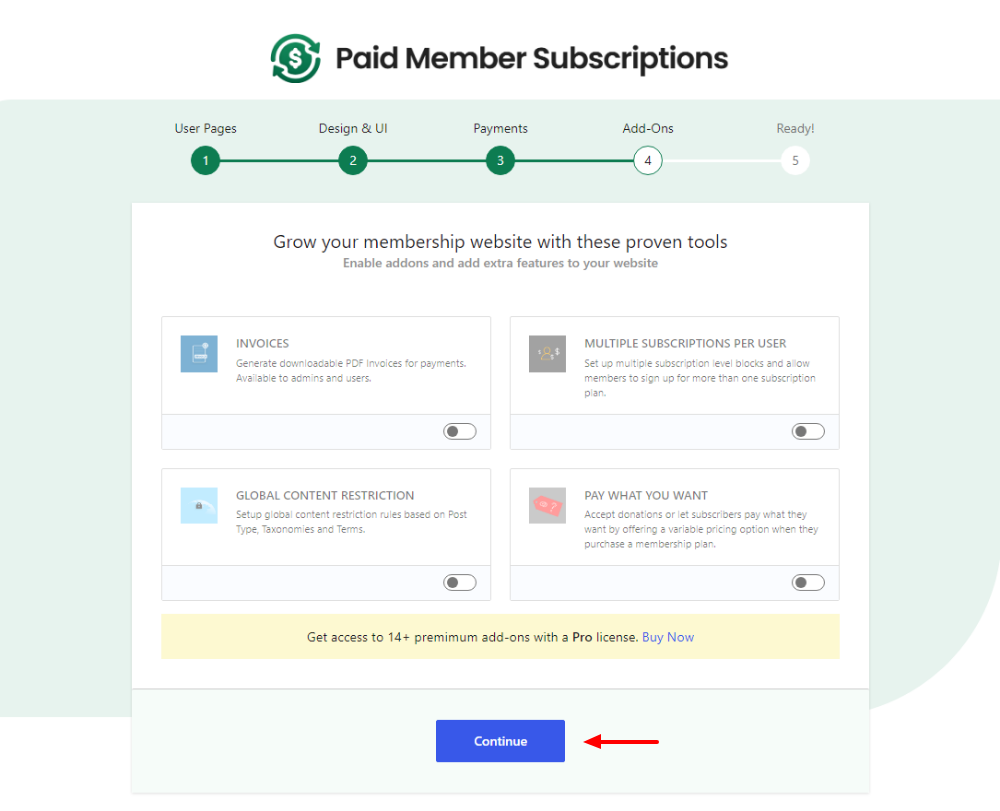
After that, choose your add-ons. Here’s where the pro version comes in, but for now click the Continue button (after all, you can activate the add-ons you need after purchasing the premium version):
Finally, enter your email address and click the Yes, Please! button to receive valuable tips to grow your online community, and then click Continue to Your Membership Dashboard.
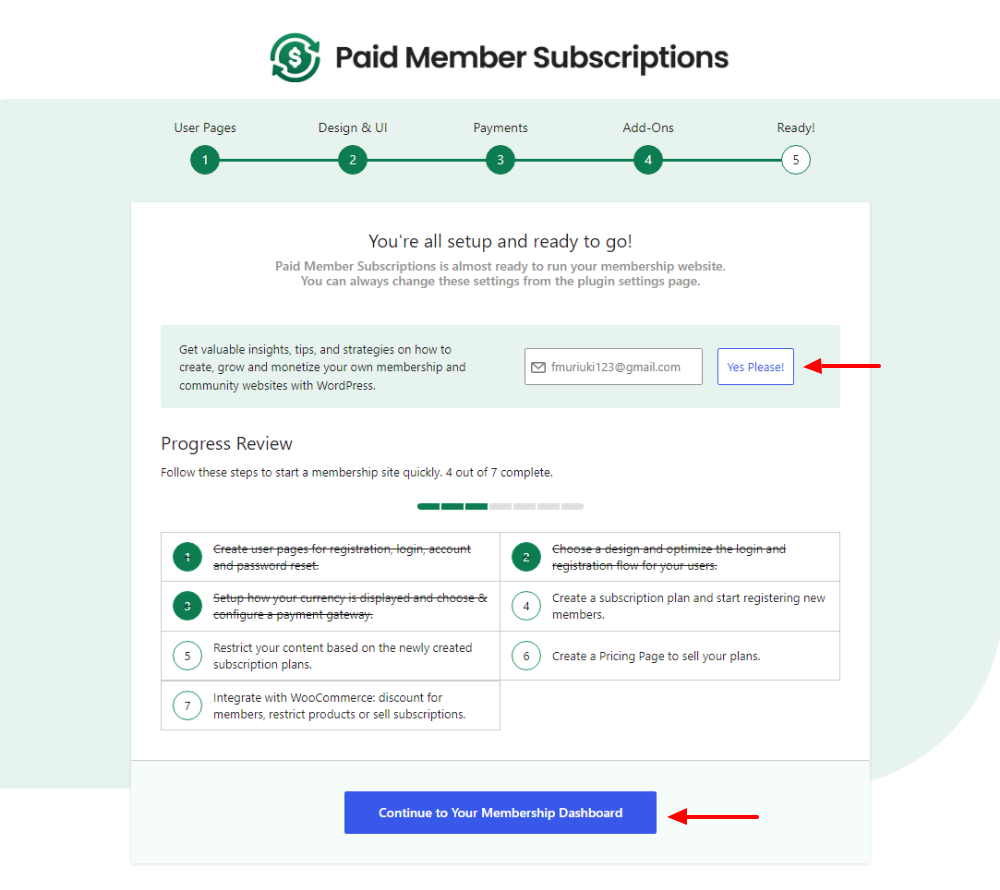
This should lead you back to the Paid Member Subscription admin dashboard. The plugin is ready to use at this point.
Now we only need to add subscription plans and create the pricing table, which is a breeze thanks to Paid Member Subscriptions pricing table templates.
Pro Tip: While it comes highly recommended, you don’t need the pro version to add subscription plans, create a pricing table, and receive payments. Is that not awesome? It’s like a gift that never stops giving.
However, I will quickly show you how to install the pro version because I happen to have a copy and you rock 🙂
Installing Paid Member Subscriptions Pro Version
This section is useful to non-tech-savvy people and individuals new to installing a premium WordPress plugin.
First, grab your copy of Paid Member Subscriptions from this page. The process is super-duper easy you should be done in a jiffy.
Next, download the Paid Member Subscriptions plugin from your account page and save it to your computer.
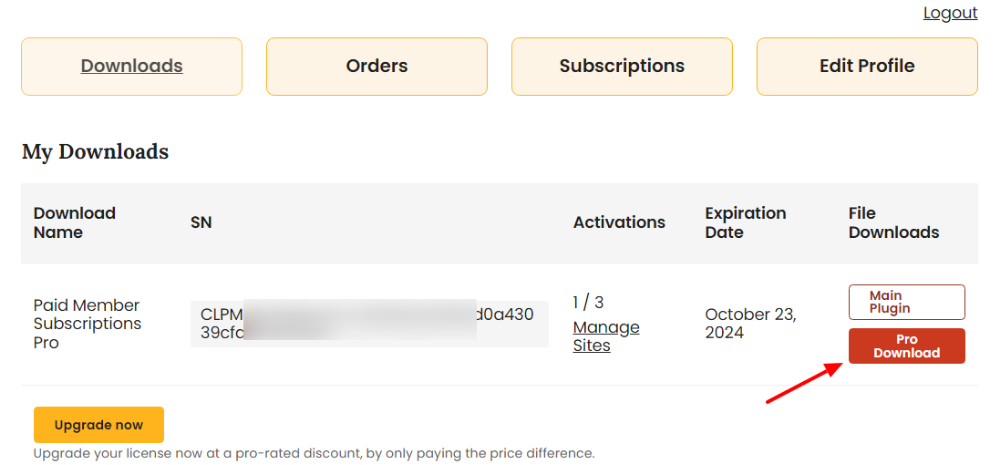
After that, you upload the plugin and install it on your WordPress website.
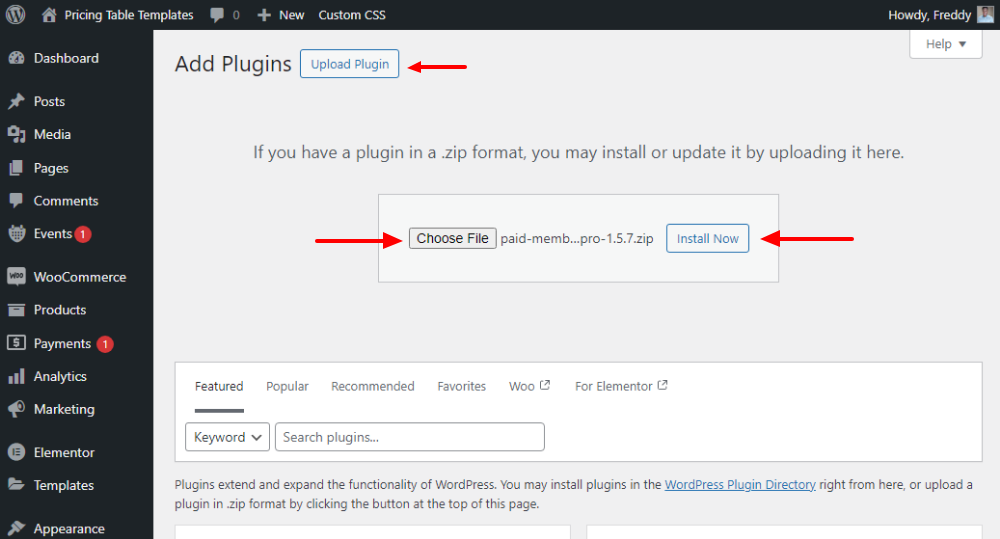
Go to Plugins → Add New Plugin as we did earlier:
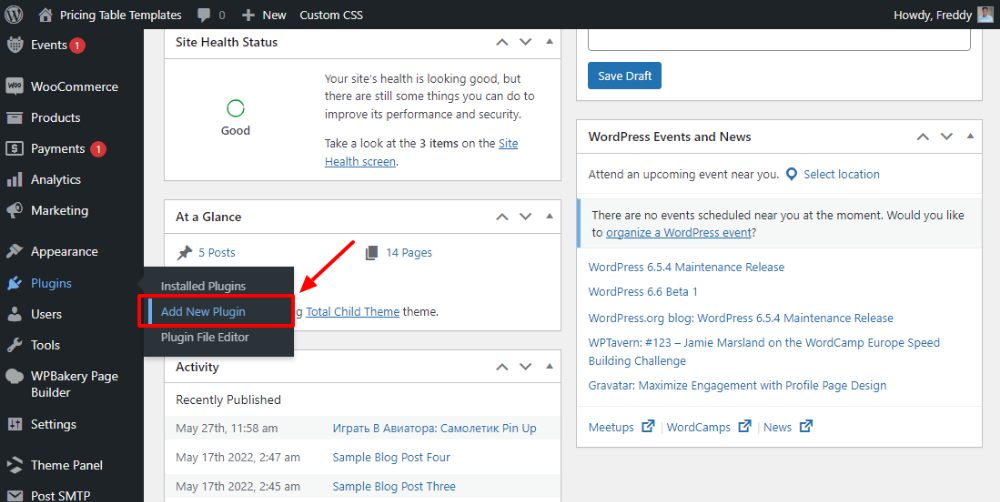
This time, however, we won’t be searching in the WordPress plugin repository. Instead, click Upload Plugin, choose the Paid Member Subscriptions file you downloaded earlier, and click the Install Now button, as highlighted below.
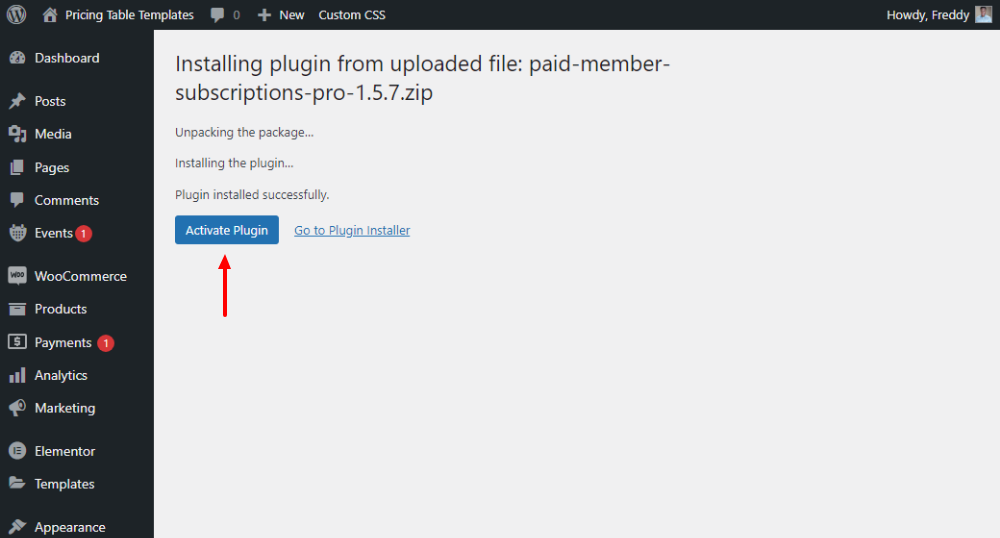
After installing, click the Activate Plugin button to get the party started.
Let us move on and activate the Paid Member Subscriptions license.
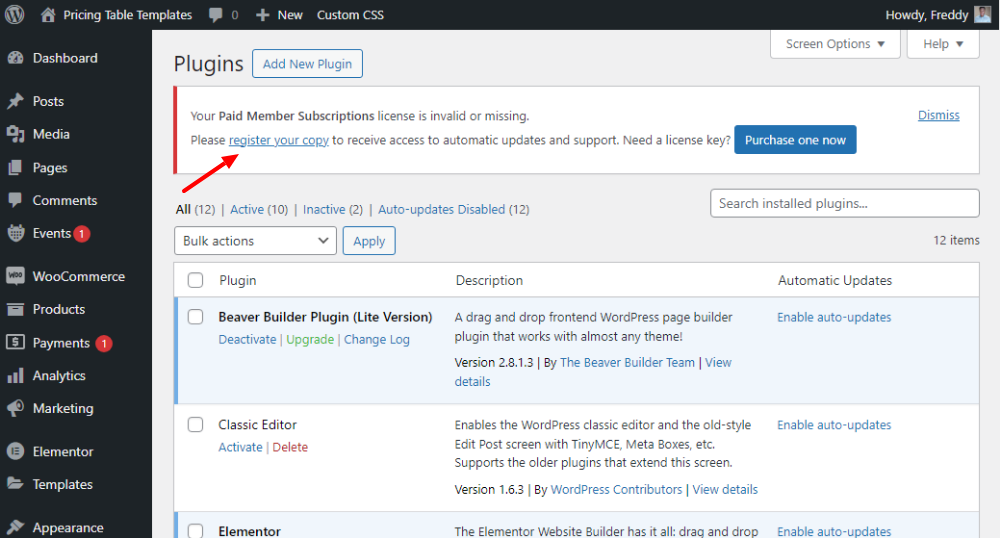
WordPress will automatically redirect you to the plugins page, and Paid Member Subscriptions will show you a notice, which makes adding your license key effortless.

You might see a lot of notices on the page depending on the plugins or theme you use (or the updates you need), but the Paid Member Subscription notice should be there, too.
Click the register your copy link, as shown below.
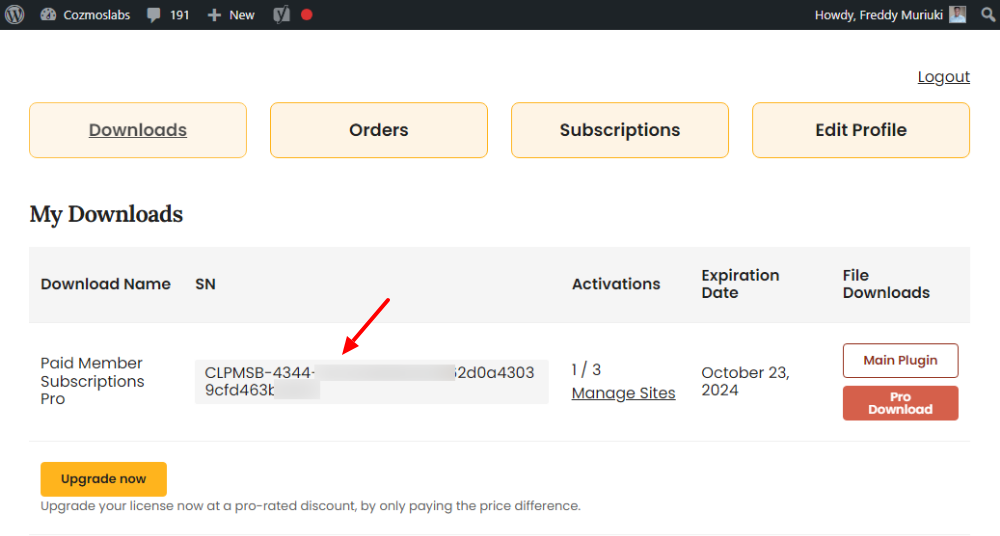
Go back to your Cozmoslabs Account and copy your license key…
…then return to the Paid Member Subscriptions settings page, paste your license key, click Activate License, and then Save Settings, as highlighted below.
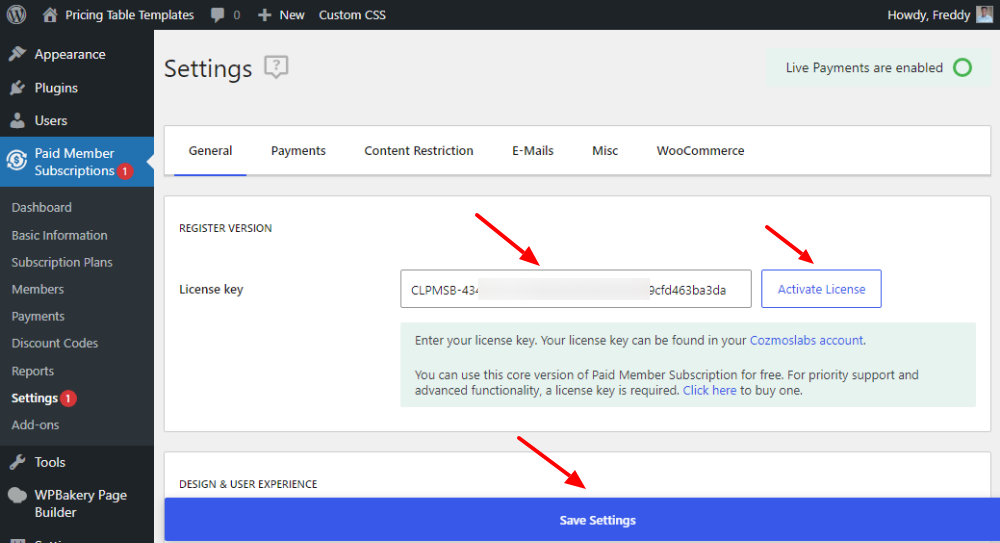
At this juncture, you’re ready to rock and roll.
Pro Tip: The settings page allows you to modify other Paid Membership Subscription settings, including design, registration flow, payments, content restrictions, membership pages, et cetera.
However, we will stick to adding subscription plans and creating a pricing table for now.
Adding Paid Member Subscription Plans
Before we create the pricing table, you should add your subscription plans, which is effortless with Paid Member Subscriptions.
Remember, we said you don’t need the pro version to add subscription plans, create a pricing table, and receive payments.
This means the instructions in this section will benefit all users, whether you have the free or pro version. Enjoy.
In your WordPress admin dashboard, navigate to Paid Member Subscriptions → Subscription Plans, as shown below.
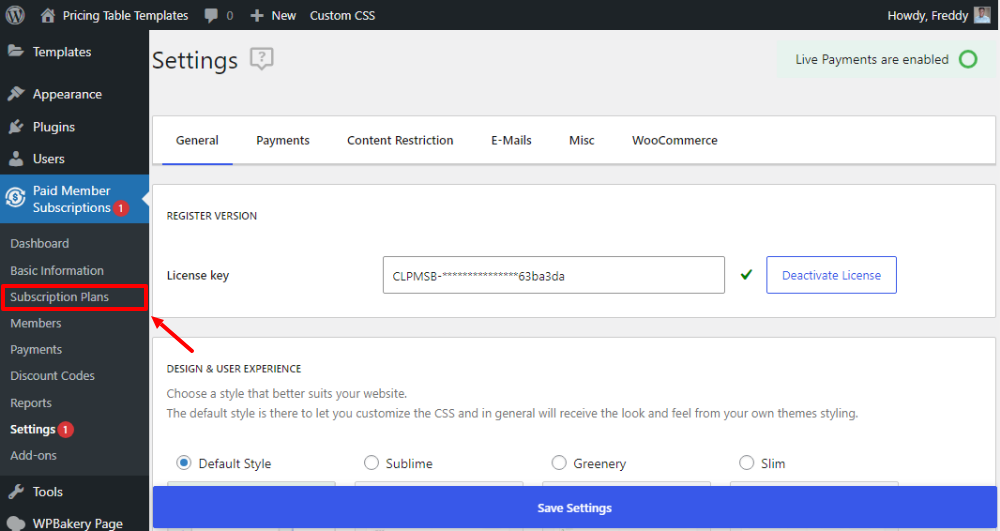
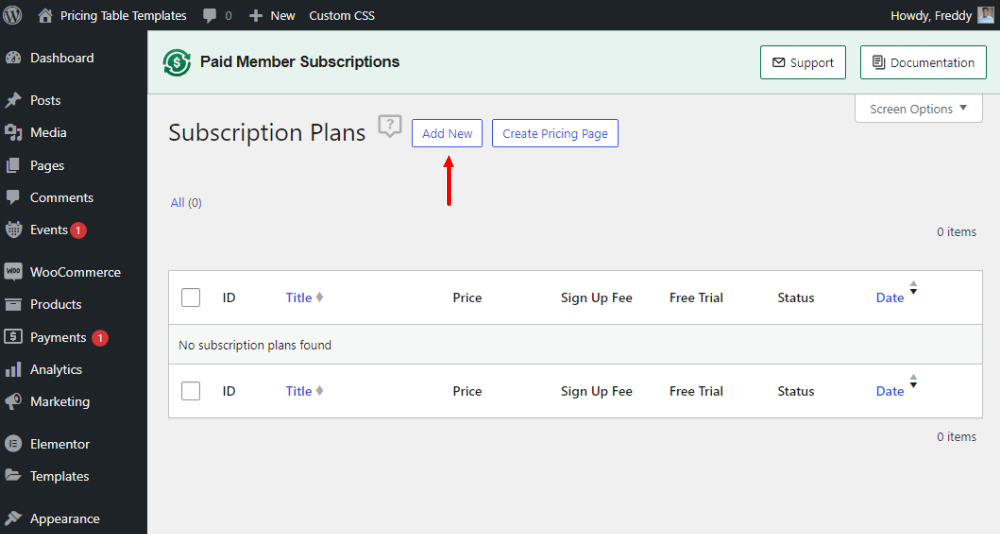
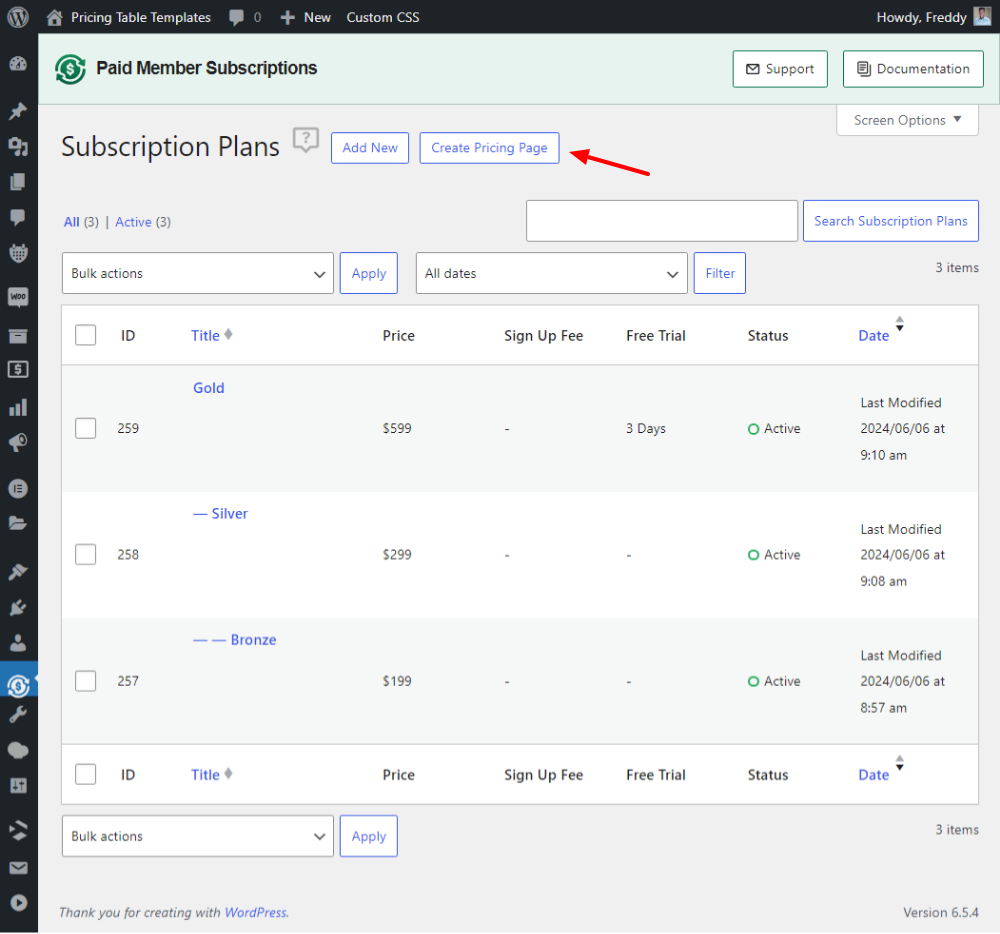
Next, click the Add New button. You can see the Create Pricing Page button evidently (I mean; it is just there), but let us add subscription plans first.
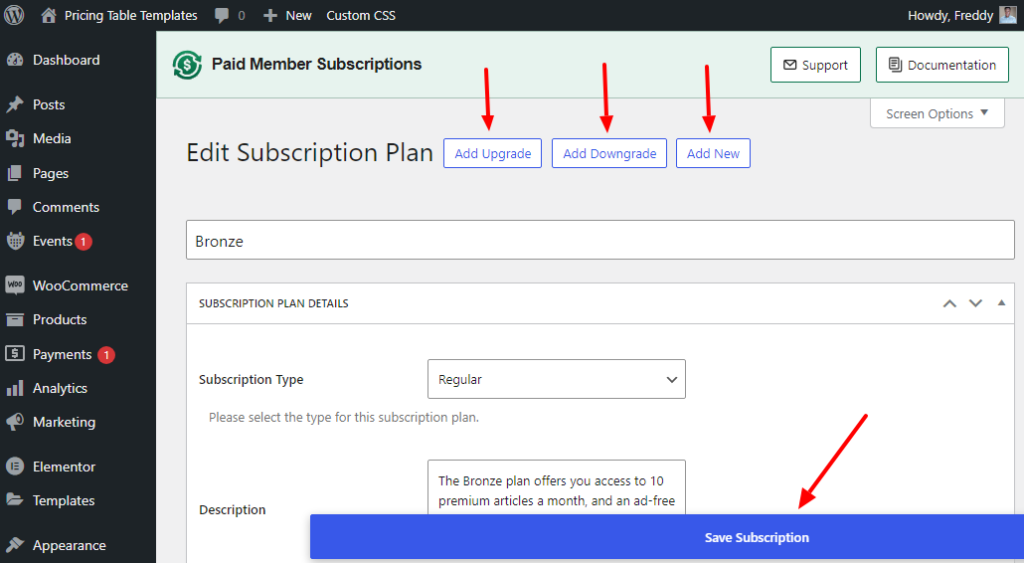
Next, add details for your subscription plan and click the Save Subscription button, as shown below.
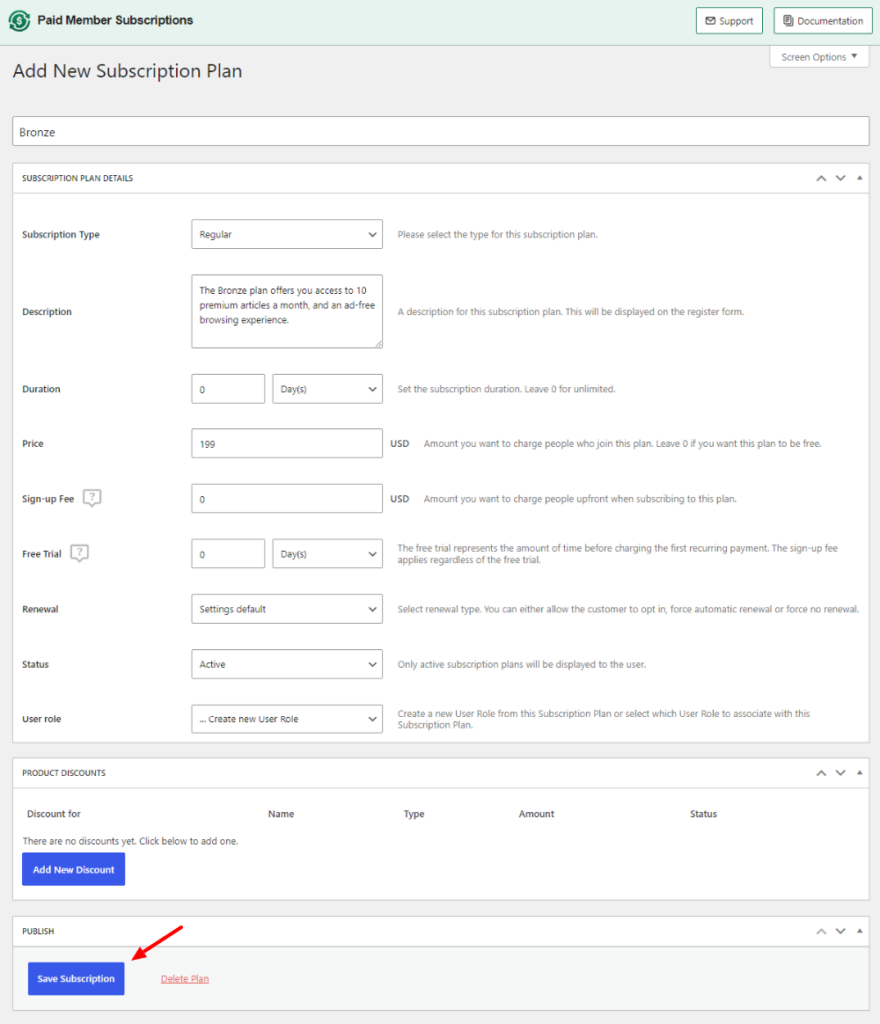
The above page allows you to add many details about your subscription plan. You can even include free trials and discounts to entice hesitant customers.
Go ahead and add more subscription plans.
To do this, merely click Add Upgrade (so that users can upgrade from the current plan), Add Downgrade (so that users can downgrade from the current subscription plan), or Add New to add a separate subscription plan.
For illustration purposes, I added two upgrades: Silver and Gold.
Always remember to click the Save Subscription button.
Here’s the screenshot with the deets:
With your plans ready, you’re primed to create your pricing table using Paid Member Subscription templates.
This, too, is ridiculously easy, a fourth-grader can do it.
Creating a Pricing Table Using Templates
Now let us create a pricing table. You can design your table however you like. Here’s how.
Point your browser to Paid Member Subscriptions → Subscription Plans and click the Create Pricing Page button, as shown below.
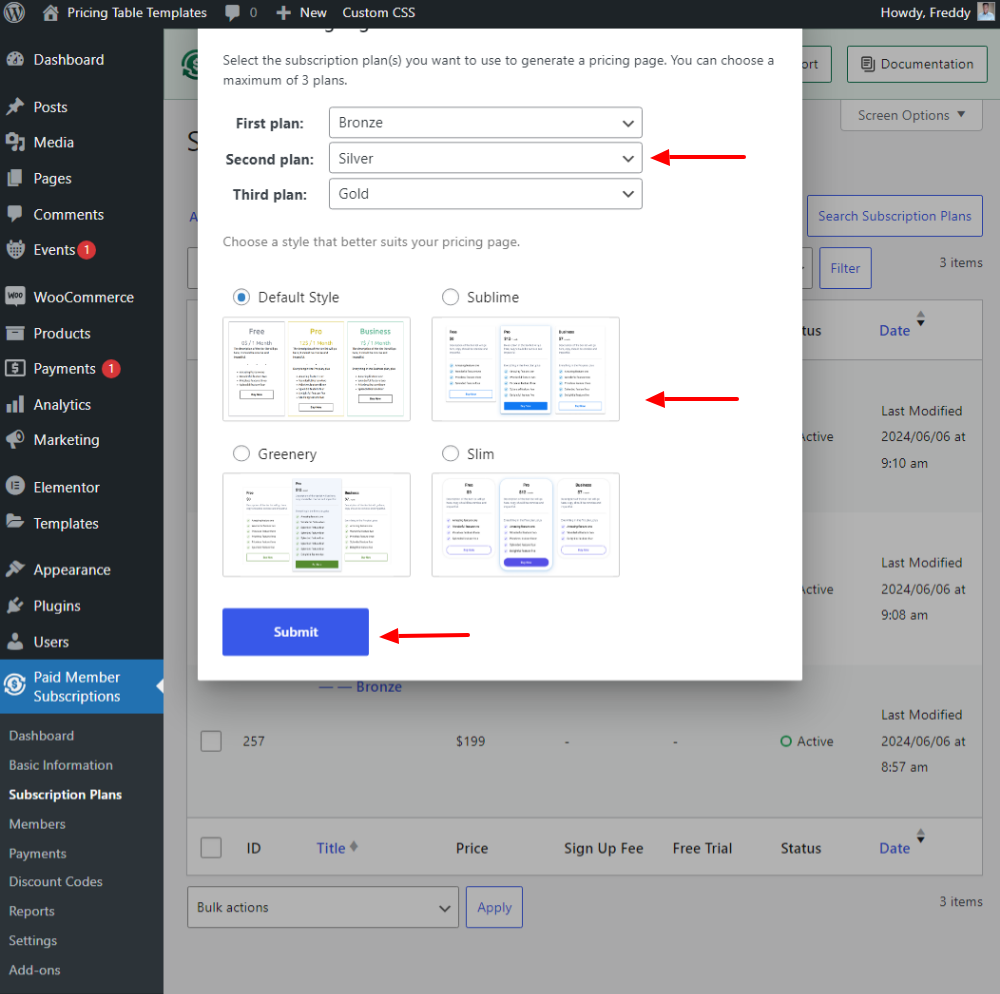
Next, choose your first, second, and third plan. Also, set your pricing page style, and click the Submit button, as shown below. Note that you can preview each style before making your choice.
Doing so will redirect you to the WordPress block editor where you can customize your pricing table as you deem fit.
Below is a GIF presentation showing you how easy customizing your pricing table template in the WordPress Gutenberg editor is:
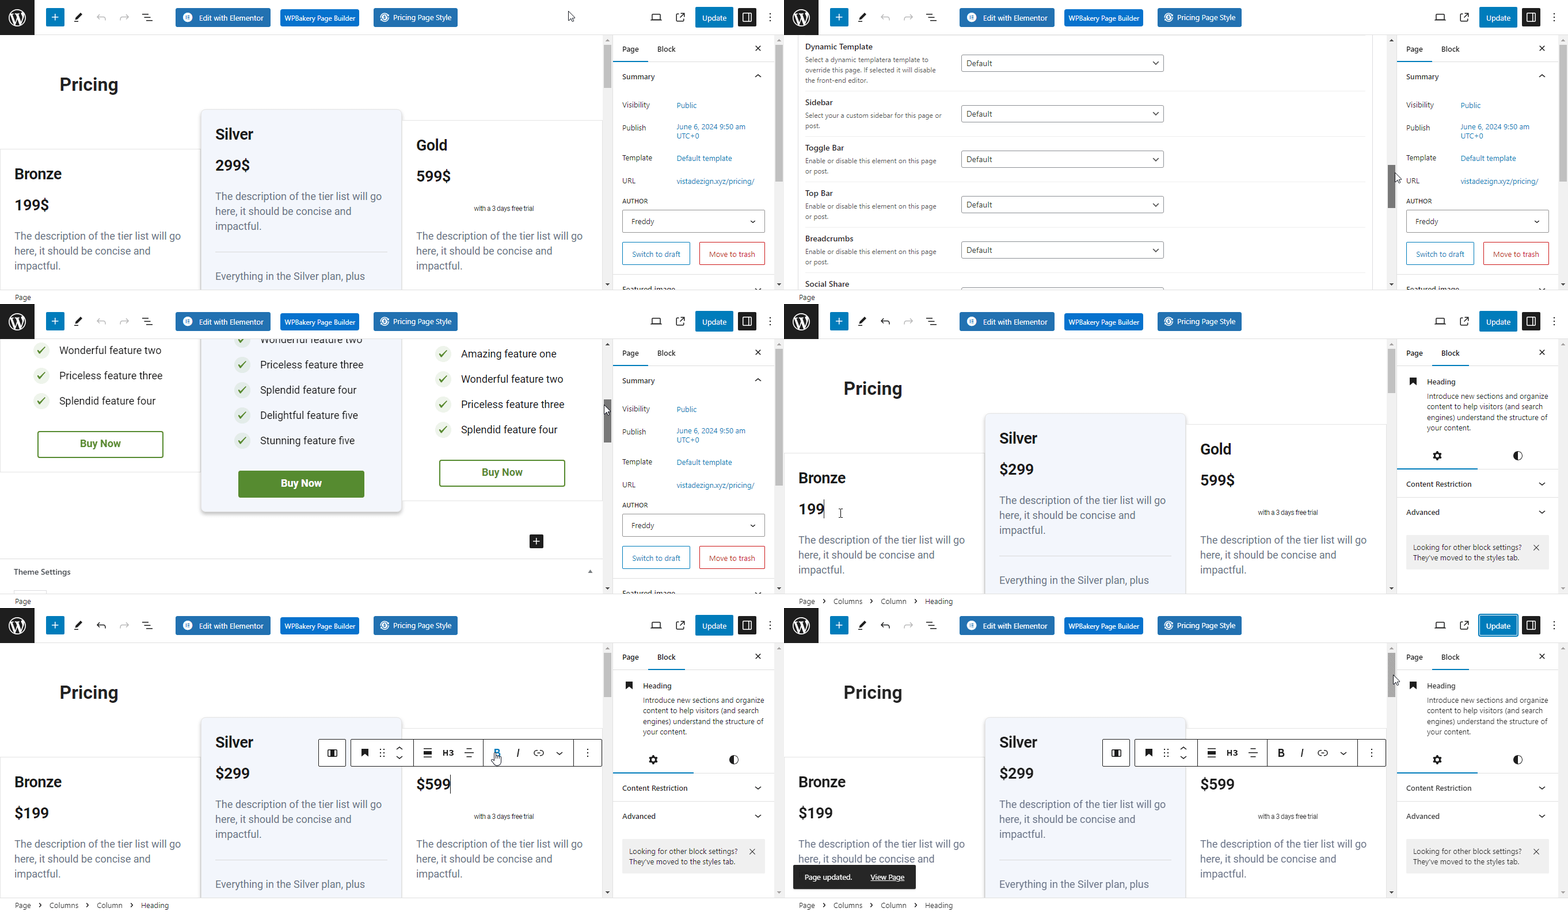
By default, the second subscription plan is emphasized for you, making customization many leaps and bounds easier.
All you have to do is add your features, change colors, set up content restriction settings (if needed), and click the Update button.
Oh, by the way, here is how our example pricing table looks on our test website without additional customization:
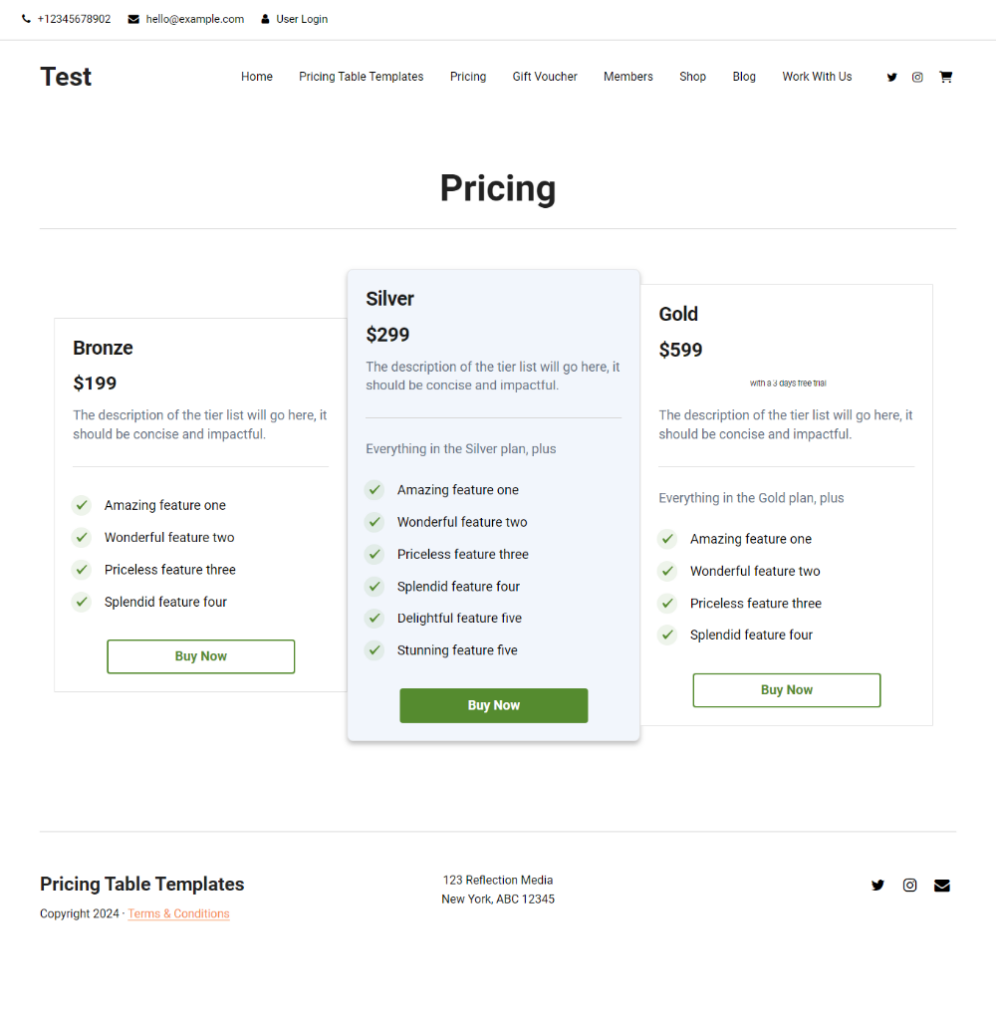
As you can see above, my pricing page is already looking good. I need to add a few details, such as testimonials, trust seals, ratings, and payment badges, and I am good to go.
Pro Tip: If you are wondering why I need these extras, these elements act as social proof and can convince a customer on the fence to sign up.
Let us go back to our example pricing page above.
If you were to click on any of the Buy Now buttons, the website would lead you to the registration page, with the chosen plan pre-selected. Talk about convenience for your users.
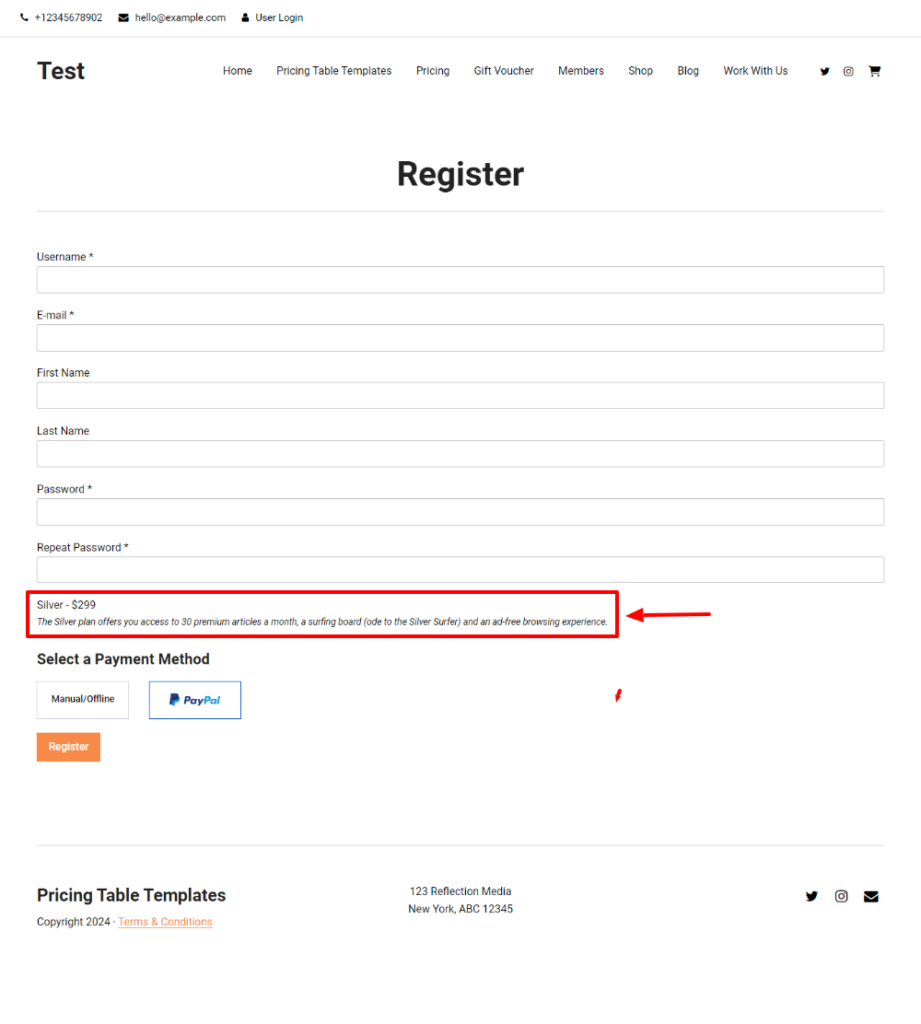
From here, your customers can register effortlessly.
But, there is more…
If you ever need to change the style of your pricing page template, the Paid Member Subscriptions plugin makes it all too easy.
Click the Pricing Page Style button, choose a new style, and click the Submit button, as shown below.
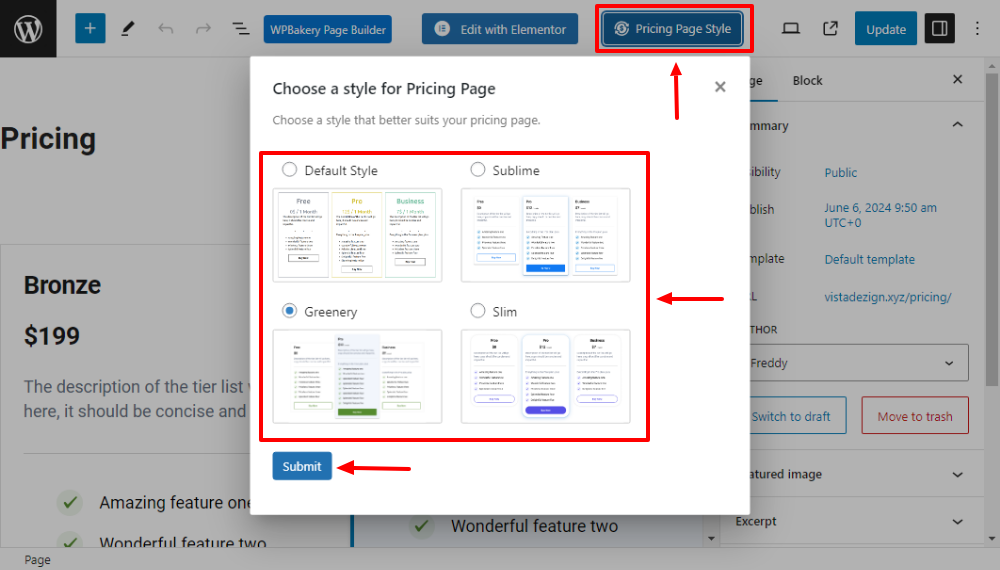
It is as easy as pie. I promise you will have lots of fun with this plugin. That’s true, especially when you remember you have access to most of these features for free.
You Can Use Page Builder, Too!
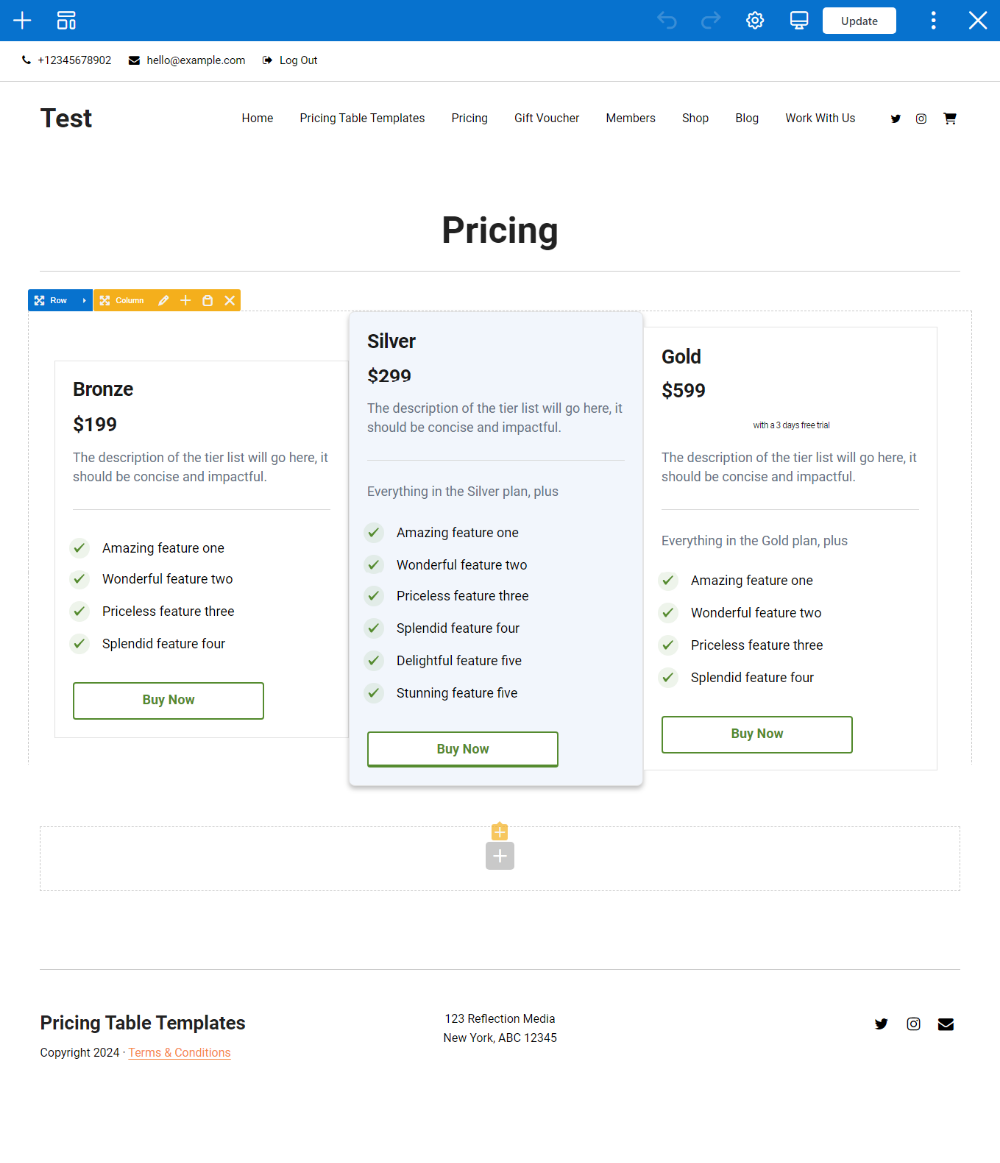
We are not yet done. Let us head back to the WordPress editor. Did you know you can edit the pricing table template in your favorite page builder?
That’s right, you can click on your page builder and edit away.
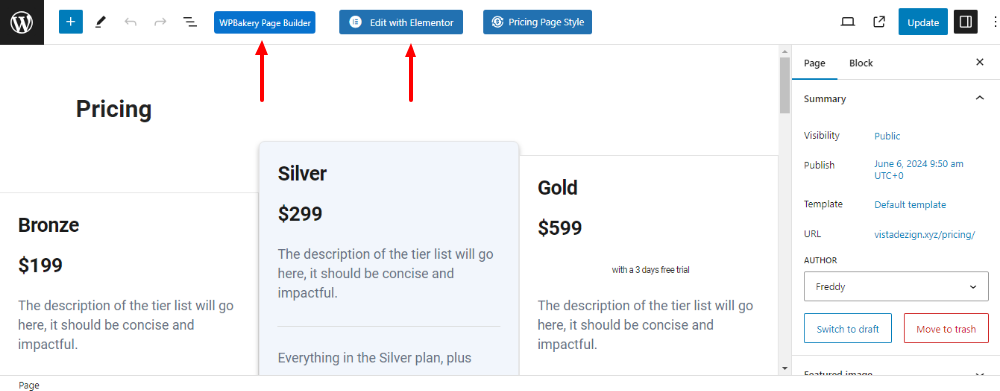
This is how the pricing table template looks inside the WPBakery Page Builder, for instance:
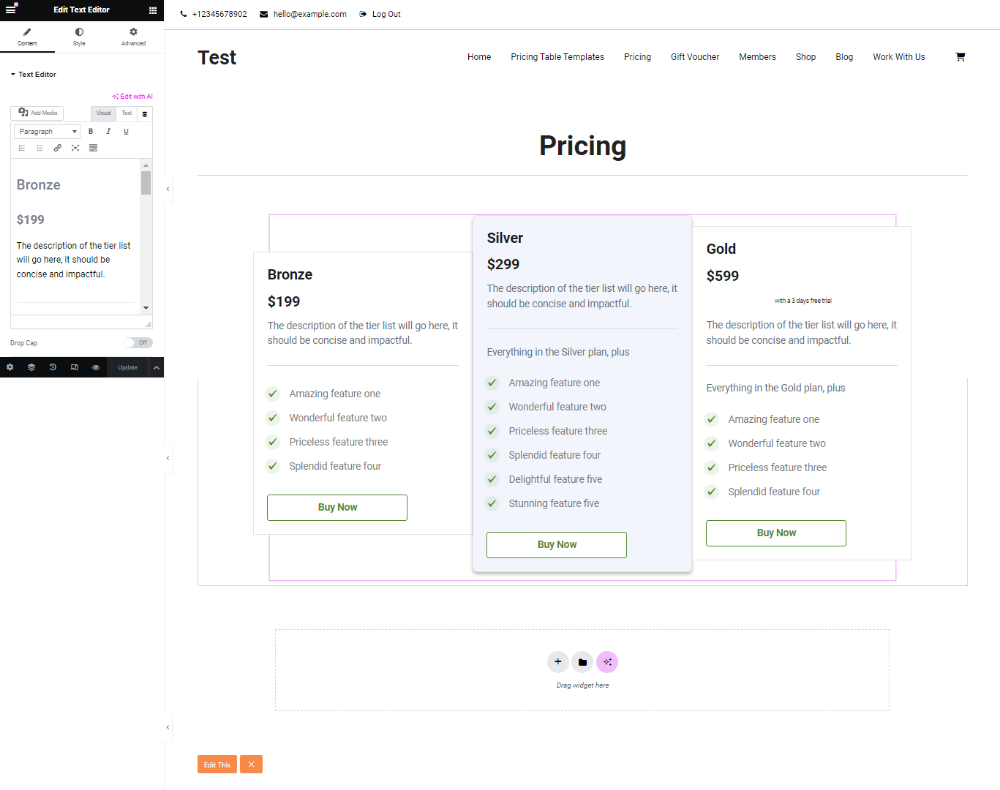
If Elementor is your go-to page builder, you will also have a field day customizing your pricing page templates.
Here is how that looks:
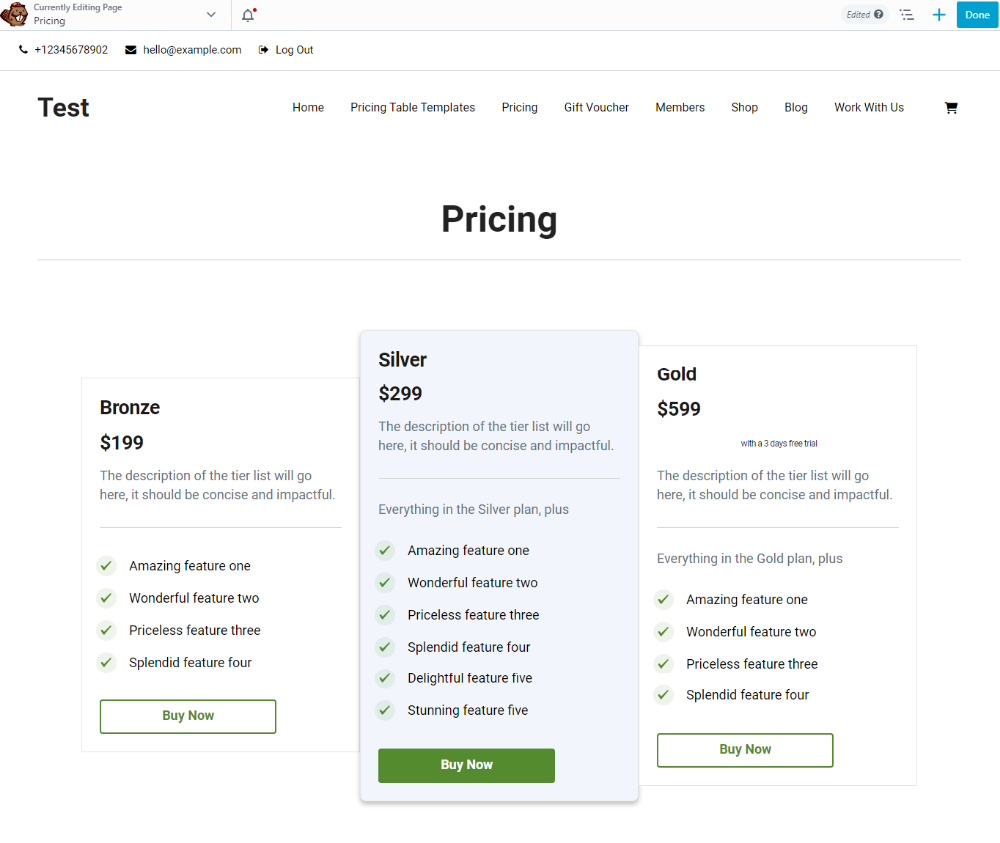
If Beaver Builder floats your boat, Paid Member Subscriptions pricing table templates have your back, too.
Here is how the pricing table template looks in the Beaver Builder Page Builder:
I told you. The Paid Member Subscriptions plugin is like a gift that never stops giving.
There are so many other features that it would take an article longer than this to cover. Check out pricing table templates in this knowledge base article to learn more.
Final Words
Pricing tables are a fantastic way to outline your membership plan’s features and get people to sign up. They are straightforward and effective, making them invaluable to any subscription-based business.
Make your pricing tables clear and powerful by avoiding distracting clutter for best results. The best part is you don’t have to create a pricing table from scratch.
The Paid Member Subscriptions plugin comes with pricing table templates that you can use to improve your pricing page without spending a dime.
What are your thoughts? Did we miss something? Please let us know in the comments and don’t forget to share the article with a friend.
Here’s to your success. Cheers!
Paid Member Subscriptions Pro
Paid Member Subscriptions offers you free and easy-to-use pricing table templates to supercharge your pricing page without breakinig a sweat.
Source: https://www.cozmoslabs.com/3324020-how-to-use-pricing-table-templates/
Auto Amazon Links: No products found.

